
What if the most valuable tool in your truck wasn’t a pipe wrench, but a camera that automatically organized your entire jobsite? You’re likely tired of spending hours after a long shift labeling blurry images or scrolling through personal galleries to find that one shot of a buried lateral. It’s frustrating to know your best work is hidden behind walls where you can’t prove its quality if a dispute arises. We agree that manual plumbing inspection photo documentation is a massive bottleneck that eats your profits and risks your reputation.
This guide teaches you to master automated workflows that eliminate liability and speed up reporting. You’ll learn to generate professional reports in seconds, provide ironclad proof for buried systems, and use visual evidence to boost your close rates by up to 40 percent. We are diving into the tech-savvy strategies that turn documentation from a chore into your greatest competitive advantage. Get ready to stop the documentation chaos, protect your business, and reclaim your evenings once and for all!
Key Takeaways
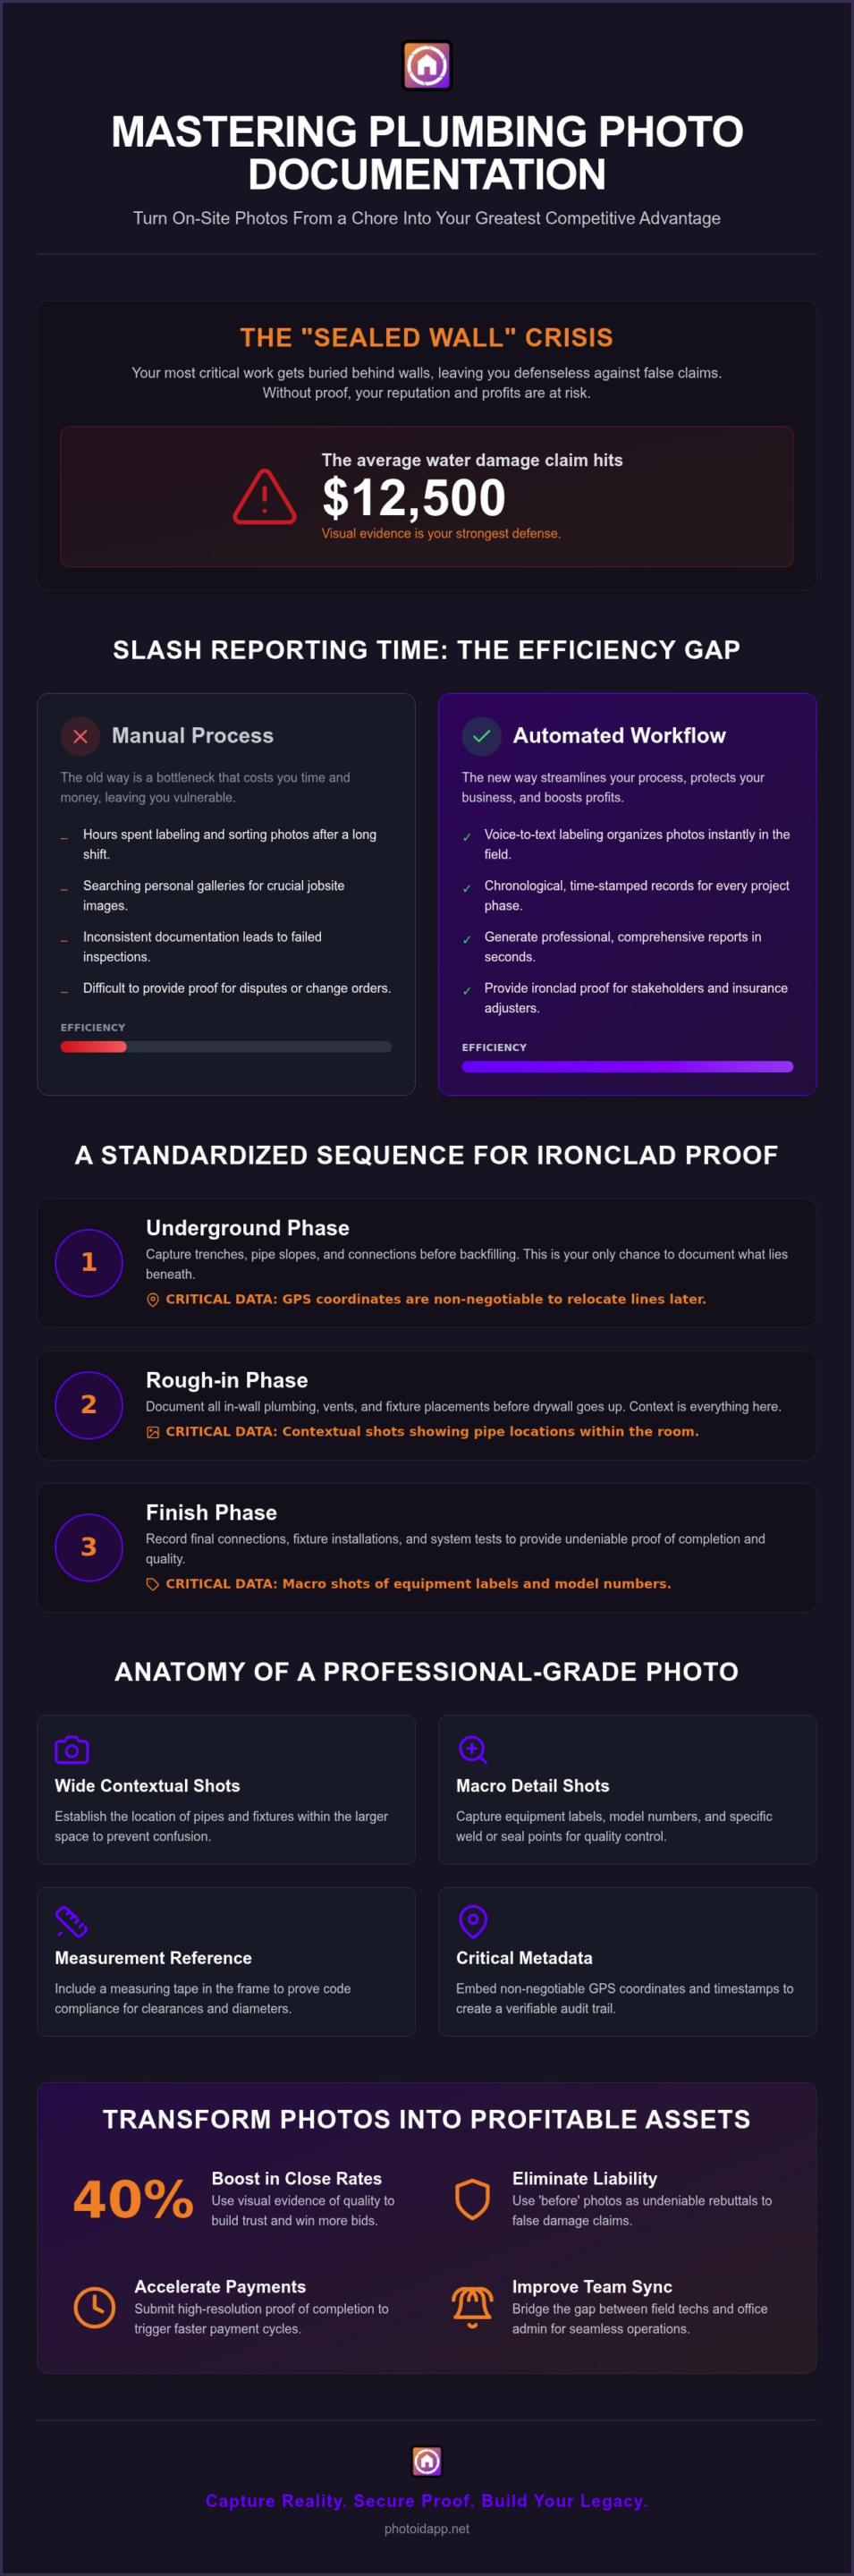
- Protect your business from the “sealed wall” nightmare by building a chronological record of every system’s lifecycle. Eliminate liability before the evidence is buried forever!
- Master a standardized sequence for plumbing inspection photo documentation to ensure every pipe slope and joint seal is captured with professional precision.
- Slash your reporting time by ditching manual sorting for voice-to-text labeling that organizes your project photos instantly. Capture, comment, and conquer your documentation in real-time!
- Identify the “point of no return” moments in every plumbing phase to secure ironclad proof of work quality before construction moves forward.
- Leverage team management dashboards and Xactimate integrations to sync field data with office estimates seamlessly. Transform your onsite photos into profitable business assets!
The Critical Role of Plumbing Inspection Photo Documentation
Plumbing is a high-stakes trade where your most critical work is eventually buried under concrete or sealed behind drywall. This creates the “sealed wall” crisis. Once the site is closed, your evidence vanishes. Professional plumbing inspection photo documentation isn’t just about taking pictures; it’s about building a chronological record of a system’s lifecycle. It provides the only proof that your slopes are correct, your joints are sealed, and your materials meet code before they disappear from view. For interior pipe conditions, integrating data from a Pipeline video inspection adds a layer of technical depth that sets your business apart from the competition.
In a world where the average water damage claim hits approximately $12,500, visual evidence is your strongest defense. You need time-stamped, geo-located photos to satisfy insurance adjusters and code officials. This level of transparency does more than just protect your tail; it builds massive trust with homeowners and commercial property managers. They see the quality. They understand the complexity. They value the expertise. When you document every step, you transform a hidden utility into a verifiable asset. Capture the reality. Secure the proof. Build the legacy!
Protecting Your Business Against Liability
Stop losing money on false damage claims. Document pre-existing conditions before your tools even hit the floor. If a homeowner claims your crew cracked a foundation or scratched a vanity, your “before” photos provide an instant, undeniable rebuttal. This practice creates a verifiable audit trail for code compliance and permits, ensuring you never fail an inspection due to a lack of visual context. Use your photos to justify change orders when you uncover unexpected site conditions like rusted cast iron or improper previous installs. Capture the problem. Present the solution. Secure the payment.
Improving Communication with Stakeholders
Visual proof accelerates your cash flow. Provide high-resolution evidence of completion to trigger faster payment cycles and eliminate verbal disputes. There is no need for back-and-forth emails when the proof is in the portal. This documentation bridges the gap between field technicians and office administrators, ensuring everyone is on the same page without extra phone calls. Share real-time progress with general contractors to keep the entire project moving. It’s about speed, clarity, and professional execution! You aren’t just fixing pipes; you’re providing peace of mind through total visibility.
Essential Components of a Plumbing Documentation Strategy
Consistency is the backbone of high-quality plumbing inspection photo documentation. You can’t afford to wing it on a busy jobsite. Establish a standard sequence for every inspection to ensure nothing is missed. Start at the main shut-off and work your way to the furthest fixture. Require specific angles for every critical point, focusing on pipe slopes, connections, and joint seals. If a pipe is buried or a wall is closed, your photos are the only evidence that the work was done right. Capture the context. Prove the precision. Secure the data!
The Anatomy of a Professional Plumbing Photo
Context is king. Every documentation set should start with wide contextual shots that show exactly where a fixture or pipe sits within the room. This prevents confusion during the rough-in phase when multiple lines are visible. Once the context is set, move in for macro shots of equipment labels, model numbers, and specific weld points. Professional standards, such as those outlined in NYSERDA’s photo documentation requirements, highlight the need for clear and verifiable images for quality control. Always include a measuring tape in the frame for size reference. It proves your clearances meet code and your pipe diameters are correct.
Metadata and Contextual Tagging
A photo without data is just a picture. GPS coordinates are non-negotiable for underground plumbing. When the trench is backfilled, those coordinates are the only way to relocate a cleanout or lateral without digging blindly. Use timestamps to prove work was performed on the scheduled date, protecting your timeline against delay claims. Organize your workflow by categorizing photos into three distinct phases: Underground, Rough-in, and Finish. This structure turns a disorganized gallery into a searchable project history that anyone on the team can navigate.
Implement mandatory labeling for every image captured in the field. Don’t wait until you’re back in the truck; label the details while they are fresh in your mind. Ensure all data syncs to a secure, centralized cloud environment instantly. This keeps project data off your personal device and accessible to the whole team for real-time oversight. To make this process seamless, you might want to try a professional photo app designed for field efficiency. Stop the chaos. Start the system. Scale your business!
Manual vs. Automated Photo Labeling: The Efficiency Gap
Manual sorting is a drain on your most valuable resource: time. When you rely on a standard phone gallery, you’re choosing chaos over clarity. You spend hours after work squinting at thumbnails, trying to distinguish one pipe joint from another. This manual process is prone to error and creates a massive lag in your billing cycle. Professional plumbing inspection photo documentation requires a faster, smarter approach that moves at the speed of your tools. Every minute spent labeling photos at the kitchen table is a minute you aren’t growing your business or resting for the next shift. Stop the scrolling. Start the automation. Reclaim your time!
The efficiency gap between a personal gallery and a professional app is staggering. Photos lost in text threads or buried under family pictures are useless when a contractor asks for proof of a specific weld. A professional app creates a structured environment where every image is synced to a secure cloud instantly. This organization ensures that field data is accessible to the entire team, allowing your office staff to see progress without making a single phone call. It is about transparency, speed, and absolute organization. You don’t just need photos; you need a searchable database of your work.
The Voice-to-Text Advantage for Plumbers
Plumbers work in the trenches. Your hands are often wet, muddy, or covered in grease. Trying to type specific pipe specs or location data on a touchscreen with work gloves is a frustrating, messy task that usually results in typos or a cracked screen. Voice-to-text labeling solves this problem instantly. It allows for hands-free operation, letting you label photos without cleaning your hands or removing your gear. This technology can reduce your documentation time by up to 50 percent per site visit. By capturing details while they are fresh in your mind, you improve accuracy and eliminate the guesswork that plagues manual reporting. Speak it. Tag it. Done!
Instant Report Generation: From Field to Client
The ultimate goal of documentation is the final report. Manual labeling forces you to compile photos into PDFs manually, often leading to a dreaded “office day” dedicated to paperwork. Automated labeling changes the math. Because your photos are tagged in real-time, you can generate professional, branded reports with a single tap before you even leave the driveway. This seamless flow turns field data into client-ready documents instantly. For those looking to scale their operations, using The Best Home Inspection App of 2026 provides the high-velocity documentation framework you need to stay ahead. Speed up your workflow. Impress your clients. Get paid faster!
Best Practices for Documenting Each Plumbing Phase
Every plumbing project has a “point of no return.” This is the moment concrete is poured or drywall is hung, sealing your work away forever. To manage this risk, you need a roadmap for plumbing inspection photo documentation that covers every phase of the install. Using custom inspection templates ensures your crew never misses a critical shot while the pipes are still visible. Rough-in documentation is the capture of all piping before wall closure. Capture the context. Confirm the quality. Close the project!
Rough-In and Underground Documentation
You can’t fix what you can’t see. Before backfilling a trench, capture the pipe pitch and the quality of the bedding material. Document every vent stack and drainage line within the wall cavities. Make sure support brackets and fire-stopping are clearly visible in your shots. This isn’t just about showing the pipe; it’s about proving the installation meets every structural and safety requirement. If a leak occurs three years later, these photos are your only defense against costly litigation and repair disputes.
Pressure Testing and Code Compliance
Proving a system is leak-free requires more than a verbal confirmation. Photograph your gauges during hydrostatic or air pressure tests to show the exact PSI. Use time-stamped photo sequences to document the duration of the test, proving the pressure held over the required period. Capture inspector signatures or green tags alongside the tested system to create an undeniable record of compliance. This data is your insurance against future liability. It’s about speed, accuracy, and ironclad proof! Stop guessing and start documenting the facts.
The Finish Phase and Final Walkthrough
The final walkthrough is your chance to shine and secure your final payment. Document every fixture install, shut-off valve location, and supply line. Capture evidence of leak-free operation under normal load to show the system is ready for the homeowner. Create a “homeowner manual” visual guide of key shut-off points to add value and reduce nuisance service calls. This visual record builds massive trust and positions you as a modern, professional contractor who leaves nothing to chance. You’re providing peace of mind through total visibility.
Ready to automate your field workflow and protect your business? Start your PHOTO iD subscription today to access custom plumbing templates and professional reporting tools!
Optimizing Your Workflow with PHOTO iD
Harnessing the power of professional software transforms your plumbing inspection photo documentation from a cluttered gallery into a high-performance business engine. You aren’t just capturing images; you’re building a scalable system that protects your bottom line. Use custom templates to standardize every inspection across all your field crews. This ensures that every technician, from the rookie to the veteran, captures the exact same critical data points every single time. Standardize. Sync. Succeed! By removing the guesswork from the field, you eliminate the documentation chaos that leads to missed details and lost profits.
Scaling Your Business with a Centralized Dashboard
Managing multiple field crews shouldn’t feel like a guessing game. Use the Team Management Dashboard to gain real-time oversight of every active jobsite directly from your office. This centralized hub allows you to monitor progress without making a single phone call or sending a text. You can ensure every technician follows the exact same documentation protocol, maintaining total brand consistency across the board. Remote verification allows you to spot errors before the concrete is poured, drastically reducing the need for expensive re-inspections. It is about oversight without the overhead. Monitor. Manage. Master!
Integration and Estimating Accuracy
Speed up your billing cycle by moving photo data seamlessly into your property claims software. Integrating your visual evidence with Xactimate ensures your estimates are accurate and backed by undeniable proof. This is crucial for large-scale repairs where every line item requires justification for insurance adjusters. For external plumbing or complex drainage planning, utilize aerial measurements to get a bird’s-eye view of the site before the first shovel hits the dirt. Refer to our guide on Construction Management Software for more tips on scaling your field operations and optimizing your team’s output.
High-velocity documentation doesn’t stop at the jobsite. Utilizing virtual inspection tools allows you to troubleshoot issues or verify minor repairs without burning daylight in traffic. This capability reduces unnecessary site visits, allowing your lead technicians to focus on high-value installs and complex problem-solving. By leveraging custom templates, you ensure every piece of plumbing inspection photo documentation is uniform, searchable, and ready for audit at a moment’s notice. This isn’t just about saving an hour; it’s about resource optimization and long-term business growth. Efficiency is the new industry standard! Stop the manual struggle and start leveraging technology that works as hard as you do.
Take Control of Your Documentation Today
You’ve seen the high cost of manual chaos. Every minute spent sorting through personal galleries is a minute lost to growth. Mastering plumbing inspection photo documentation isn’t just a technical upgrade; it is a shield for your business. You can now protect your work behind sealed walls, prove your code compliance with time-stamped evidence, and scale your operations with total visibility. It’s time to stop the late-night paperwork and start leveraging a system that works as hard as your field crews. Reclaim your evenings, secure your reputation, and win more bids!
Eliminate hours of manual labeling with voice-to-text. Generate professional reports instantly for your clients. Organize your team with a powerful management dashboard that keeps everyone on the same page. Start Your Free Trial of PHOTO iD Today! Your expertise deserves a professional record. Build trust, eliminate disputes, and reclaim your time. The future of plumbing documentation is here. Grab it!
Frequently Asked Questions
How does automated photo labeling save time for plumbing contractors?
Automated labeling slashes documentation time by eliminating the need to type out descriptions on a messy jobsite. By using voice-to-text, you can tag pipe materials, locations, and conditions instantly while your hands are busy. This process turns your plumbing inspection photo documentation into an organized project record in real-time. You save hours every week by avoiding the office day shuffle and focusing on billable work instead. Capture the data. Save the hour!
Can I use plumbing inspection photos for insurance claim documentation?
Professional photo documentation is essential for insurance claims, especially for water damage which averages $12,500 per claim. PHOTO iD integrates directly with property claims software like Xactimate to provide adjusters with undeniable proof of work and damage. Because the app was founded by industry veteran Ken Perry, it is built specifically to handle the high-velocity requirements of accurate property assessment and liability protection. Secure the proof. Protect your business!
Does the PHOTO iD app work without an internet connection in basements?
Absolute reliability is built into the PHOTO iD app. It is designed to work in basements and crawlspaces where signals are often weak or non-existent. You can continue taking photos and using voice-to-text labeling offline. Once your device reconnects to a network, the app automatically syncs all data to the secure cloud. This ensures your project photos are never lost and remain organized without extra effort from your team. Work anywhere. Sync everywhere!
What are the most important photos to take during a plumbing rough-in?
Focus on the point of no return moments during a rough-in. You must capture pipe pitch with a level in the frame, bedding material quality, and the orientation of vent stacks. Ensure all support brackets, joint seals, and fire-stopping materials are clearly visible. These photos provide ironclad proof of your work quality before the walls are sealed, protecting you against future liability and ensuring you pass code inspections. Document the detail. Prove the quality!
How do I organize hundreds of photos from multiple plumbing jobsites?
Use a centralized Team Management Dashboard to bring order to the chaos of multiple jobsites. Instead of losing photos in text threads or personal galleries, every image is automatically categorized by project and phase. You can monitor field crews in real-time and verify work quality remotely. This cloud-based approach keeps project data off personal devices and ensures your office staff has instant access to the documentation they need. Stop the chaos. Start the system!
Can I share plumbing inspection reports directly with clients from my phone?
You can generate and share professional, branded reports with a single tap from your mobile device. There is no need to wait until you are back at a computer to compile a PDF manually. Once your plumbing inspection photo documentation is complete, the app builds a report that you can send directly to homeowners or general contractors. This speed improves client communication and triggers faster payment cycles for your business. Tap the button. Send the report!
Is voice-to-text labeling accurate enough for technical plumbing terms?
Voice-to-text labeling is highly accurate and specifically designed for the technical nouns used in the plumbing and assessment industries. It handles terminology like PEX manifolds, hydrostatic testing, and backflow preventers with ease. This hands-free operation is a game-changer for plumbers with wet or dirty hands. It allows you to capture precise details while they are fresh in your mind, resulting in more accurate and professional reports. Speak the truth. Capture the fact!
How does photo documentation help with plumbing code compliance?
Photo documentation creates a verifiable audit trail that proves your system meets International Plumbing Code or Uniform Plumbing Code requirements. By capturing time-stamped and geo-located images of your installs, you provide inspectors with the context they need to verify compliance. This is especially critical for buried systems or work hidden behind walls. It eliminates disputes and ensures your permits are closed out quickly without unnecessary delays. Show the code. Pass the test!