
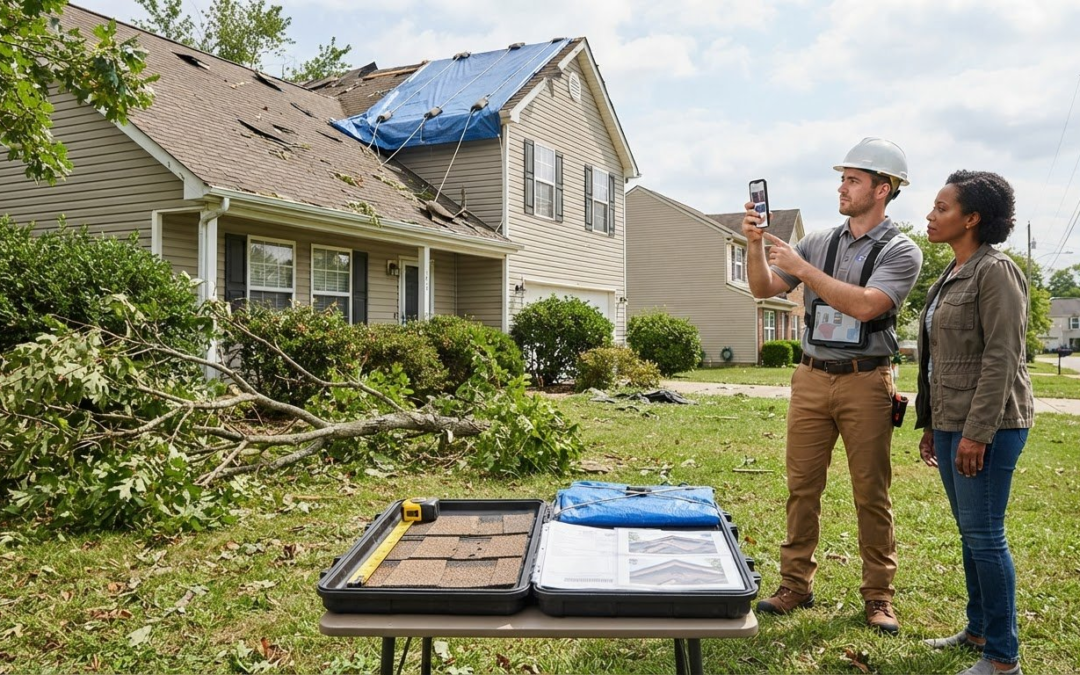
Printed timestamps aren’t universally required on storm damage photos. Insurers may set their own requirements, and a camera timestamp shows when a photo was taken, not when the damage occurred. Strong storm damage photo documentation pairs original images with clear notes about when you first noticed the damage.
A visible date can help organize a claim file, but it’s only one part of a useful record. Photograph damage safely, show how it relates to the property, and keep dates and details accurate.
Use this checklist to document damage, measurements, temporary repairs, contractor findings, receipts, and correspondence. Learn how to preserve original image files, distinguish storm observations from older records, and organize updates without replacing earlier evidence. Build a clear, practical record of what you saw and what changed, without relying on photos alone to establish when damage occurred or determine coverage.
Key Takeaways
- Ask your insurer whether timestamps must appear visibly on images; keep the actual capture date distinct from when you first noticed the damage.
- Build a record that pairs photos with contractor findings, estimates, invoices, receipts, and relevant messages.
- Photograph damage only from safe positions, capturing an overview, context, and close detail when accessible.
- Document temporary protective work before and after when it’s safe, and preserve records of changes rather than recreating damage.
- Keep original image files and a separate, organized evidence file so updates don’t overwrite earlier records.
Claim records, receipts, contractor findings, and correspondence
How to document storm damage safely before cleanup: Wait until the severe-weather threat has ended, then photograph only areas you can reach safely. The National Weather Service advises checking for damage only after the threat ends. Don’t delay urgent protective work to finish taking pictures.
Build a record that explains what you observed, where you saw it, and when each step happened. The date you first noticed a condition may differ from the date you photographed it, so keep those dates separate. A camera’s capture date identifies when an image was taken, but it doesn’t establish when damage occurred.
- Start an event log. Record when you first noticed each problem, the approximate storm date if known, and what you observed.
- Identify each photo location. Note the room, exterior elevation, or accessible area, then describe the visible condition, such as water on a bedroom ceiling.
- Separate observation from conclusion. Write “shingles visible on the ground” rather than claiming roof damage caused them to fall.
- Keep older records apart. Store pre-storm inspection photos and maintenance records in a dated folder separate from new storm observations.
Preserve contractor inspection findings, estimates, invoices, and receipts for authorized temporary work. Match each document to the related area or task. For example, label a receipt for a temporary window covering with the room, work date, and corresponding photos. Keep contractor assessments separate from an insurer’s coverage decision. A contractor can document observed conditions, but that finding does not determine coverage or payment.
Save messages with your insurer, agent, and contractors alongside the claim file. Include instructions, repair discussions, submitted documents, and claim-submission confirmations. A submission confirmation records delivery, not approval of coverage. Contact your insurer or agent promptly for claim instructions, and ask about reporting procedures, required records, and policy-specific obligations.
Use the file for more than a claim. A dated record can support personal files and repair planning by showing which conditions were observed, what work was authorized, and what changed afterward. If cleanup has already happened, preserve available photos, contractor records, receipts, and messages. Explain what was removed or altered, and don’t recreate or stage damage to make it look as it did before cleanup.
Keep the property owner’s records together, even when contractors provide documents. This makes it easier to share relevant records, plan repairs, and track decisions without confusing an estimate with an invoice or an observation with a coverage determination. Clear storm damage photo documentation records what you saw and when, while leaving conclusions about cause and coverage to the appropriate evaluation.
Temporary repairs and protective-work documentation
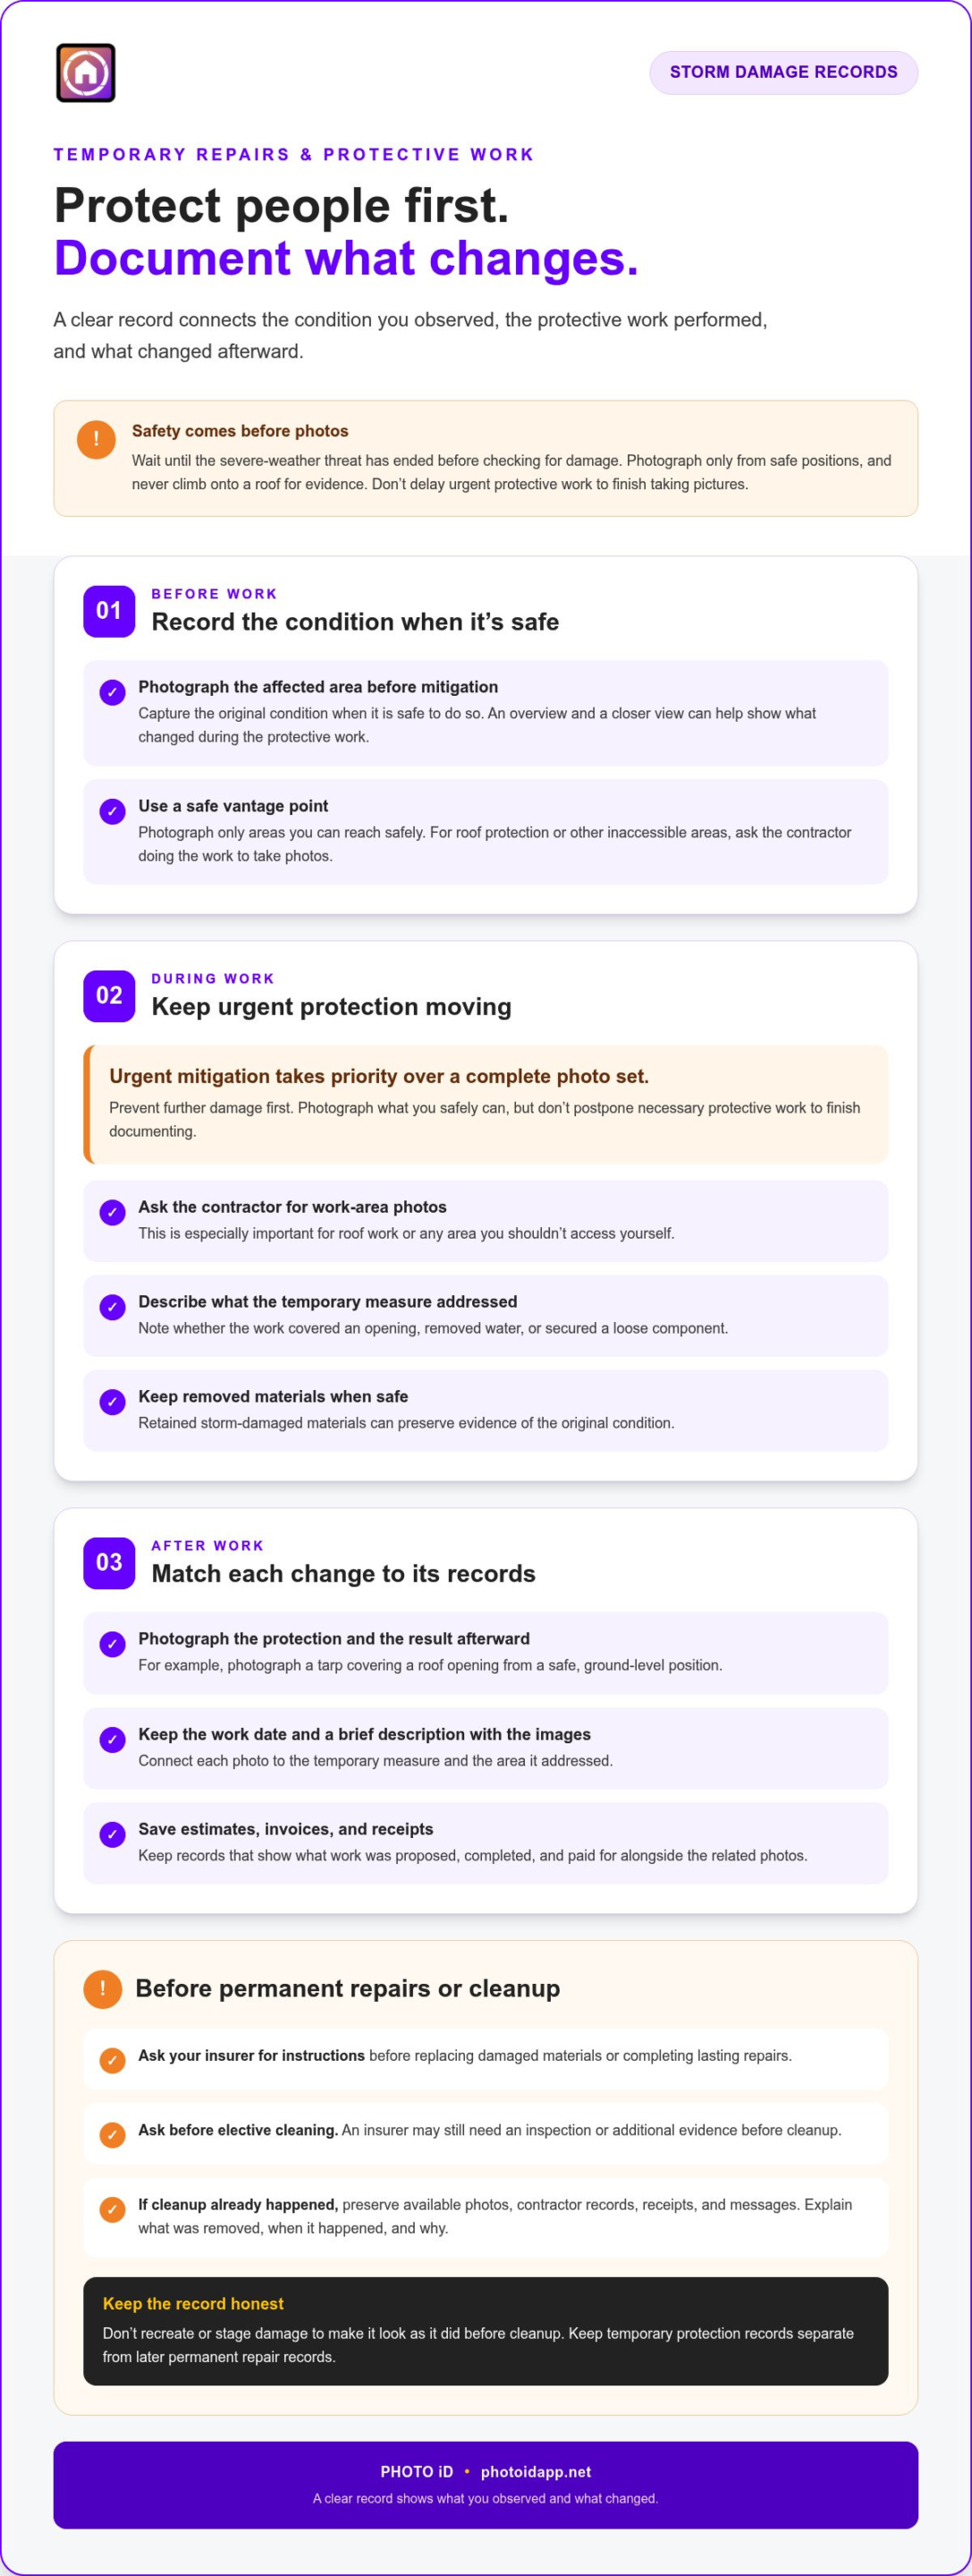
Protect people first, then document the work. The National Weather Service advises checking for damage only after the severe-weather threat has ended. Photograph conditions before mitigation when it’s safe, but don’t delay urgent protective work to finish taking pictures. Never climb onto a roof for evidence; ask the contractor performing temporary roof protection for work-area photos.
For each temporary repair, photograph the affected area before work, the protection installed, and the result afterward. For example, photograph a tarp covering a roof opening from a safe, ground-level position. Ask the contractor to document areas that aren’t safely accessible, including roof work. Keep the images with the work date and a brief description of what the protection addressed.
Use this checklist to connect the work to its records:
- Photograph before mitigation when safe. The original condition helps show what changed during protective work.
- Proceed with urgent mitigation. Preventing further damage takes priority over completing a photo set.
- Request contractor work-area photos. Roof protection may require access homeowners shouldn’t attempt themselves.
- Save estimates, invoices, and receipts. These records show what work was proposed, completed, and paid for.
- Describe each temporary measure. Note whether the contractor covered an opening, removed water, or secured a loose component.
- Keep removed materials when safe. Retained storm-damaged materials can preserve evidence of the original condition.
- Ask before non-emergency permanent repairs. Get your insurer’s instructions before replacing damaged materials or completing lasting repairs.
- Ask before elective cleaning. An insurer may still need an inspection or additional evidence before cleanup.
If the same handyman completes temporary protection and later repair work, keep the stages distinct. Save the first visit’s findings and receipts separately from the permanent repair scope, invoice, and completion records. Ask for dated photos showing what the handyman observed and what changed. This creates a clear sequence without presenting a contractor’s assessment as an insurer’s coverage decision.
After cleanup has already occurred, preserve available photos, contractor records, receipts, and messages. Explain what was removed, when the work happened, and why; don’t recreate or stage damage. For a more organized record of protective work, photo documentation tools can help keep images and report details together.
Organizing a storm-damage evidence file
For organizing photos and receipts, choose an app with clear labels, searchable folders, and report exports. Group each receipt with the related room, repair, or contractor visit so the records stay connected.
Report storm damage promptly by contacting your insurer or agent for claim instructions. Follow the reporting procedures and documentation requirements in your policy. Don’t wait to complete the evidence file before making contact.
Requirements depend on state rules and policy terms, so ask your insurer which records and submission methods apply. Confirm accepted upload formats before sending files through an external share link.
Keep the file controlled and easy to update. Assign 1 claim-file owner to gather photos, records, and correspondence from everyone involved. That person can maintain consistent labels and prevent separate versions from getting mixed together.
- Create a folder for the storm event. Use a clear event name and keep photos, receipts, contractor findings, and insurer messages in separate subfolders.
- Sort records by location and date. A folder for “kitchen ceiling” can hold images, inspection notes, and repair paperwork for that area.
- Keep two copies in separate storage locations. A second copy protects access if a phone is lost or one storage account fails.
- Preserve earlier evidence and log updates. Add dated notes when new findings arrive instead of rewriting the original summary.
- Separate storm observations from older records. Label prior inspection photos and maintenance documents with their dates to preserve context.
- Save submission confirmations with the sent files. Keep the confirmation and a record of what you submitted together.
Use labels that describe visible conditions, not assumed causes. “Water mark below hallway window” records an observation; “storm broke window” states a conclusion. This distinction helps readers understand what the evidence shows and what still needs evaluation.
When safe, retain removed storm-damaged materials, such as a broken window frame, and record where they came from. If cleanup has already happened, preserve available photos, receipts, contractor records, and messages. Add a dated note explaining what changed, and never stage or recreate damage.
Before sharing the file, confirm that the intended recipient can access the selected format. Keep the owner’s organized records intact and create a separate copy for submission. This keeps the evidence history clear while supporting claim follow-up and repair planning.
Original image files, metadata, and honest date information
Keep each original image file as captured, including its embedded metadata. Metadata can preserve details such as the camera’s capture time, while the image shows the visible condition. Neither proves when the damage happened. Treat the capture date and the date you first noticed damage as separate facts in your written notes.
A camera timestamp records when the photo was taken. It doesn’t establish when a roof leak, broken window, or ceiling stain began. If you discovered a stain after a storm, record both events accurately: when you first noticed it and when you photographed it. This distinction keeps the timeline clear without presenting an assumption as evidence.
Use the actual capture date in each filename, not the presumed storm date. A simple structure such as [capture-date]_room-or-location_original makes images easier to sort. Add a short condition label, such as “hallway-ceiling-water-mark,” rather than a claim about the cause. Keep the original filename or a clearly marked original copy alongside any renamed working copy.
- Save the camera original. Copy the image file before editing, cropping, or annotating it, so the untouched version remains available.
- Keep original files outside messaging apps. Text messages and social platforms may resize photos or strip metadata during sharing.
- Don’t change timestamps. Altered capture information can misrepresent when a photo was taken.
- Don’t substitute filtered images. Keep the original intact if you make a brighter or cropped copy for easier viewing.
- Record date differences in writing. Note when you first saw a condition, when you photographed it, and when a contractor later inspected it.
- Keep duplicates in separate storage locations. A separate copy helps preserve access if a phone or account is lost.
Common mistakes include changing timestamps, using edited images instead of originals, and treating a photo date as proof of when damage happened. It’s also a mistake to rely only on a visible date stamp without keeping the original file and a written timeline.
Before submitting images, preserve the original files and ask your insurer whether timestamps must appear visibly on photos. Insurers may have different submission requirements, so don’t assume a printed date is necessary or sufficient. Follow the accepted upload method and retain a copy of what you sent.
Keep captions factual. “Water mark below the bedroom window” describes what the image shows; “wind-driven rain caused the leak” states a cause the photo alone may not establish. Separate visible evidence from conclusions, and retain both the photo’s capture date and your written account. Photos support a claim record, but coverage and payment depend on the policy, the facts, and the insurer’s evaluation.
Storm damage photos and measurements
For an insurance claim, photograph safely accessible damage in three views: overview, context, and detail. Start with a wider view, then move closer only when it’s safe. When visible, show both the opening and the resulting damage.
For roof damage, stay on the ground and photograph from safe positions around the property. Leave roof areas requiring professional access to a qualified inspector, and request their findings or work-area photos instead of climbing.
For FEMA disaster assistance, create a clear record of observed damage with location notes, original images, and available repair or contractor records. Follow the instructions for your specific assistance application, and describe visible conditions without assuming their cause.
Build each photo set around the damaged area. A wide view establishes where the problem is, a context view connects it to nearby features, and a close detail records what can actually be seen. For each safely accessible affected location, aim for 3 views. There’s no universal photo count that guarantees a complete claim.
- Show every room and exterior elevation. Include areas that appear undamaged to give the record broader property context.
- Capture the breach and its result. If water entered through a damaged opening, photograph the opening and resulting interior condition.
- Use a reference for scale. Place a ruler beside an accessible crack or opening, without covering its edges.
- Record dimensions in writing. Note the measured length and width, the location, and how you took the measurement.
- Keep the camera steady. Check that close details are in focus before leaving the area.
- Add a narrated walkthrough when useful. Move slowly and describe locations to capture context still photos may miss.
Measurements add useful detail when they identify the size and location of an observable condition. Measure only from a safe, accessible position, and keep the measuring tool visible in a separate photo. For roof surfaces or other inaccessible areas, leave measurements to a qualified inspector. A photo of a dented gutter or scattered debris does not establish the cause or extent of roof damage.
Use factual captions such as “cracked siding beside the rear window” rather than “wind caused siding failure.” Keep observations separate from conclusions that require professional support. Preserve original images, and don’t apply filters or edit them in place of the originals.
Build a focused visual record. Pair clear views, safe measurements, and precise location notes, then keep the images with your other claim records. These steps help explain what the photos show, but no image set can guarantee insurance payment.
PHOTO iD: PHOTO iD Mobile App Subscription
PHOTO iD’s PHOTO iD Mobile App Subscription helps organize property photos and turn field documentation into clear reports. Use Automated Photo Labeling to keep images associated with inspection details, then create reports with Instant Photo Report Generation. Custom Inspection Templates help structure the information you capture for consistent documentation.
Choose this workflow when storm photos, measurements, and notes need a consistent home, or when you’re preparing a report from inspection records. PHOTO iD supports documentation and organization; it doesn’t determine insurance coverage or handle claim negotiations. Keep original image files and follow your insurer’s instructions for submitting evidence.
For a more organized photo documentation workflow, visit photoidapp.net.
Turn Your Documentation Into a Clear Next Step
Make storm damage photo documentation a working record, not a folder you stop using after submission. As inspections continue and repairs move forward, add relevant updates so your records reflect the property’s changing condition. That ongoing history can help you plan the next conversation, track decisions, and keep your files useful beyond the initial claim.
PHOTO iD supports this workflow with its PHOTO iD Mobile App Subscription, Automated Photo Labeling, and Instant Photo Report Generation. Bring inspection images into an organized reporting process and keep documentation moving from capture to review.
For a practical way to structure property photo records, contact PHOTO iD about photo documentation. Take the next step with a clearer process and keep your field records ready for what comes next.
Frequently Asked Questions
Are timestamps printed on the image required?
There’s no universal requirement for a visible timestamp; insurers set their own photo instructions. Check the claim instructions to see whether the date must appear on the image or whether original file information and written notes are acceptable. Record when you noticed the condition separately from when you photographed it. For example, note that you discovered a ceiling mark Tuesday and photographed it Wednesday.
Can these photos guarantee payment?
No. Photos document visible conditions, but they don’t guarantee insurance payment. Coverage and payment depend on the policy, the circumstances, and the insurer’s evaluation. A clear image can show what a room or exterior looked like, but it cannot establish every cause or policy term by itself. Keep photos with repair records and claim correspondence so the insurer can review the relevant evidence together.
What do I get from a documentation visit?
A documentation visit is a physical inspection, and PHOTO iD doesn’t provide physical inspection services. Its PHOTO iD Mobile App Subscription helps organize inspection photos with Automated Photo Labeling and Instant Photo Report Generation. A field professional using the app can create labeled photo records and reports; the app itself doesn’t inspect the property or determine what caused damage. Keep inspection findings separate from insurance coverage decisions.
What if temporary repairs have already been made?
Preserve the evidence that still exists. Save any before-and-after images, contractor notes, receipts, invoices, and messages about the work. Write down what was repaired, when it happened, and which materials were removed. For example, if a broken window was covered before you photographed it, explain that sequence and retain the contractor’s record. Don’t recreate or stage the original damage.
What photos and videos should I take after storm damage?
Capture a wide view to locate the damage, followed by context and close-detail views of safely accessible areas. Photograph both an opening and resulting interior damage if you can see both. Include rooms and exterior sides that appear unaffected to establish broader context. A slow, narrated walkthrough can record room locations and conditions that still photos may miss. Keep descriptions factual, such as “cracked siding beside the window.”
What documentation do insurers require for storm damage claims?
There isn’t one universal checklist for every claim. Your policy and insurer’s instructions determine the required records and submission method. Ask about the claim’s specific documentation requirements, accepted file formats, and upload options. Keep relevant photographs, contractor findings, estimates, invoices, receipts, and claim correspondence together. If the insurer requests a particular form or additional evidence, record what you submitted and keep its delivery confirmation.
How do I preserve metadata and timestamps on storm damage photos?
Keep the camera’s original image files, because messaging apps and social platforms can resize photos or strip metadata. Don’t alter timestamps or replace originals with filtered images. Store a separate copy before editing or sharing, and use the actual capture date in filenames. If you discovered the damage earlier, record that date in a written note instead of changing the photo’s timestamp.
Can I make temporary repairs before documenting storm damage?
Yes. If urgent protective work is needed, don’t delay it just to finish taking photos. Photograph the condition first when it’s safe, then proceed with mitigation. Never climb onto a roof to document damage; ask the contractor performing roof protection for work-area photos. Before non-emergency permanent repairs or elective cleanup, ask your insurer whether it still needs an inspection or additional evidence.