
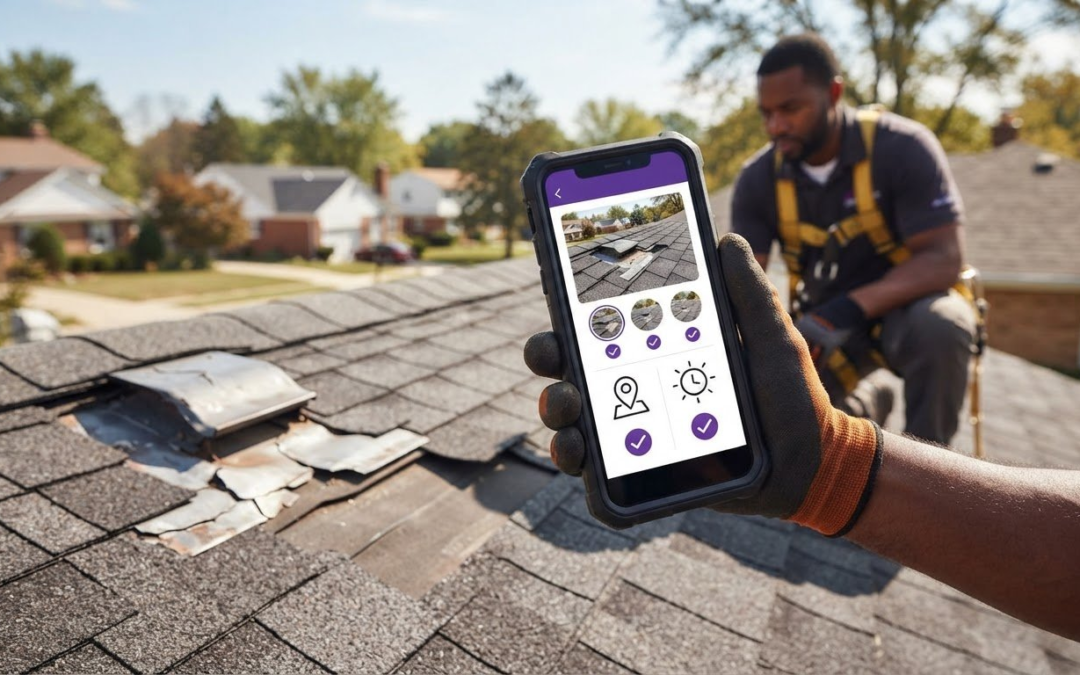
The best app for taking pictures on a roof helps you capture clear damage photos and keep each image tied to the right job. Photograph existing conditions before tarping or cleanup begins to document the roof’s original state. A dependable workflow also makes it easy to manage location, capture time, and offline use.
Roof documentation can get messy quickly: images pile up, details blur, and a photo loses value if nobody knows where or when it was taken. Keep the record clear from the first shot. This guide explains what to look for in a roof photo app, how GPS and timestamps can support organized documentation, and what to consider when working without an internet connection.
You’ll also see how app features support real inspection tasks, from documenting existing damage to sorting photos into a report. Compare the options with your crew’s workflow, then choose an approach that keeps roof photos accurate, organized, and ready for review.
Key Takeaways
- Capture existing roof conditions before tarping or cleanup, and make each image clear enough to support later review.
- Choose a mobile workflow that fits your jobsite connectivity, and understand how it handles photos when you’re offline.
- Compare apps by how they organize images, record location and time, and turn documentation into usable reports.
- Separate photo documentation from roof measurement tools; choose the right approach based on whether you need images, dimensions, or both.
- PHOTO iD combines automated photo labeling, custom inspection templates, and instant photo report generation for a more organized documentation workflow.
Documenting pre-existing damage
Photograph existing roof conditions before tarping, cleanup, or repairs change the scene. Start with an overall view, then take close-ups of each damaged area. For example, show a missing shingle in context, then capture a closer view of its edges and nearby materials. This gives reviewers more context than an isolated close-up.
Use a repeatable sequence at every property. Start at a recognizable access point, move across each roof plane, and finish with details that need review. Include gutters, flashing, vents, and visible debris when they relate to the condition being documented. Following the same sequence across jobs helps reviewers understand how the photos fit together.
- Take a wide photo that identifies the roof plane and surrounding features.
- Capture each damaged area from a useful distance, then take a closer view.
- Add a brief label describing the feature, such as “north slope, lifted shingle.”
- Review the photos before leaving and retake any blurred or obstructed image.
Use the phone’s camera app for quick, familiar image capture. A notes app can hold observations when a photo alone doesn’t explain the condition. A photo organization app can group images by property or inspection, while labeling tools connect each image to a roof area. Keep labels factual: describe what the photo shows rather than guessing at the cause.
For a later warranty callback, dated, organized job photos can help compare the documented condition with the roof’s later appearance. A consistent label such as “garage roof, flashing detail” gives reviewers more context than a camera roll full of unnamed images.
When taking drone photos of roofs in the U.S., account for aviation requirements and privacy considerations, which can vary by flight and location. Keep the camera focused on the roof and avoid capturing neighboring properties or people unnecessarily.
Prioritize safe access over a better angle. Don’t climb onto a roof when the surface, weather, or access conditions create a hazard. Use ground-level views or remote imaging instead. Keep your phone secured while moving, and stop in a stable position before taking photos.
A drone’s flight-control app can help capture roof areas that are difficult to see from the ground, while a 360-degree camera app can record a wider view around a position. Both can add context, but neither replaces clear close-ups of specific damage. Check the saved images for useful detail before finishing the inspection.
Choose a roofing photo documentation app that a new hire can use correctly from day one. A straightforward workflow helps staff follow the property’s labeling conventions as they learn them. Before relying on an app, confirm that its basic process supports the inspection sequence: identify the roof area, add a factual label, and review the saved image. That makes it easier for someone else to assess the documented condition later. Keep the app focused on organizing and recording observations, with clear, factual images and labels.
Native mobile apps and offline mode
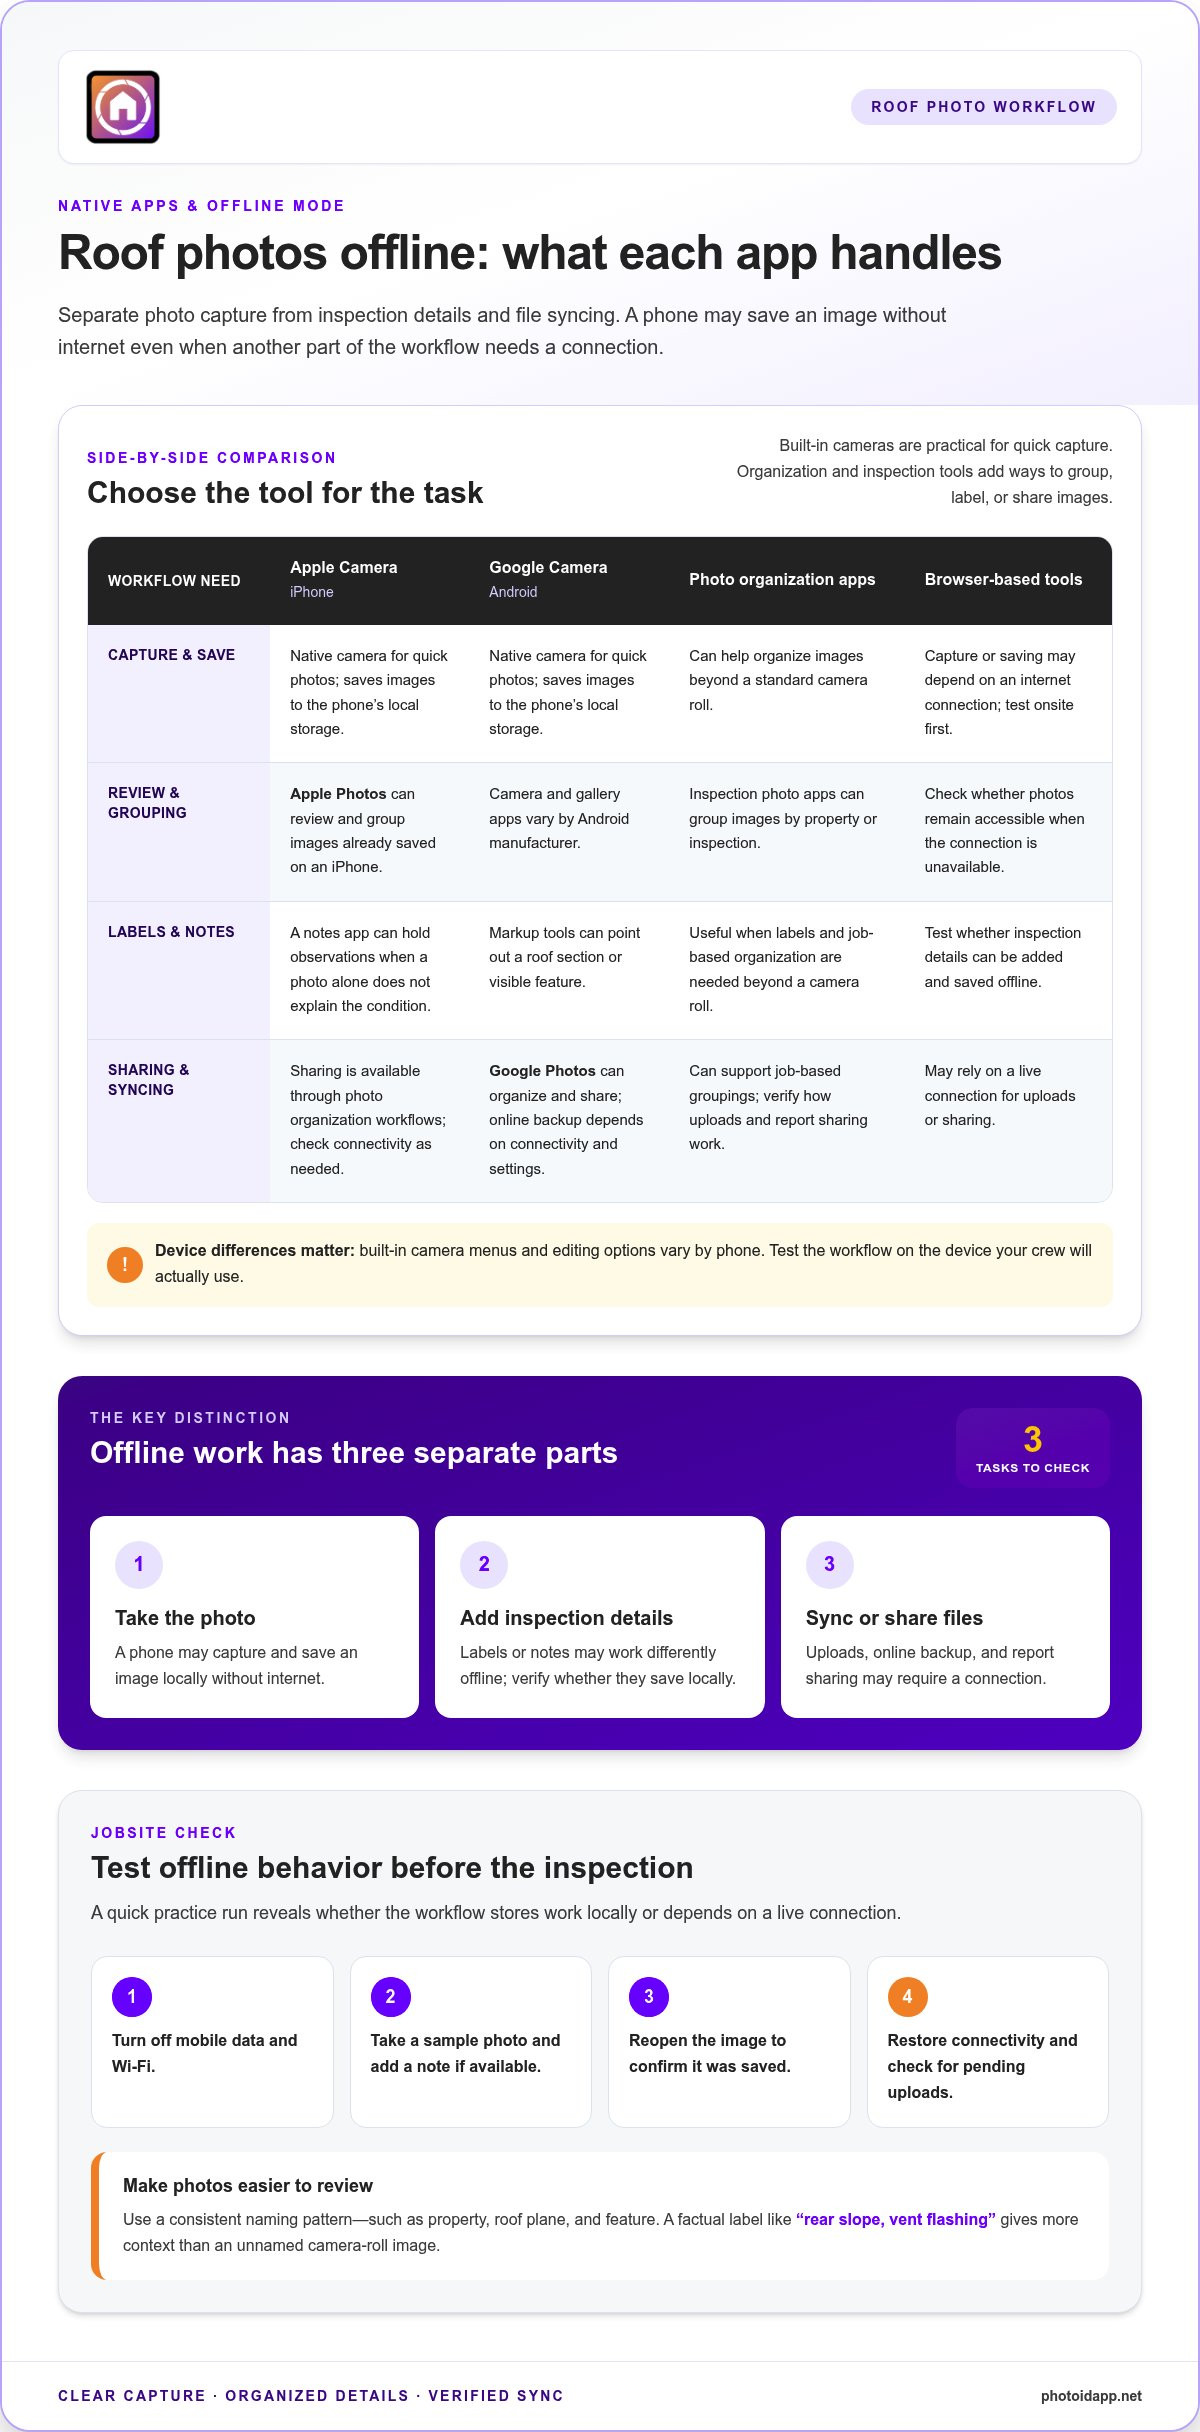
A native camera app opens directly on your phone and saves photos to local storage. Apple Camera and Google Camera are built for their respective mobile systems, making them practical for quick roof photos. Browser-based tools may depend on an internet connection, so test their capture and saving workflow before using them onsite.
Offline support matters when a roof or rural property has weak reception. Consider three separate tasks: taking a photo, adding inspection details, and syncing files. A phone may capture an image without internet, while an inspection app may need a connection for labels, uploads, or report sharing. Treat these as distinct functions.
On iPhone and Android, built-in camera apps handle basic photo capture, but menus and editing options differ by device. Apple Camera pairs with Apple Photos, while Android camera and gallery apps vary by manufacturer. Choose based on your phone’s actual workflow, then test it at the jobsite.
Test offline behavior before an inspection. Turn off mobile data and Wi-Fi, take a sample photo, add a note if available, and reopen the image. Then restore connectivity and see whether any pending upload completes. This simple check shows whether the app stores work locally or relies on a live connection.
- Apple Photos: Use it to review and group images already saved on an iPhone.
- Google Photos: Use it to organize and share images, with online backup dependent on connectivity and settings.
- Markup tools: Use built-in editing features to point out a lifted shingle, flashing gap, or roof section.
- Inspection photo apps: Use them when you need labels and job-based organization beyond a standard camera roll.
To share a roof record, select only relevant photos and add context. An image labeled “rear slope, vent flashing” is easier to review than a file with a default camera timestamp as its name. Annotation tools can add arrows or circles, while albums and folders group images by property or inspection.
Which apps annotate, organize, and share roof photos with contractors or insurers? Apple Photos and Google Photos support photo organization and sharing, while built-in Markup tools can add visual notes. Inspection photo apps can combine labels with job-based groupings, making them useful when a camera roll becomes difficult to sort.
For repeat inspections, use the same naming pattern across devices, such as property, roof plane, and feature. A dedicated roof photo organization workflow can help keep images labeled and ready for reporting. Test capture, annotation, and sharing before the crew leaves the site.
What are the best apps for taking photos on a roof?
The right choice depends on what the photo needs to do after capture. Apple Camera and Google Camera suit crews that need a fast, familiar way to take images. A dedicated inspection photo app is a better fit when each image needs to connect to a property, roof area, or report. Compare the workflow, not just the camera screen.
Apple Camera: Choose it for direct image capture on an iPhone. Its familiar interface helps crews take an overview, then move closer for detail shots. Pair it with Apple Photos to review images saved on the device. This setup is simple, but adding job labels may take a separate step.
Google Camera: Use it for straightforward image capture on supported Android phones. The camera experience can vary by device, so test the phone your crew actually uses. Then open the saved images in the device’s gallery or Google Photos. Check that photos stay in the right album and retain enough detail for later review.
Annotation and gallery tools: Apple Markup and Android editing features can highlight a visible area with a circle or arrow. Apple Photos and Google Photos help you review, group, and share images. These tools work well for a small set of marked-up photos, but they don’t automatically create a consistent inspection sequence across jobs.
Inspection photo apps: Consider these when a project needs structured photo records rather than a camera roll. Look for a workflow that connects images to an inspection, supports clear labels, and makes review straightforward. For example, a crew documenting several roof planes needs an easy way to distinguish photos of each plane after capture.
Use this quick comparison to narrow the field:
- Fast capture: Start with the phone’s native camera, such as Apple Camera or Google Camera.
- Basic review and sharing: Use Apple Photos or Google Photos to sort and share saved images.
- Visual callouts: Use Markup or the Android editing tools to highlight a visible feature.
- Repeatable inspection records: Choose a dedicated photo app that organizes images around job details.
Before choosing, run the same sample task in each app: photograph one roof area, label it, find it again, and prepare it for review. Compare the manual steps and whether the finished record makes sense to someone who wasn’t onsite. The best app for taking pictures on a roof fits your phone and turns images into clear, retrievable job documentation.
What apps are best for roof inspection and documenting damage?
The best fit depends on whether you need quick capture, organized inspection records, or both. Apple Camera and Google Camera handle basic image capture on their respective phones. Apple Photos and Google Photos help sort and share saved images. Dedicated inspection documentation apps add job-based organization, labels, and report workflows.
For a one-off roof visit, a phone camera and gallery may be enough. Create an album for the property, then name or annotate images by roof area. For recurring inspections, choose an app that keeps photos connected to inspection details. A “front slope, missing shingle” label is more useful than an image buried among unrelated camera-roll photos.
Match the tool to the operation. A roofing business with fifteen crews across three counties may find manual photo sorting impractical. Automatic organization and reporting can keep records grouped by job. A smaller team might prefer a simple capture-and-label workflow that avoids extra steps.
- Apple Camera or Google Camera: Use the phone’s native camera for direct capture and familiar controls.
- Apple Photos or Google Photos: Use a gallery app to group, review, and share saved inspection images.
- Inspection documentation app: Use job-based folders, labels, or templates to structure repeat inspections.
- Report-building app: Use a tool that places selected images and notes into a review-ready document.
Prioritize a straightforward interface. A new hire should be able to use the photo workflow correctly from day one. Test it with a sample inspection: create a job, capture a roof detail, label its location, and find the image again. If the process feels confusing during practice, it will slow down field documentation.
Warranty callbacks show why retrieval matters. Organized, dated job photos can help assess a callback that arises six months after the work. Use consistent labels for the property, roof plane, and visible feature. Keep observations separate from conclusions: describe what appears in the image without guessing why the damage occurred.
Compare apps by the finished record, not the number of buttons. Check whether photos remain connected to the correct inspection, labels stay readable, and reports present images in a useful order. A strong workflow moves from capture to review without requiring crews to rebuild the job record later.
Choose native camera and gallery tools for simple image handling. Choose inspection software when recurring jobs need structured records, templates, or reports. For a roofing team, the distinction makes app selection practical: decide whether the main challenge is taking photos or managing the documentation they create.
Which apps can measure roof dimensions from photos?
Standard camera apps capture roof images, but they don’t calculate roof dimensions on their own. Measurement tools need additional information, such as aerial imagery, image overlap, or a known reference length. Choose the method based on the result you need: a roof outline, individual plane measurements, or a visual record.
Aerial roof measurement software uses overhead imagery to map roof planes and estimate dimensions. It can help when you need a broader view than ground-level photos provide. Aerial roof and wall measurement tools support this type of workflow. Results depend on usable imagery and clear identification of roof edges and plane boundaries.
Photogrammetry apps use multiple overlapping images to build a spatial model. Capture the same roof feature from different positions, keeping it visible between images. The app processes the views into a model that can support measurement. This approach requires a planned capture path and sufficient image detail, not just a close-up of a shingle.
Image measurement apps can estimate a visible length when a photo includes a known reference, such as a measuring stick beside the feature. Without a reference or suitable spatial data, a flat image cannot reliably show real-world dimensions. Perspective, camera angle, and distance can make identical objects appear different in size.
Use this workflow to select and prepare a measurement method:
- Define the output: Decide whether you need a roof-plane area, a ridge length, or a visible feature measurement.
- Choose the image source: Use overhead imagery for roof geometry or overlapping views for a spatial model.
- Capture deliberately: Keep roof edges visible and avoid images blocked by trees, equipment, or shadows.
- Review the result: Compare the mapped boundaries with the source imagery and correct misplaced edges.
- Keep evidence together: Store the measurement with its source photos and roof-plane label.
A phone photo is useful for documenting conditions, but it serves a different purpose from a measurement tool. For example, a close-up of cracked flashing shows its visible condition, while aerial measurement software can map the surrounding roof plane. Keep the photo and measurement linked to the same property record so reviewers can interpret both.
Before relying on an app’s output, inspect how it represents roof planes and source images. Check whether the result is an estimate, a marked-up image, or a measurement report. For roof documentation that pairs photos with organized records, explore roof photo documentation tools.
App availability is another practical consideration: the article’s author says the apps discussed are for iOS and notes comparable Android apps where available. For larger operations, the workflow matters as much as the measurement feature. A roofing company running fifteen crews across multiple regions may need automatic photo organization and reporting because manual sorting becomes impractical at scale.
Some image-planning considerations apply outside roofing. Tide levels can determine whether some seascape photographs are possible, with certain shots requiring low or high tide. Historic architectural landmarks often offer specific free admission hours for visitors depending on the day of the week. Neither detail changes roof dimensions, but they illustrate why photo capture and organization may depend on the task and its context.
PHOTO iD: PHOTO iD Mobile App Subscription
PHOTO iD turns roof photos into organized inspection records through its PHOTO iD Mobile App Subscription. Use Automated Photo Labeling to connect images with relevant inspection details, then generate an Instant Photo Report for review. Custom Inspection Templates structure repeatable documentation, helping teams capture the information each inspection requires.
Choose PHOTO iD when taking the photos is only part of the job, and sorting images or preparing reports adds extra work. The app supports a more consistent path from image capture to organized documentation. Explore how it fits your roof photo workflow, or visit photoidapp.net.
Build a Roof Photo Workflow You Can Keep Using
Make your next step a consistent documentation routine. Decide how your team will identify each property, label roof areas, and prepare images for review. A clear process helps everyone contribute to a record others can understand after the jobsite work is finished.
Choosing the best app for taking pictures on a roof ultimately means finding a tool that fits your routine. Identify where photos become difficult to manage, then focus on the capability that addresses the problem. Keep the workflow practical for the people capturing and reviewing the images.
PHOTO iD offers a PHOTO iD Mobile App Subscription with Automated Photo Labeling and Instant Photo Report Generation. These tools help turn captured images into organized documentation, without treating the photo itself as the entire process.
Ready to explore a more structured roof photo workflow? Contact PHOTO iD about roof photo documentation. Choose a process that helps your team capture, organize, and share each record with confidence.
Frequently Asked Questions
What are the prices and subscription costs of popular roof photography apps?
Costs depend on the app’s features, user licenses, billing period, and assignment needs. For PHOTO iD, pricing depends on the case and is provided after a quote request. Before comparing subscriptions, list the essentials for your workflow, such as photo labeling, cloud storage, or report creation. Then compare plans with those needs in mind, rather than paying for tools your crew won’t use.