

Build a photo inspection report by capturing clear images on-site, organizing them by inspection area, and connecting each photo to a note and label before assembling the final report. To learn how to create a photo inspection report, follow a consistent route through the property, then arrange the evidence into sections that make each observation easy to understand.
Good documentation takes more than a camera roll full of images. Each photo needs context: an overview of the area, closer views of specific conditions, and a note explaining what the reader should notice. A repeatable capture routine keeps these details connected and helps you spot gaps while you’re still on-site.
Choose a report structure that fits the inspection instead of forcing every property into the same format. Capture photos in sequence, organize them by report section, connect notes and labels, then build a customizable report. This workflow turns field photos into clear, organized documentation.
Key Takeaways
- Map a consistent route through the property so photos stay in inspection order and are easier to sort later.
- Pair an overview image of each area with close-ups that show the specific condition, then group both under the right report section.
- Use clear labels, notes, and tags to connect each image to its observation; according to the U.S. Environmental Protection Agency, photographs should be referenced in the report body.
- Shape report sections around the inspection and reuse a template that keeps essential details consistent while allowing project-specific changes.
- Compare template examples by how clearly they organize photos, findings, and follow-up details before choosing a format for your workflow.
Uploading and organizing photos by report section
Upload photos to the report section where each observation belongs instead of leaving them in one undivided camera roll. Create sections that match the property and inspection scope, such as kitchen, electrical, attic, and exterior. Place each image beside the relevant finding so readers can move from a reported condition to its visual evidence without searching through unrelated rooms.
In the United States, organize photos to support the inspection agreement and the report’s stated findings. Connect each image to its location and observation, and follow requirements that apply to the inspection type. There is no universal report layout for every inspection.
Build upload groups around recognizable areas or systems. For example, make separate groups for the kitchen, bathrooms, and roof, then split a large group into smaller zones when that improves clarity. Use labels such as “Kitchen, sink cabinet” rather than vague names like “Photo 12.” This makes later sorting faster and helps prevent an image from landing in the wrong section.
- Create the section structure. Match report headings to the property, such as “Interior,” “Garage,” and “Roof.”
- Upload one area at a time. Select the kitchen images together, then place them under the kitchen section before moving on.
- Keep related views together. Group an overview image with close-ups of the same issue, such as a ceiling stain and its surrounding area.
- Review the placement. Check each section for misplaced files, duplicate images, or observations without supporting photos.
For shared online projects, use a consistent folder and section structure across the team. Give projects clear names, use consistent room labels, and separate draft uploads from reviewed report images. For example, an inspector and reviewer should both be able to find “Exterior, north wall” without guessing which folder contains the evidence. Limit project access to people who need the photos, and use secure sharing controls.
Protect privacy by removing unrelated personal details from images before sharing, such as family photos or visible documents. Store inspection files in access-controlled project folders and share them only with intended recipients. Keep original files separate from edited copies when preserving image history matters.
For digitally submitted photos, inspect the EXIF header when checking for possible manipulation, as recommended by the National Institute of Standards and Technology (NIST). Reference each photograph in the report body so readers can connect the evidence to the findings, as advised by the U.S. Environmental Protection Agency. If the source file is a Word report, convert it to PDF before sending when a fixed layout will help preserve section order.
Capturing inspection photos on-site
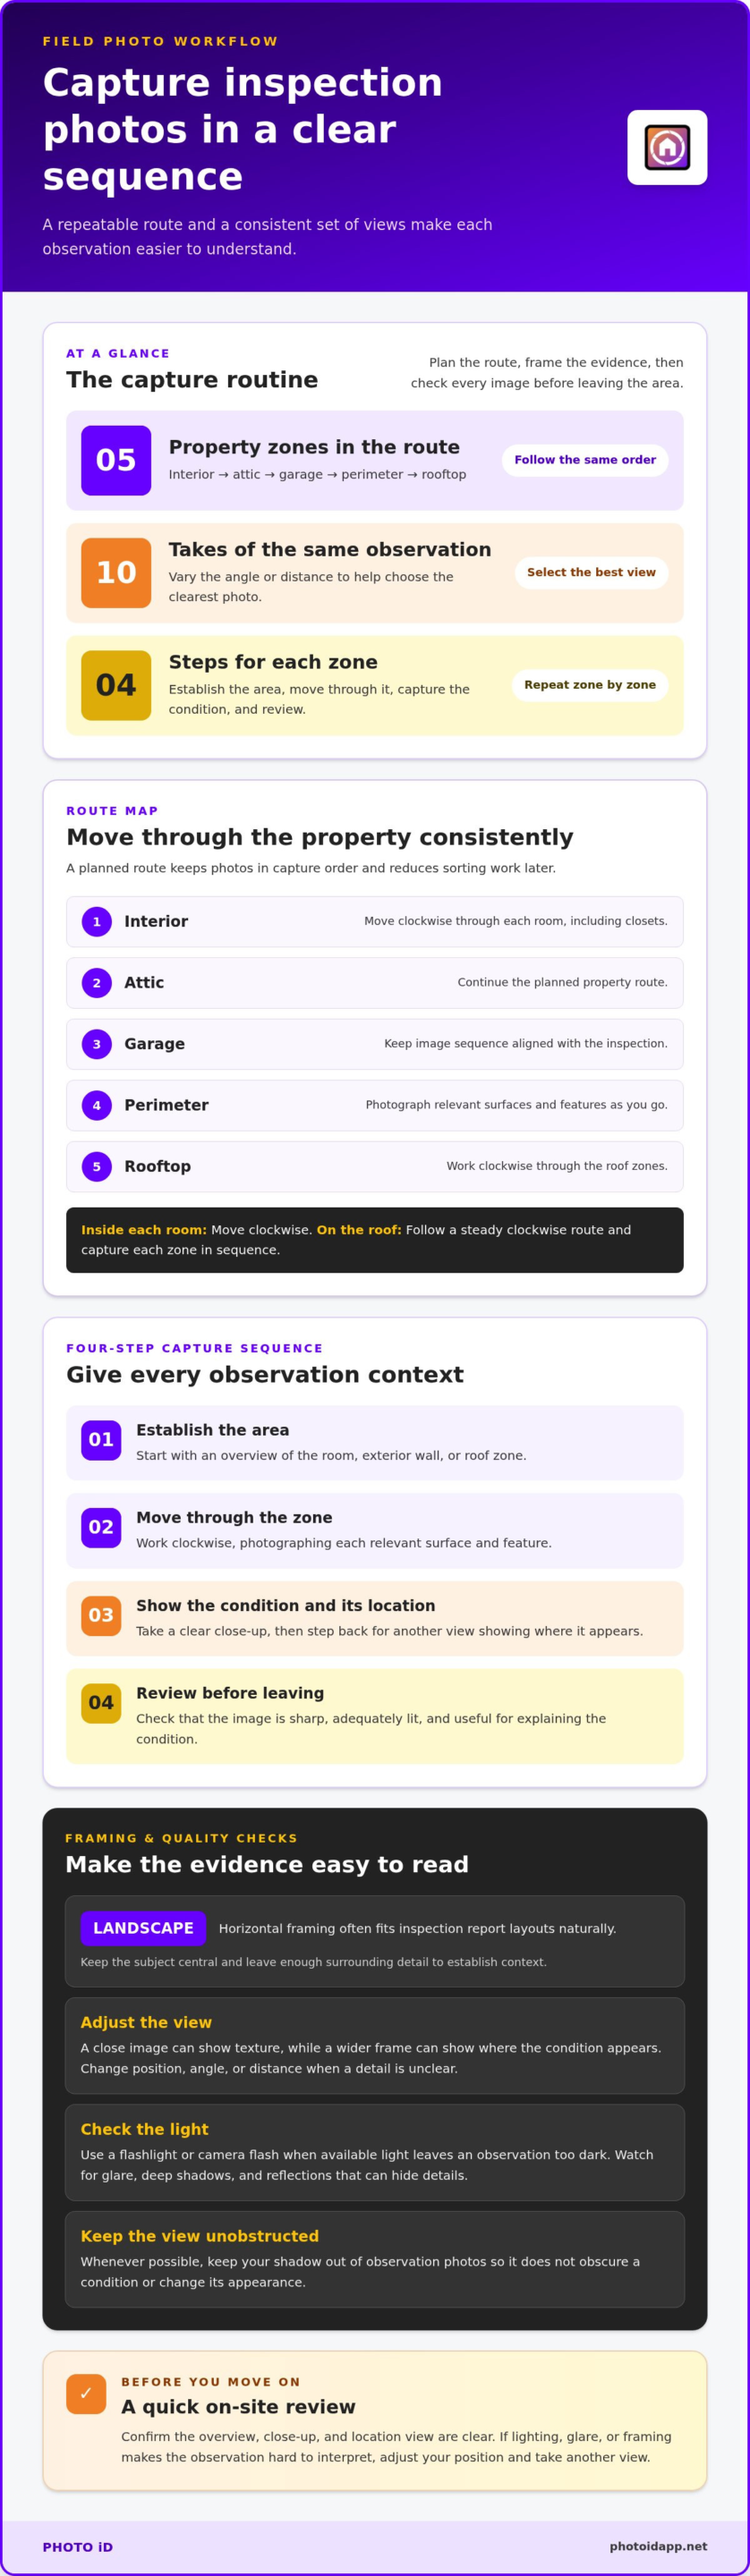
Capture photos in a planned sequence rather than as scattered snapshots. Start each zone with an overview, then photograph specific observations nearby. This gives readers context before they examine a close-up. A consistent route also keeps images in capture order, reducing sorting work after the inspection.
Follow a repeatable route through the property: interior, attic, garage, perimeter, and rooftop. Inside, move clockwise through each room, including closets. On the roof, work clockwise through its zones. This pattern helps cover each area systematically and makes photo order easier to interpret.
- Establish the area. Take an overview that shows the room, exterior wall, or roof zone.
- Move through the zone. Work clockwise, photographing each relevant surface and feature.
- Capture the observation. Take a clear close-up, then step back for another view showing its location.
- Review before leaving. Confirm the image is sharp, adequately lit, and useful for explaining the condition.
Get the strongest view, not merely the first view. Capture the same observation 10 times to help select the best photo. Change your angle or distance between shots. A close image can show a crack’s texture, while a wider frame can show where it appears. Extra photos can also prevent another site visit for an overlooked image.
Choose landscape orientation when taking images for inspection software. Horizontal framing often fits report layouts naturally and leaves room around the observation. Keep the subject central, while including enough surrounding detail to establish context. Whenever possible, keep your shadow out of observation photos, as it can obscure a condition or change its appearance.
Lighting matters in interiors, attics, and garages. Use a flashlight or camera flash when available light leaves an observation too dark. Check the screen before moving on. Glare, deep shadows, and reflections can hide details, especially on glass or glossy surfaces. Adjust your position and take another view if the feature remains unclear.
Give rooftop overviews particular attention. A client may be seeing the roof’s condition for the first time in the report, so frame each zone clearly before adding close-ups. Capture images in sequence and follow a steady clockwise route. This creates an understandable visual record from the first area to the last.
For a smoother field routine, consider a mobile photo workflow that keeps capture and documentation connected.
Creating customizable inspection reports
Build the report around the inspection’s scope, findings, and intended reader. Common problems include relying on a generic layout, mismatching photos and findings, and leaving observations unclear. Review every section before delivery.
Customizable Report Options
A customizable report lets you arrange sections, labels, and finding details around the property. A home inspection might include sections for the exterior, electrical system, plumbing, and interior. Choose a structure that reflects the work performed, then keep headings consistent across similar projects. Readers can scan familiar categories while still seeing details specific to each property.
Decide what each finding needs to communicate. A useful entry identifies the location, describes the observed condition, and connects it to supporting evidence. For example, “Hallway ceiling” is more specific than “Interior.” Keep explanations factual, and distinguish visible observations from interpretations or recommended next steps.
Templates and Examples
Free photo inspection report templates and examples can provide a starting layout, but treat them as models rather than finished reports. Compare their section order, finding descriptions, and photo placement with your inspection’s actual scope. Remove fields that don’t apply, and add headings when a project needs them. A template should support consistent documentation without forcing inaccurate categories.
Before adopting an example, test it with a sample finding. Add a location, a concise description, and the related image. Then check whether a reader can understand the observation without extra explanation. If the image appears far from its finding, revise the layout. If the template hides important context, adjust its sections before using it on a real project.
Keep the report’s order logical. Start with property and inspection details, then present findings under relevant system or area headings. Close with any summary or follow-up information the report requires. Use a custom inspection template when repeated projects share a structure, but leave room for unique conditions. This supports consistency without making every property look identical.
- Check the scope. Remove sections unrelated to the inspection performed.
- Check each finding. Confirm its location and description match the evidence.
- Check the sequence. Put related findings and supporting photos together.
- Check the final file. Review headings, spacing, and page breaks before delivery.
Avoid claims that go beyond what a photo shows. A close-up of a stain, for instance, documents its visible appearance, not its cause. Keep observations precise, avoid unsupported conclusions, and clearly label edited or annotated images. A final review should catch missing context, duplicate entries, and sections that imply work outside the inspection’s scope.
Linking notes and tags to photos
Connect every photo to a location, observation, and report finding. Consistent labels and concise notes make evidence easier to understand and retrieve.
Label each image with its property area, subject, and capture time when available. Sort photos by inspection section, then connect each image to its matching finding.
Write captions that describe visible conditions without guessing at causes. State what the image shows, where it appears, and any relevant context.
Photo Labels and Timestamps
Use a repeatable label format, such as “Bathroom, vanity, cabinet base.” Add the capture date and time through the camera’s timestamp details when available, and preserve the original timestamp when organizing files. Sort images by room or system, then group related views under one observation. Reviewers can then distinguish similar photos without opening every file.
Objective Notes and Captions
Describe what the photo shows, not what you assume caused it. For example, write “Dark discoloration visible below the window” rather than naming a leak without supporting evidence. Add the precise location and visible extent when relevant. Keep each caption direct, factual, and tied to its image. Separate observed conditions from interpretations or recommended follow-up.
Build a simple connection between image, note, and report entry. Use the same room name in all three places. If the image shows a loose handrail at the stair landing, label the photo “Stair landing, handrail,” then use that location in the finding. Avoid labels like “Issue” or “Photo 4.” They don’t identify useful context.
Apply labels for categories that help you retrieve or review evidence. Examples include “safety,” “maintenance,” or “further evaluation,” when they fit the documented observation. Use a controlled set of terms across projects. If one inspector labels a condition “roof” and another uses “rooftop,” searches may miss related records. Define preferred terms before team members add their own.
- Match the location. Use identical room or system names in tags, captions, and findings.
- Keep the note factual. Describe visible evidence before adding interpretation.
- Retain image context. Preserve timestamps and avoid renaming files ambiguously.
- Review the link. Open each report reference and confirm it points to the intended photo.
Reference attachments directly in the report body. The U.S. Environmental Protection Agency advises that attachments, including photographs, should be referenced there. Point readers to the relevant image near its finding instead of leaving photos unconnected at the end. For example, place a captioned photo beside the paragraph describing the visible condition.
Before sharing, compare every caption with its image and report entry. Correct mismatched locations, duplicate labels, and unclear wording. A final pass through the “Kitchen” section, for example, should confirm that each photo supports the note beside it. This check keeps the visual record useful and prevents readers from having to guess what an image documents.
Are there free photo inspection report templates or examples?
Yes. Free photo inspection report templates and examples can give you a starting structure. Treat each one as a draft, then adapt its sections to your inspection scope. A home inspection example might separate the interior, exterior, and major systems. Check whether it has space for photos, captions, findings, and identifying property details.
Choose a template by testing it with a real sample observation. Add a location, a short description, and its supporting photo. Then check whether a reader can understand the finding without searching elsewhere in the document. If the image sits apart from its explanation, adjust the layout. If the template lacks a field your workflow needs, add it before using it.
A free template is most useful when its structure is editable. Word documents let you change headings, spacing, and photo placement. Keep a clean master copy, then save a separate version for each inspection. Before sending, convert the completed Word report to PDF when you need to preserve its layout across devices.
- Check the sections. Confirm they match the property and inspection scope.
- Check the photo space. Make sure images can sit beside relevant findings.
- Check the text fields. Look for clear areas to record locations and observations.
- Check the final format. Review the exported PDF for cut-off text or misplaced images.
Examples also help you judge how much detail each entry needs. Compare a vague caption like “Damage” with “Paint peeling on the bedroom window trim.” The second identifies a location and visible condition. Keep your language factual, and don’t use a sample’s diagnosis as your own conclusion. A template shows how to organize a report, not what a specific property contains.
Free files can become cumbersome when every photo needs manual placement. For a small report, a document template may be enough. For repeated inspections with many images, photo-report software can organize and place evidence within report sections. Choose a workflow that suits your image volume, editing needs, and preferred final format.
Before adopting an example, run a complete test report. Add a property heading, one finding, its photo, and a caption. Review the order on a phone and a computer. Check that the image remains readable and the text stays beside its evidence. Fix the master template, not just the test copy, so the improvement carries into future reports.
Want to build reports from a reusable structure? Explore a customizable report workflow for organizing inspection photos and report sections.
PHOTO iD: PHOTO iD Mobile App Subscription
PHOTO iD’s mobile app subscription supports field documentation with automated photo labeling, instant photo report generation, and custom inspection templates. Use it when manual sorting and report assembly slow down your workflow. Real-time image labeling and voice-to-text help connect photos with inspection details, while customizable templates structure reports around your process. Generate a photo report for review and refinement.
Choose a template that fits the inspection, capture and label photos as you work, then review the generated report for accuracy. Focus your final check on image placement, captions, and whether each photo matches its finding. To streamline inspection documentation, explore the PHOTO iD mobile app subscription and its photo-labeling and report-generation tools.
Make Your Next Report Easier to Build
Let your documentation workflow support the decisions that follow an inspection. A well-structured report provides a practical reference for reviewing observations, communicating with clients, and keeping project records clear. As you refine how to create a photo inspection report, focus on a process your team can repeat without losing the details that make each property unique.
When manual labeling and report assembly become a bottleneck, PHOTO iD’s mobile app subscription brings automated photo labeling and instant photo report generation into one workflow. Use these tools to organize images and create reports, then choose a process that fits your inspection work and make it part of your regular field routine.
Ready to explore a more organized approach? Contact PHOTO iD about inspection reports and see how its tools fit your documentation workflow. Put your next report on a clearer path, and keep moving forward with confidence.
Frequently Asked Questions
What information should a photo inspection report include?
A photo inspection report should identify the inspected property or equipment, inspection scope, observations, and related images. Include the inspection date, relevant locations, and the inspector’s identifying details. For equipment, record its make, model, or serial number when available. Distinguish observed conditions from recommendations, and note areas that couldn’t be accessed. For example, connect a photo of a worn belt to the specific machine and component.
How do you create a photo inspection report step by step?
To understand how to create a photo inspection report, start by defining the inspection scope and report sections. Capture and label evidence during the inspection, then connect each image to a written observation. Draft findings in a consistent order, check that every claim matches its evidence, and review the final file for missing context. For example, confirm that a maintenance recommendation refers to the same unit shown in its accompanying image.
What photos should be taken for a property or equipment inspection?
Photograph each relevant area or item, along with details that show specific conditions. For a property, capture major rooms, systems, exterior features, and observed defects. For equipment, include the whole unit, its identifying plate, key components, and any visible wear or damage. Add context around close-ups so readers can locate the condition. For example, pair a close view of corrosion with a wider image showing its position on the equipment.
How do you take clear, useful inspection photos with a phone?
Clean the phone lens, steady your hands, and tap the screen to focus on the condition. Move closer instead of relying on digital zoom, which can reduce detail. Check that glare, shadows, or foreground objects don’t hide the subject. Take a second angle if the first image lacks context. Before leaving the area, review the photo at full size to confirm the relevant detail is visible.
What apps or software can create photo inspection reports?
Photo inspection software can combine image capture, labeling, and report creation in one workflow. PHOTO iD’s mobile app subscription includes automated photo labeling, instant photo report generation, and custom inspection templates. These tools suit field professionals who want labeled images and structured reports without assembling every photo manually. Choose software based on how you capture, organize, and present evidence, then review generated reports for accuracy.
What are the legal or documentation requirements for photo inspection reports in the United States?
In the United States, organize photos to support the inspection agreement and the report’s stated findings. Connect every image to its location and observation, and follow requirements that apply to the inspection type. There is no universal report layout. Reference each photograph in the report body, and inspect the EXIF header of digitally submitted photos when checking for possible manipulation.