

What if every property visit ended with a visual record your team could use, rather than another camera roll to sort? Photo documentation for real estate agents can capture more than a room’s appearance. It can preserve the context behind each image, from a feature to follow up on to a detail worth sharing with a client or colleague.
The challenge isn’t just taking photos during a busy showing or listing schedule. It’s capturing them consistently, labeling them clearly, and finding the right image later. Without room and feature labels, even a full set of photos can leave people guessing.
This guide walks through a repeatable process for capturing, labeling, organizing, and sharing property photos. A visit-specific checklist helps you focus on what matters. Consistent labels and voice-to-text tools can make it easier to add context as you work, while an organized report helps your team review details without digging through a camera roll.
Key Takeaways
- Build a visit-specific checklist so you capture the rooms, features, and context that matter.
- Choose the right visual format for the task by distinguishing documentation photos from listing images and immersive tours.
- Use consistent property, room, and feature labels to make photo documentation for real estate agents easier to review and share.
- PHOTO iD’s automated and voice-to-text labeling can help organize images during capture, while custom templates support consistent reports.
- Turn property photos into a clear visual record that helps teammates revisit details and coordinate follow-up.
Why Photo Documentation Matters for Real Estate Agents
A property visit moves quickly. You may spot a finish to discuss, a feature to point out, or a detail to revisit before the next conversation. If the images land in a general camera roll without labels or context, finding the right one later can take longer than capturing it did.
Photo documentation is an organized visual record of a property visit, with images labeled so you can understand what they show and why they matter later. The goal isn’t to take the most photos. It’s to record selected areas and visible features, then make each image easy to retrieve and share with the appropriate client or teammate.
Keep documentation distinct from presentation. A documentation photo records what you observed in context. A listing photo is composed to present a property to potential buyers, while a virtual tour lets viewers explore spaces digitally. These formats can overlap, but they serve different purposes. The overview of Architectural Photography and Real Estate offers useful context on how property photography can serve artistic or marketing aims. A documentation record prioritizes clarity and identification.
That distinction helps keep the record useful: describe what’s visible without treating a photo as a professional assessment. Images can help you revisit details and communicate what you saw, but they don’t establish a property’s condition on their own or resolve a disagreement.
What Should a Real Estate Photo Record Help You Remember?
Capture the area, the visible feature, and enough surrounding context to recognize it later. A close view of a kitchen fixture, for example, may be hard to place on its own. A wider frame can show where it sits. Add a clear room or feature label, such as “kitchen, sink,” so you can retrieve it without opening every image. Use factual captions to record what you noticed, not conclusions the photo can’t support.
Which Property Visits Benefit from Consistent Photo Documentation?
Use a repeatable approach during listing preparation, routine walkthroughs, and follow-up visits. The purpose may vary: one visit might help you remember a feature to discuss with a client, while another may focus on a specific area for team review. Match the photos and labels to that purpose. When several properties or team members are involved, consistent naming makes it easier to tell which record belongs to which visit.
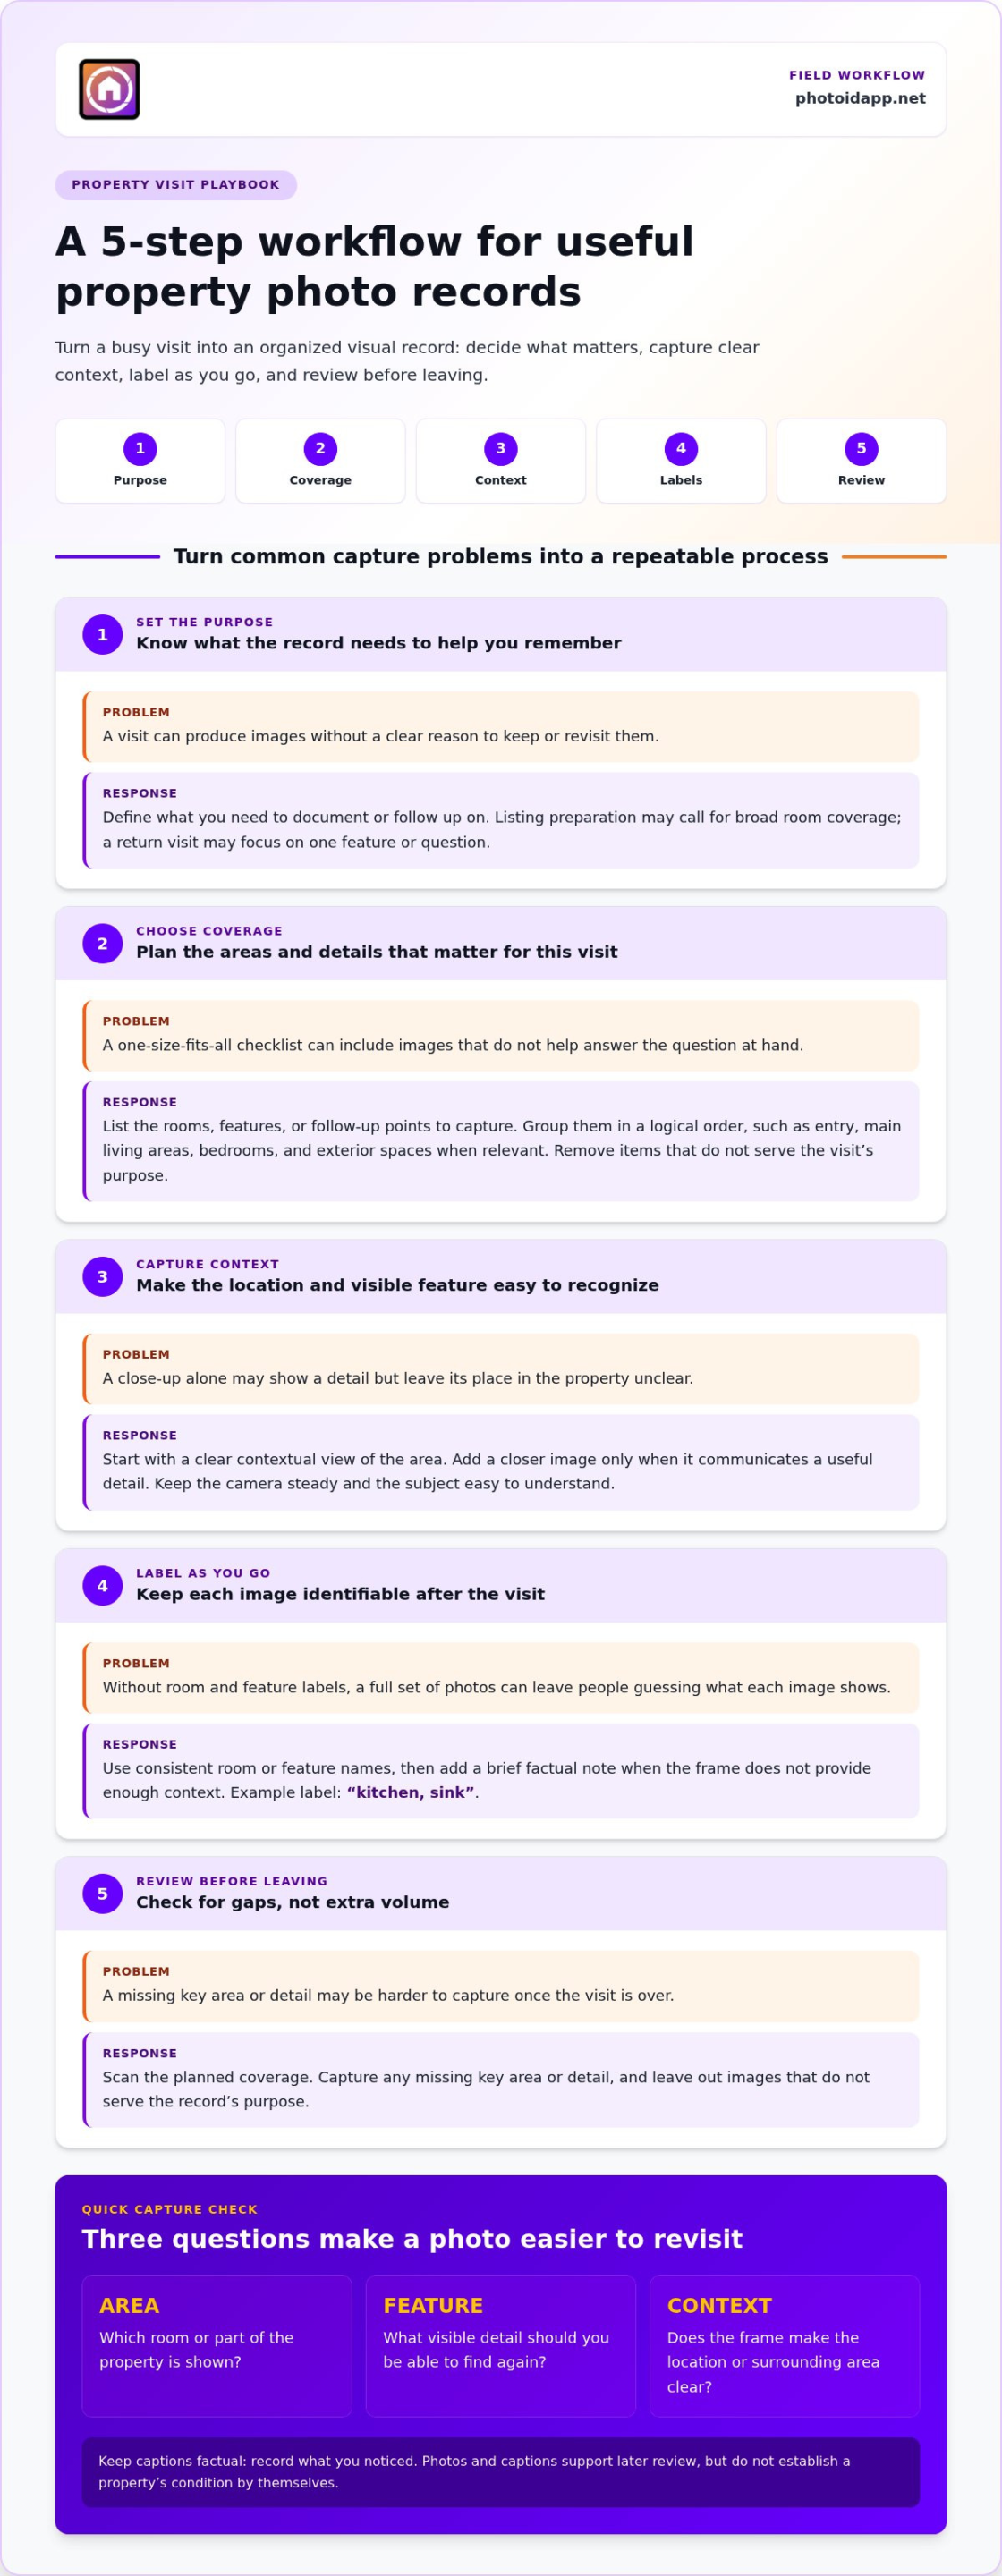
Before capturing anything, decide what the record needs to help you recall. This quick check keeps the process focused:
- Area: Which room or part of the property is shown?
- Feature: What visible detail should you be able to find again?
- Context: Does the frame make the location or surrounding area clear?
That small habit turns separate images into a record with a purpose. Adapt the process to your role and the visit, then use consistent labels to make details easier to review and communicate.
Plan a Real Estate Photo Documentation Workflow Before You Arrive
A quick plan keeps a property visit focused. Before you step inside, decide what the photo record needs to help you remember, which areas matter, and how you’ll identify each image afterward. This makes photo documentation for real estate agents easier to repeat across properties without forcing every visit into the same mold.
Use this field checklist as a starting point. Adjust it to the purpose of the visit, the client’s needs, and your role.
- 1. Set the purpose. Define what you need to document or follow up on. A listing-preparation visit may call for broad room coverage, while a return visit may focus on one feature or question.
- 2. Choose coverage. List the rooms, features, or points you need to capture. Group them in a logical order, such as entry, main living areas, bedrooms, and exterior spaces when relevant.
- 3. Capture context. Take a clear view that identifies the area, then add a closer image only when it communicates a useful detail. Keep the camera steady and the subject easy to understand.
- 4. Label as you go. Use consistent room or feature names. Add a brief note when a photo needs context that isn’t obvious from the frame.
- 5. Review before leaving. Check the planned coverage. If a key area or detail is missing, capture it. Avoid adding images that don’t serve the record’s purpose.
Build a Capture Checklist Around the Visit
Make the checklist specific, not exhaustive. Group planned images by room, feature, or follow-up question so you can move through the property in a repeatable order. If you need to revisit a particular finish, for example, plan a contextual frame that shows its location and a closer view that makes the finish clear. General preparation and composition principles also appear in Real Estate Photography Best Practices, though your documentation checklist should follow the visit’s goal, not a marketing shoot plan.
One template won’t suit every visit. Start with the relevant areas, then remove items that don’t help answer the question at hand. A custom checklist can also help teammates follow the same naming and capture order when they document different properties.
Capture Useful Context Without Overloading the Photo Set
Frame each image so another person can tell what they’re looking at. A room label identifies the general location; a short note can explain why you captured a feature or what needs follow-up. Keep notes factual and concise. Photos and captions support later review, but they don’t replace other forms of assessment or establish condition by themselves.
Before you leave, scan your checklist and confirm that each priority has a usable image and label. Property photo documentation tools, including PHOTO iD’s custom templates and photo-labeling capabilities, can help keep that process consistent.
Separate Documentation Photos from Real Estate Marketing Images
A photo can serve more than one purpose, but it shouldn’t have to serve every purpose at once. A useful internal record may include an ordinary angle that makes a feature easy to identify. A listing image, by contrast, is selected and composed to present the property to prospective buyers. An immersive tour offers a spatial experience that still images can’t provide.
Documentation records details; marketing imagery presents the property. Keeping those goals distinct helps you decide what to capture, how to label it, and who should see it. The best format depends on the job, not on one format being universally superior.
| Format | Purpose | Framing | Labels and audience | Expected output |
|---|---|---|---|---|
| Documentation photos | Record visible details for reference or follow-up | Clear views that identify a feature and its context | Room, feature, or note labels for the agent or team | An organized photo log or visual record |
| Listing photos | Present the property to potential buyers | Intentional composition suited to public-facing marketing | Selected and prepared for listing use | A set of marketing images |
| Immersive tours | Let viewers explore the property’s layout and spaces | Connected views that convey how areas relate | Organized for prospective viewers | A navigable digital experience |
In practice, an agent may keep a labeled photo log for internal follow-up while separately selecting images for a listing. The documentation set might include a close view of a feature and a wider frame to show where it is. The marketing set may favor a more polished composition. Separate records reduce the chance that internal notes or reference images are mistaken for prepared public-facing content.
When Is a Simple Photo Log More Useful Than a Virtual Tour?
Choose a photo log when you need a quick reference, a closer look at a specific detail, or a reminder to follow up after the visit. A virtual tour is better suited to giving viewers a connected spatial overview. A photo log doesn’t replace professional listing photography or 3D capture; it solves a different problem with a focused record.
Keep Client-Facing Images Clear and Contextual
Use a concise label or caption to explain why a photo was captured, especially when its purpose won’t be obvious later. Keep internal notes separate from material prepared for public listing use. A clear label supports communication, but it doesn’t by itself establish compliance, disclosure, or evidentiary value. Apply your normal review process before sharing images beyond the intended audience.
For photo documentation for real estate agents, the practical test is simple: can the next person understand what the image shows, what it’s for, and whether it’s intended for internal reference or public presentation? If not, clarify the label or keep the image in the appropriate record.
Organize and Share Property Photos Without Losing the Context
A useful photo set needs a structure that makes sense after the visit, not just while you’re taking pictures. Start with a consistent naming order: project or property identifier, room, then feature. For example, “Project A / kitchen / cabinet detail” tells a teammate more than “IMG_4821.” Keep identifiers generic in shared examples and avoid putting private client or property details in filenames unless they’re appropriate for the intended audience.
Labels identify what an image shows. Captions add why it matters. A note such as “living room, window, follow up on measurement” gives a later reviewer a useful prompt without asking them to guess. Keep descriptions factual and brief. The goal is to make the next step clear, not to draw conclusions from an image.
Create a Repeatable Naming and Review Routine
Use the same naming pattern across visits so the team can find images without relying on anyone’s memory. Before sharing or generating a report, review the set from top to bottom. Remove duplicates and unrelated images, add missing labels, and check that each photo supports the visit’s purpose. A quick review can prevent confusion at handoff.
- Findability: Does each image have a recognizable project, room, or feature label?
- Context: Can someone understand what the image shows without asking the person who captured it?
- Relevance: Does it belong in this record, or is it a duplicate or unrelated capture?
- Handoff: Is the set organized for the person who will review it next?
Make this check part of closing out each visit. Consistent labels help when several properties or team members are involved, because records follow the same logic even when different people capture them. PHOTO iD’s automated and voice-to-text labeling can help organize images, while custom templates and instant photo reports support a consistent handoff.
Choose a Useful Format for the Next Handoff
Match the output to what the recipient needs to do. An organized image set may be enough for quick reference; a photo report can bring images and their context together for review. A concise caption makes an image more actionable by connecting it to a room, feature, or follow-up item. For related field documentation workflows, see this home inspection app guide.
Before sending, confirm that the recipient can distinguish internal notes from material intended for broader sharing. Keep the handoff focused: include relevant images, clear labels, and the context needed to understand them. That’s the practical payoff of photo documentation for real estate agents: a visual record that’s easier to find, review, and use with a team.
Explore PHOTO iD’s property photo documentation tools to organize labeled images and create photo reports.
Use PHOTO iD to Turn Property Photos into Organized Reports
A consistent capture routine sets the stage. PHOTO iD brings photo labeling, templates, reports, and team oversight into one documentation workflow. Add structure as you work, then prepare a clearer handoff for review instead of leaving every image to sort through later.
PHOTO iD is a mobile app and cloud-based inspection management platform. For property photo documentation, it helps organize images and create reports. It doesn’t provide a physical property inspection or determine what a photo means. Keep the process grounded in your visit’s purpose and the details your team needs to find again.
Label and Structure Photos During the Visit
Automated photo labeling can help organize images as they’re captured. Voice-to-text labeling gives you another way to add context: speak a room or feature label instead of typing it. For example, a short spoken label such as “hallway, entry door” can make an image easier to identify later than an unlabeled file. These capabilities help reduce manual sorting, while your chosen labels still need to reflect the image accurately.
Custom templates provide a repeatable structure for the property documentation you want to collect. Set up relevant prompts around the visit’s purpose, such as areas to cover or features to record. A template gives each visit a familiar framework without requiring every property or assignment to follow identical prompts. Agents and teammates can capture information in a consistent order while retaining flexibility for the specific visit.
Generate Reports and Keep Teams Aligned
Once images are labeled and organized, instant photo report generation brings them into a structured output. A report can make a set easier to review and share than separate files, particularly when the recipient needs to see images alongside their labels. Review the contents before sharing to confirm that the report reflects the intended project and includes useful context.
A centralized team management dashboard supports project oversight by giving the team a shared view of work. That visibility can help teammates follow project documentation without depending on one person’s camera roll or memory. Keep labels clear, use a suitable template, and prepare the report around the handoff. These steps connect on-site capture to team review.
For photo documentation for real estate agents, the advantage is a repeatable path from image to organized record. Capture, label, structure, and review, then share a report that helps others understand the visual information you collected. PHOTO iD brings these documentation tools together in a mobile workflow.
See how PHOTO iD streamlines property photo documentation.
Make Your Next Property Visit Easier to Follow
Choose one improvement for your next visit: make image labels consistent, clarify the purpose of each photo, or prepare a repeatable template. Build that habit into your team’s process, and photo documentation for real estate agents becomes easier to carry forward from one property to the next.
PHOTO iD supports this workflow with automated photo labeling, voice-to-text labeling, custom inspection templates, and instant photo report generation. A team management dashboard adds a centralized view for project oversight, helping keep documentation organized beyond the moment of capture.
Start with the visit your team handles most often. Shape a process around the details you need to remember, then make it simple for everyone to use. Explore PHOTO iD for organized property photo documentation and take the next step toward clearer, more consistent records.
Every visit is an opportunity to make the next handoff smoother. Keep the process practical, keep the context clear, and give your team a visual record it can use with confidence.
Frequently Asked Questions
Can real estate agents use a phone for property photo documentation?
Yes. A smartphone can be a practical tool for photo documentation for real estate agents when images are clear, relevant, and organized. Check focus, framing, and lighting as you capture, and include enough surrounding context to identify the subject. A close detail may need a wider view to show its location. Match the device and image quality to the task; phone photos don’t replace specialist photography, professional inspections, or other required records.
How many photos should an agent take during a property visit?
There’s no universal photo count. Let the visit’s purpose, property size, relevant features, and follow-up needs guide how much you capture. If you’re recording a particular area, take enough views to make its location and details understandable rather than photographing every angle by default. Before leaving, scan the set for missing context and unnecessary duplicates. A focused record is easier to review than a large collection of near-identical images.
Can photo documentation replace written notes after a walkthrough?
No. Photos and notes capture different information. An image can show a visible feature, while a short note can record a question, conversation point, or reason you took the photo. Add a concise reminder when the next step isn’t obvious from what’s pictured. Use notes alongside images when they add useful context. Neither should be treated as a substitute for professional judgment or separately required documentation.
What is the difference between a photo log and a listing photo gallery?
A photo log supports reference and follow-up; a listing gallery presents a property to prospective buyers or renters. An image may suit both, but the intended audience can change which pictures you select, how you caption them, and how you arrange them. An internal reference image may be useful because it captures a specific detail, while a public gallery is curated for presentation. Keep internal notes distinct from content prepared for public use.
Should property photos include timestamps or location information?
Include timestamps or location details when they help explain the record’s context. They don’t independently prove an image’s accuracy or meaning, so use them deliberately rather than treating metadata as a substitute for clear labels or notes. Consider whether location details could reveal sensitive information before sharing a file. Follow the privacy and record-handling practices that apply to your situation, and include only the metadata the intended audience needs.
How can agents share property photos without losing room context?
Organize images with consistent room or feature labels, concise captions, and a clear project structure before sharing. A recipient should be able to identify an image without guessing from its filename. A caption can specify which part of a room is shown or explain why the image is included. Review the set for duplicates and unrelated captures, then choose an organized image collection or report that fits the recipient’s needs.