

What if the photo you need is buried between a lunch receipt, a screenshot, and dozens of nearly identical site shots? If you’re figuring out how to organize job site photos, the fix isn’t another frantic camera-roll search. It’s a repeatable workflow that starts when you take the picture.
When filenames don’t explain what an image shows and folders vary from project to project, important details are harder to retrieve during reporting. A little structure at capture time makes each photo easier to identify, find, and share later.
This guide covers a practical field system for capturing useful images, labeling them with clear details, sorting them into consistent project folders, and sharing documentation with colleagues and clients. You’ll also learn when a basic folder setup is enough and when dedicated photo organization software may reduce manual sorting. Voice-to-text labeling, custom templates, and centralized team oversight can help keep documentation consistent as projects grow. Capture, label, and retrieve with confidence without turning photo management into another jobsite task.
Key Takeaways
- Learn how to organize job site photos with a repeatable system that makes project images easier to retrieve and share.
- Adapt a clear naming pattern to identify the project, location, and subject in each photo.
- Compare camera rolls, shared cloud folders, and photo documentation software to find the right fit for your team’s needs.
- Use a practical site-visit workflow to prepare, capture, label, review, and share photos without disrupting fieldwork.
- Set shared team standards and assign ownership so photo habits stay consistent as projects and crews grow.
How to Organize Job Site Photos Before the Camera Roll Gets Overwhelming
A camera roll can fill up quickly with progress shots, close-ups, screenshots, and personal photos. You may remember taking an image but not where it belongs or what it was meant to show. A simple system for how to organize job site photos keeps useful documentation connected to the work instead of buried in a mixed feed.
Organized photos make handoffs clearer, progress reviews faster, and reports easier to assemble. They also help you answer later questions with the image and its context at hand. Think of the system as four linked steps: capture consistently, identify each image, store it in a predictable place, and retrieve it when needed. These are practical digital asset management principles: useful metadata makes digital media easier to classify and find.
- Project: Which job does the image belong to?
- Place: Where on site was it taken?
- Subject: What work, condition, material, or issue does it show?
- Date: When was it captured?
What makes a job site photo useful later?
A sharp image is only part of the record. Someone reviewing it later also needs to recognize the project, location, and reason it matters. For example, a close-up of a pipe connection may show the detail clearly, but without a room identifier or wider view, its location may be unclear.
Capture both perspectives when they add useful context. Take a wide view to establish the area, then a close-up to show the specific work or condition. Include a doorway, room number, nearby fixture, or other recognizable landmark when it helps identify the spot. Keep the frame focused so context clarifies the image rather than distracting from it.
Which details should accompany each project photo?
Use the same project name across the photo record, folders, and reports. Add a location the team will recognize, such as “Level 2, Room 204” or “north work area,” then describe what’s visible in a few direct words: “ductwork before ceiling close-in” or “tile crack beside entry.” Consistent labels help colleagues interpret photos without having to ask the person who took them.
Keep capture dates and times where available. Don’t rely on memory to reconstruct when or where a photo was taken after the site visit. If you add labels in the field, voice-to-text can help you record a short description while the details are fresh. A clear image, useful label, and reliable date turn a camera-roll snapshot into documentation your team can act on.
Build a Job Site Photo Naming and Folder System That Scales
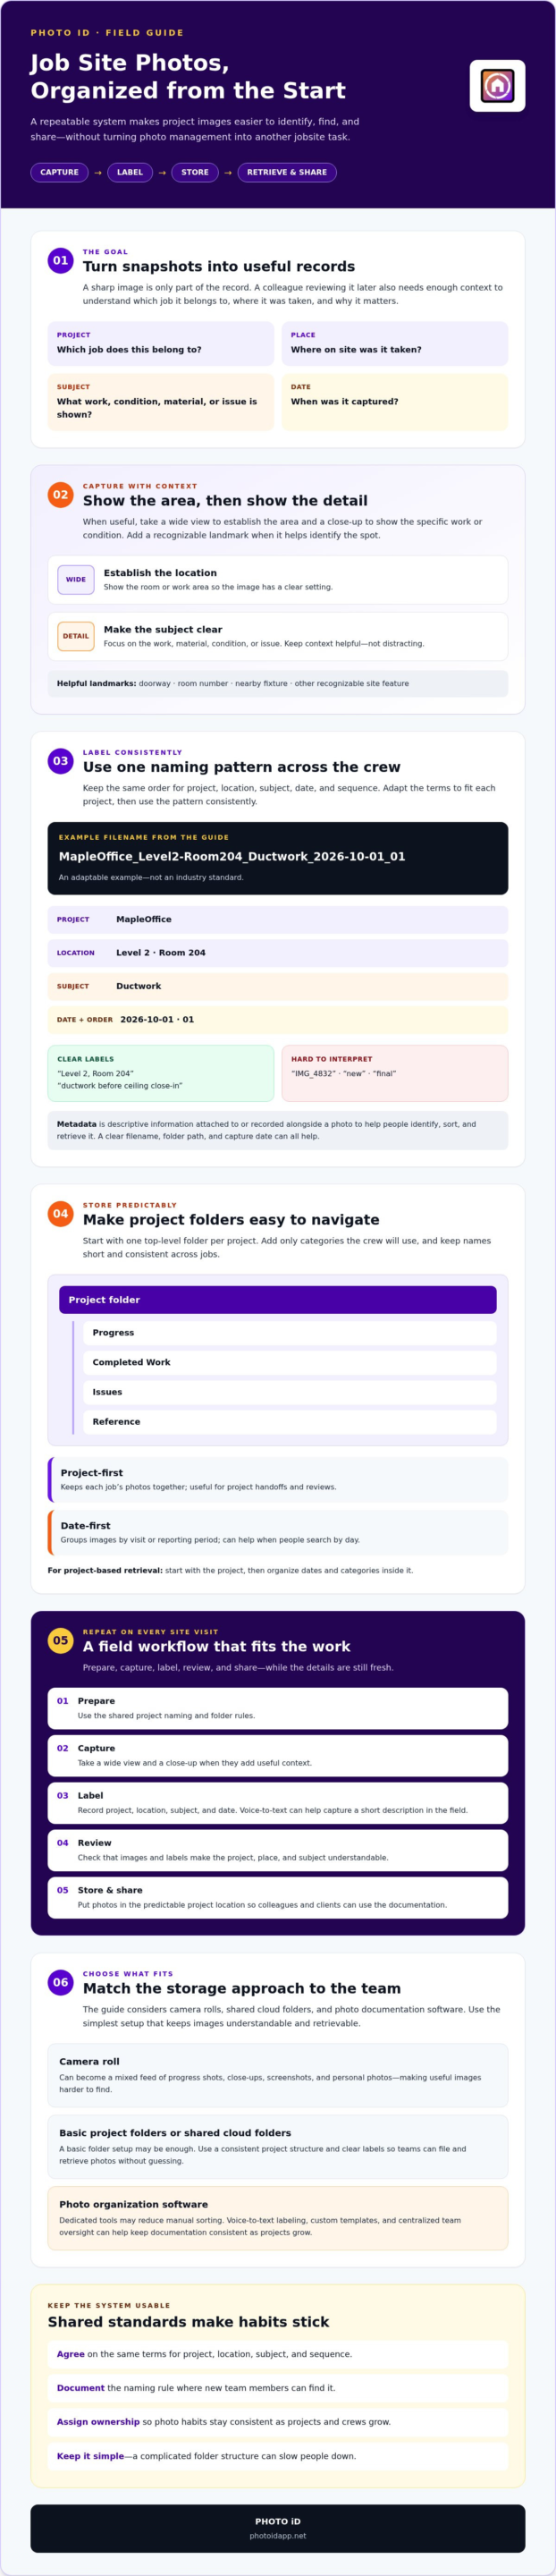
A consistent naming convention turns a pile of image files into a record your crew can search and understand. Choose a predictable pattern that identifies the project, location, and subject, then use it for every photo. For example, MapleOffice_Level2-Room204_Ductwork_2026-10-01_01 is an adaptable example, not an industry standard. Adjust the terms to fit your projects, then keep their order consistent.
Metadata is descriptive information attached to or recorded alongside a photo that helps people identify, sort, and retrieve it. A clear filename, folder path, and capture date can all help someone locate the right image later. The goal isn’t to add detail for its own sake. It’s to make the file understandable to someone who wasn’t there when it was taken.
Create project folders people can navigate
Start with one top-level folder per project. Add only categories the crew will use, such as Progress, Completed Work, Issues, and Reference. Keep folder names short and consistent across jobs. A complicated structure slows people down; a simple one helps the team file and retrieve images without guessing.
Choose the folder order based on how people search. A project-first structure keeps each job’s photos together, which works well for project handoffs and reviews. A date-first structure groups images by visit or reporting period, which can help when teams usually search for documentation from a particular day. For most project-based retrieval, start with the project, then use dates and categories inside it.
Name photos consistently across the crew
Agree on the same terms for project, location, subject, and sequence. If several images document one area, add a simple sequence such as 01 and 02 to distinguish them. Avoid vague labels like IMG_4832, new, or final. Those names depend on memory and can become confusing when another version arrives.
Write the naming rule where new team members can find it, such as in the project’s top-level folder or a shared team guide. Include one example and explain any shorthand the crew should use. Then apply the rule consistently, whether someone labels files manually or uses a tool with automated or voice-to-text photo labeling. If manual sorting starts to slow down documentation, photo organization software may help keep labels and project records aligned.
Choose the Right Way to Store and Share Job Site Photos
The right storage setup depends on your image volume, team size, retrieval needs, and reporting workflow. A solo crew documenting occasional work may be fine with shared folders. A team managing photos across several projects may need stronger search and review tools. Compare the trade-offs before settling on a system.
| Option | Searchability | Team access | Labeling | Reporting | Setup effort |
|---|---|---|---|---|---|
| Phone camera roll | Limited; often relies on scrolling | Usually centered on one device | Mostly manual | Manual selection and sharing | Low at first, but sorting can add work |
| Shared cloud folders | Depends on folder and filename consistency | Useful for sharing with an assigned team | Manual naming and filing | Files can be gathered for reports | Requires agreed folder rules and ownership |
| Photo documentation software | Can organize images around project documentation | May support centralized team review | May offer automated or voice-to-text labeling | May connect photos with report generation | Requires setup and a consistent workflow |
When are basic folders enough for job site photos?
For a small team with occasional projects, a shared folder system can be a practical starting point. Agree on who creates each project folder, who can access it, who manages the files, and who checks that photos follow the naming rules. Decide how the team will back up files, too. No storage method automatically prevents loss or unauthorized access, so review its settings and procedures rather than assuming files are protected.
When does photo documentation software make sense?
Consider a dedicated tool if workers repeatedly label images by hand, photo volume is growing, or reports require assembling pictures from several people. Custom templates can guide consistent documentation, voice-to-text labels can capture descriptions in the field, and centralized review can help connect field photos with team oversight.
PHOTO iD is one example of photo organization and inspection documentation software. Its capabilities include automated photo labeling, voice-to-text labeling, custom inspection templates, instant photo report generation, and a team management dashboard. Match those functions to your actual workflow, not just your file count. For a closer look at inspection-focused options, read this home inspection app guide.
Follow This Job Site Photo Workflow on Every Visit
A dependable field routine keeps documentation useful without pulling focus from the work. Follow the same sequence on each visit to make photos easier to file, review, and share later. Consistent capture and labeling make project photos easier to retrieve.
- Prepare the project. Open the correct project record or folder before taking photos. Confirm the location names and categories your team uses so each image has a clear destination.
- Capture with context. Start with an establishing view of the area. Photograph relevant work in a consistent sequence, then add paired wide and close-up views when someone may need both location and detail to understand the image.
- Label while details are fresh. Add a concise description that identifies the location and visible work, condition, or issue. Use a brief voice note or voice-to-text label if the context is easy to forget while moving through the site.
- Sort into the project structure. Place photos in the agreed folder, record, or documentation tool. Keep related images together, and use the team’s established location and subject terms.
- Review before sharing. Check that each image is clear, belongs to the right project, and has enough location and subject detail to make sense later. Look for accidental duplicates and unclear shots. Remove a duplicate only after confirming that the original is clear and retained.
- Share with a clear purpose. Use the team’s agreed channel. Tell recipients what to review, where to look, and whether an image documents progress, an issue, or a decision that needs attention.
Capture photos in a consistent sequence
Build a simple pattern: establish the area, photograph the relevant work, then capture details that need closer review. If a close-up could be difficult to place, take a wide view that shows nearby room features or landmarks. Keep labels short and specific. A note like “Level 2, east wall, conduit before cover” carries more useful context than “site photo.”
Review, sort, and share before the visit is forgotten
Before leaving the project record, check that photos match the correct project and location. Confirm the subject is clear, remove only verified duplicates, and flag anything that needs a retake or follow-up. This quick checkpoint can catch missing context while it’s still easy to clarify.
If field labeling and review are becoming difficult to manage manually, explore photo organization software with voice-to-text labeling, templates, and centralized team review.
Keep Job Site Photo Organization Consistent as Your Team Grows
A photo system only works if everyone follows it. As crews and projects expand, one worker’s “Room 204” can become another’s “Level 2 east,” and folders can drift into competing versions. A short shared standard keeps the workflow predictable without adding unnecessary steps in the field.
Set team rules without slowing down fieldwork
Create a one-page guide that shows the folder names, photo-label format, and preferred sharing process. Include a clear example and explain who sets up project folders, reviews images, and manages access. Keep the instructions easy to find, introduce them to new team members, and revisit them when project needs change.
Where structured documentation fits the work, custom inspection templates can help crews follow the same prompts and categories. Keep the standard practical: if a rule is hard to follow during a busy visit, simplify it before workers invent their own shortcuts.
Check whether the process works for the people using it. Can a colleague find an image without asking who took it? Can they tell what it shows and where it was captured? Track repeated clarification requests, misplaced files, and inconsistent labels. These are useful signals that a naming rule, folder category, or handoff step needs attention.
Test the workflow on one project first. Ask the crew what felt clear, what slowed them down, and what information they needed but couldn’t find. Make a few focused adjustments, then share the revised standard before using it on other projects. A small trial can expose friction before inconsistent habits spread.
Move from manual sorting to a connected workflow
If workers repeatedly type labels or assemble reports by hand, consider whether a more connected process would fit. PHOTO iD offers voice-to-text labeling, instant photo report generation, and a team management dashboard. These features can support photo labeling, reporting, and team oversight. The right fit depends on how your crew documents and reviews project work.
Keep the goal simple: capture, label, and share in a way your team can repeat. If those manual steps are becoming a bottleneck, explore PHOTO iD as an option for your photo documentation workflow.
Make Every Job Site Photo Easier to Find
A dependable system for how to organize job site photos starts with consistent capture and clear context. Use a shared naming and folder structure, then follow the same routine to label, sort, review, and share images. Those habits help turn scattered camera-roll photos into project documentation your team can understand and use.
As your workload grows, check whether manual labeling and report assembly are slowing the process. PHOTO iD offers automated photo labeling, voice-to-text labeling, custom inspection templates, instant photo report generation, and a team management dashboard for project oversight.
Explore PHOTO iD’s photo organization and inspection documentation tools to see whether they fit your team’s workflow. Start with a clear standard, test it on a project, and refine it together. A few consistent steps can make every image count.
Frequently Asked Questions
How should I organize photos from a construction site?
Use a project-first structure, then sort photos into a small set of familiar categories, such as progress, completed work, issues, and reference images. Apply the same naming pattern to every file, including the location and subject, and retain capture dates where available. For important work, pair a wide view that identifies the area with close-ups that show specific details. Keep the folder and label rules easy for the whole crew to follow.
What is the best way to label job site photos?
Use a short, consistent label that identifies the project, location, and visible subject. For example, “Maple Office, Level 2 Room 204, ductwork before ceiling close-in” is more useful than a camera-generated number or a vague label like “new.” Add a date or sequence identifier when it helps distinguish related images. Agree on the terms as a team, and document the format so everyone labels photos the same way.
Should I organize job site photos by date or by project?
For most project teams, make the project the top-level folder, then sort within it by date, location, or work category. That keeps each job’s documentation together for handoffs and progress reviews. A date-first structure can suit teams that usually retrieve images by visit or reporting period, but it can scatter one project’s photos across multiple folders. Choose the order that matches how your team searches, then apply it consistently.
How do I share job site photos with my team?
Use one agreed channel, such as the project’s shared folder or documentation platform, and file images with clear labels before sharing. Tell recipients which project and location the photos show, and whether they need to review an issue, confirm progress, or take another action. Assign someone to manage folder setup and access. Check the sharing settings for the chosen tool, and don’t assume that sending a link automatically controls who can view or change files.
Can I organize job site photos on my phone?
Yes. You can use project albums or folders on your phone, provided you apply the same naming and filing rules each time. Move work photos out of the general camera roll regularly, label them with project, location, and subject details, and review them before sharing. A photo organization app can also support field labeling and documentation. Check the app’s device compatibility and storage details before choosing a tool, since those specifics vary.
How can I find a specific job site photo quickly?
Make photos searchable before you need them. Use consistent project and location names, describe the visible work or condition, and retain capture dates where available. Then search using details you’re likely to remember, such as a room, work area, material, or visit date. Avoid relying on camera filenames alone. For a team, use the same terms across labels and folders so another person can search without knowing who captured the image.
What should a job site photo document?
A job site photo should clearly show the work, condition, material, or issue being recorded, along with enough context to identify where it is. Include a recognizable room or area identifier when useful, and capture both a wider view and a close-up if either alone could be unclear. Add a concise, factual label and retain the capture date where available. Don’t rely on the image alone to explain details that a short note can preserve.