

A report can be accurate and still leave a client wondering what matters or what to do next. Impressing clients with professional reports means turning field observations into a clear account: what you found, where you found it, what evidence supports it, and what the client should consider next.
Cluttered layouts are hard to scan. Photos lose meaning when they aren’t tied to specific findings. And assembling everything by hand can delay delivery, even after the site work is done. A polished report doesn’t need extra complexity. It needs a logical structure, relevant evidence, and plain-language explanations.
This field guide covers how to organize findings, connect photos to observations, and make next steps easier to understand. You’ll also see how custom templates, automated photo labeling, and instant report generation can support an efficient, consistent workflow while keeping your professional judgment at the center. The goal is a report that’s easier to prepare and follow, and that gives clients a clear view of the work.
Key Takeaways
- Give your report a clear sequence, from purpose and scope to findings and next steps, so clients can quickly find what they need.
- Make each finding specific and connect it to relevant photos or other documented evidence.
- Use consistent headings and labels, then follow a final review process to catch gaps and improve readability before delivery.
- Impressing clients with professional reports starts with clear evidence, useful context, and actionable recommendations.
- PHOTO iD templates, voice-to-text labeling, and instant photo reports can support an efficient, consistent workflow.
Why professional reports shape client confidence
A professional report is an organized record that helps a client understand what you observed, what the evidence shows, and why it matters. Reports serve different purposes and take different forms, as the general overview What is a Report? explains. In field work, the practical goal is to make information clear enough for a client to assess findings and understand what comes next.
Clarity reduces guesswork. Consistent sections and labels show clients where to look, while relevant detail gives them context without burying the main finding. A polished layout helps people navigate the report, but design alone can’t make a conclusion reliable. Accuracy and usefulness come first.
Evidence shows what you observed, context explains why it matters, and next steps help the client decide what to do. That’s the foundation of impressing clients with professional reports. Each part supports the others: an observation without evidence may feel uncertain, while evidence without an explanation can leave the client guessing. That same standard applies whenever thorough documentation is required—for instance, when managing property or conducting background inquiries, professional investigative firms like hubhound.com rely on concrete evidence to provide clients with actionable, trustworthy reports.
What clients need from a professional report
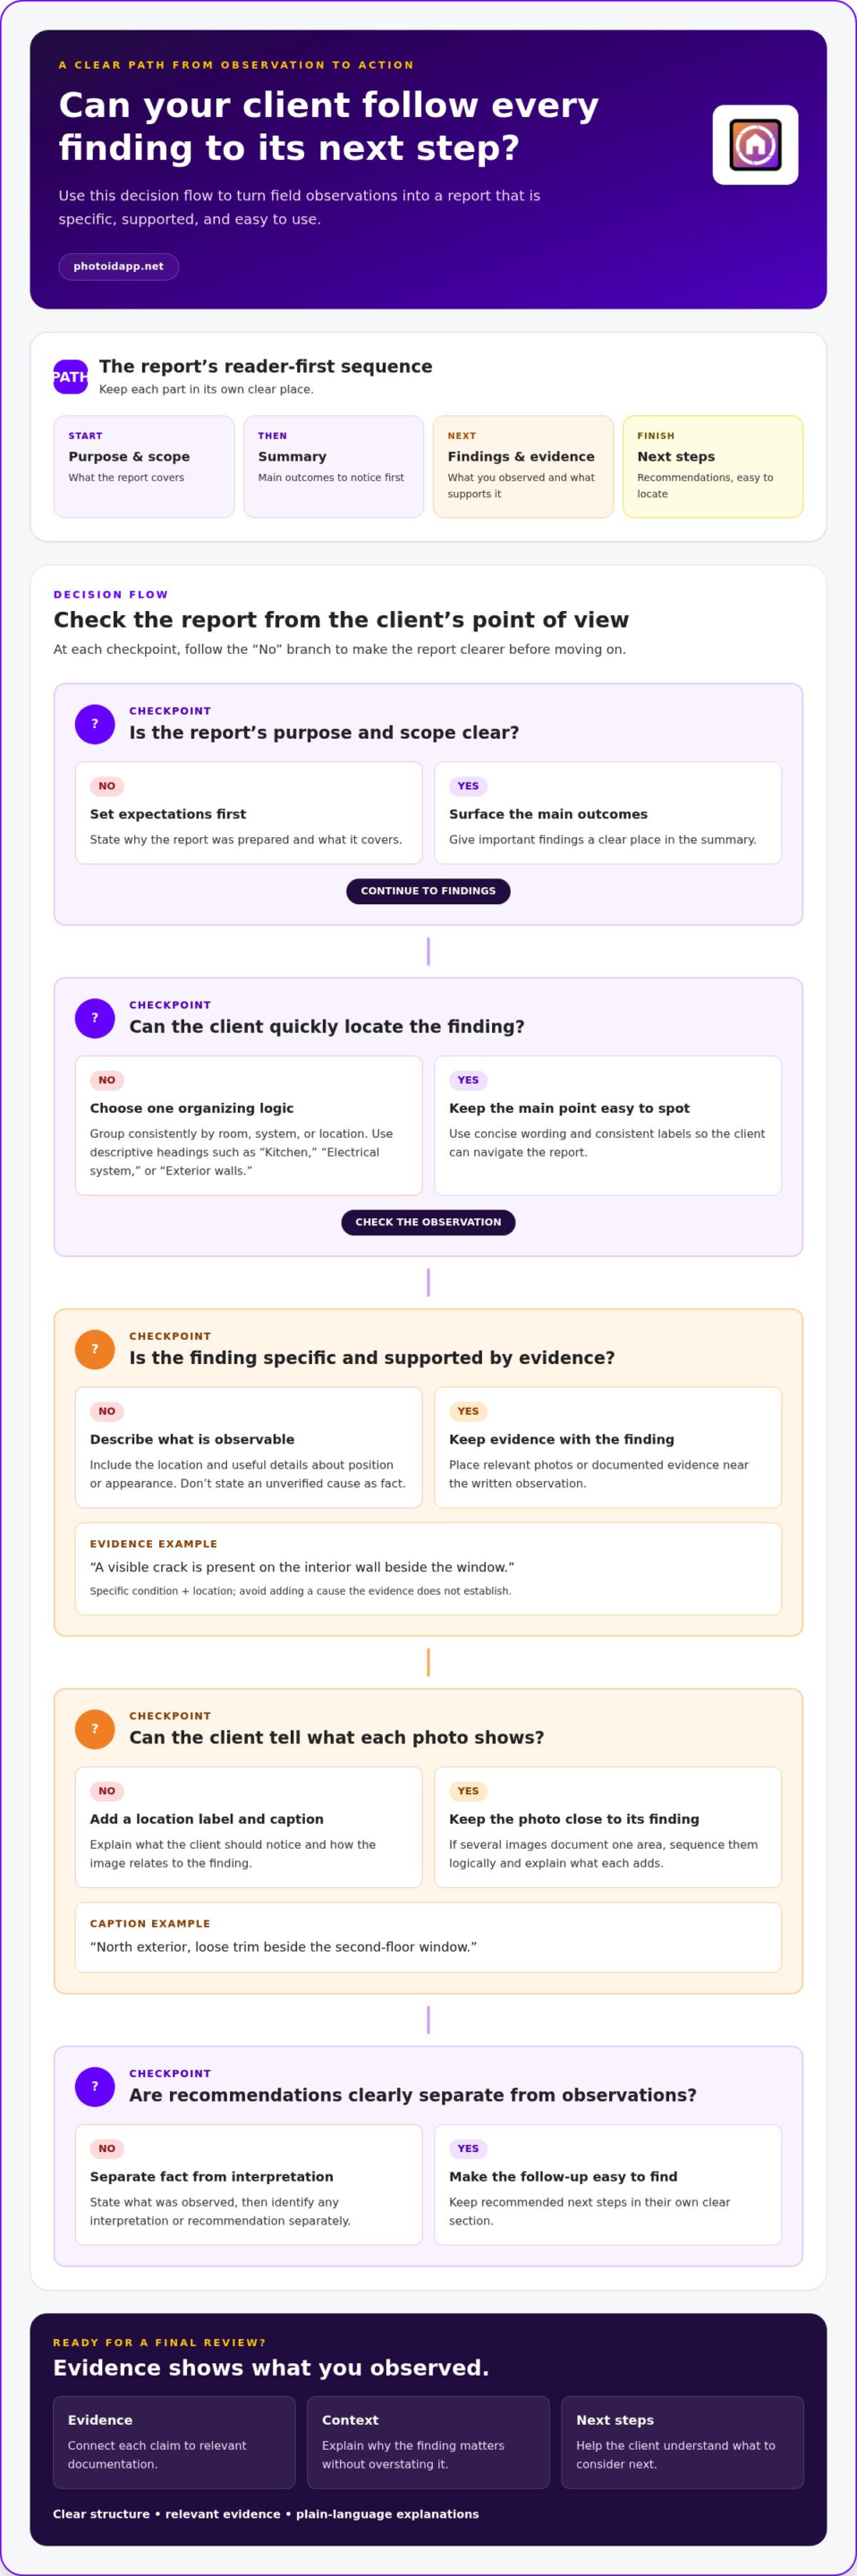
Lead with the important finding, then explain it in concise, observable terms. For example, “a visible crack is present on the interior wall beside the window” gives the reader a specific observation to locate and consider. Include details such as position or appearance when they help the client understand the finding, but keep the main point easy to spot.
Use clear headings and predictable labels to guide the reader. A client should be able to locate a finding, see its supporting evidence, and identify any recommended follow-up without searching through unrelated details. This makes the report easier to use and helps the client focus on what each observation means.
Polish versus substance: what earns trust
Consistent formatting, readable spacing, and clean labels make a report easier to scan. They don’t compensate for unsupported claims or unexplained conclusions. Use neutral, precise language: state what you observed, then identify any interpretation or recommendation separately. Don’t present an assumption as a verified fact.
Photos should support the explanation, not replace it. A labeled image can show a location or visible condition, but a short caption should tell the client what to notice and how the image relates to the finding. Keep each claim tied to evidence, and make that evidence easy to follow.
Build a report clients can scan, understand, and use
A client-ready report follows the reader’s path from purpose to action. State why the report was prepared and what its scope covers. Summarize the main outcomes, then organize findings, supporting evidence, and recommended next steps so each has a clear place.
A client-ready report moves from purpose and scope to summary, findings, evidence, and clear next steps. Use this sequence as a framework, then adapt the details to the work. A report should feel consistent without forcing every project into identical findings.
Organize findings around the client’s questions
Choose one clear organizing logic, such as room, system, or location, and use it throughout. Descriptive headings like “Kitchen,” “Electrical system,” or “Exterior walls” orient readers before they reach the details. Avoid broad labels that could apply to any section.
Keep the observation, supporting evidence, and recommendation distinct. This helps clients see what was recorded, what supports it, and what action is suggested, without mistaking advice for an observed condition.
- Purpose and scope: Set expectations about what the report covers.
- Summary: Surface the findings clients should notice first.
- Findings and evidence: Group details consistently and connect them to supporting documentation.
- Next steps: State recommendations separately and make them easy to locate.
Prioritize findings by relevance, not by how much space they take up. Put significant items where they’re easy to spot, then add useful supporting information. Short paragraphs, clear headings, and consistent labels make the report easier to scan on screen or in print. They also keep important details from disappearing in dense blocks of text.
Make photos and captions work together
Place each image near the finding it supports. Use a consistent label to identify its location, then add a concise caption explaining what the client should notice. For example, “North exterior, loose trim beside the second-floor window” gives readers a location and a visual reference.
Don’t stack images without a clear order or purpose. If several photos document one area, sequence them logically and explain what each one adds. Consistent labels make it easier to trace a finding from the written section to the relevant image.
For a repeatable reporting workflow, explore PHOTO iD reporting tools for organizing and labeling photos and preparing reports.
Make findings and photo evidence clear, not overwhelming
A strong finding gives the client more than a label. It identifies what was observed, where it was observed, and what evidence supports the description. Use direct wording, then distinguish any possible implication or recommendation from the recorded condition. This makes the report useful without claiming more than the evidence can show.
Write findings that are specific and understandable
Replace broad phrases such as “needs attention” with plain descriptions of visible or documented conditions. Identify the location and observable details. If the evidence doesn’t establish a cause, don’t present one as fact. State what you can see, note any limits, and keep follow-up advice separate from the observation.
The examples below are illustrative. Adapt the wording to the evidence collected:
| Vague finding | More specific finding |
|---|---|
| Wall damage | Hairline crack visible on the hallway wall beside the doorway |
| Roof issue | Shingle appears lifted near the edge of the south-facing roof slope |
| Check this area | Dark discoloration visible on the ceiling below the upstairs bathroom |
Specific language helps clients understand what was documented without implying an unverified cause. If a condition could have several explanations, describe the observation first and present any follow-up as a recommendation, not a certainty.
Choose evidence that supports the explanation
Select images that make the finding easier to understand. A wide view can establish location, while a close-up can show a relevant detail. Include both only when each adds useful context. A caption should identify the location and clarify what the image shows without repeating the full finding.
For example, pair a finding about a lifted shingle with a caption such as “South roof slope, near lower edge.” The finding explains the condition; the caption helps the client orient the photo. Keep labels consistent so the connection is easy to follow.
More photos don’t automatically make a report more persuasive. Duplicate angles, unrelated images, and unexplained clusters slow readers down. Choose evidence deliberately: each photo should support a finding, show its location, or add context another image doesn’t provide. Clear documentation is about relevance, not volume. That discipline helps with impressing clients with professional reports because it makes the basis for each conclusion easier to see and assess.
Use a repeatable review process before sending reports
A consistent final check can catch missing details before they reach the client. Keep the process short enough to use on every project, but specific enough to verify the report’s structure and the evidence behind its findings. A custom inspection template can provide dependable sections and labels while leaving room for observations unique to each job.
Check accuracy, consistency, and completeness
Review the report in the same order each time. Confirm project details first, then trace important findings to their supporting evidence. Finish by checking that the report is clear and ready to share.
- Check completeness: Confirm the expected sections are present and project details, dates, and locations are consistent.
- Verify labels: Check that photo labels match their locations and that every image referenced in the report appears in the correct section.
- Clarify language: Make sure each important finding is understandable, grounded in documented observations, and distinct from any recommendation.
- Inspect layout: Review headings, spacing, captions, and image placement. Look for anything that makes a key detail hard to find.
- Deliver: Once the report is complete and easy to follow, send the finished version through your usual process.
Pay special attention to the evidence trail. If a finding refers to a photograph, confirm that the image is present, correctly labeled, and relevant. Check recommendations against the documented observation so the client can understand how the suggested next step follows from what was recorded.
Keep the final review fast and repeatable
Turn recurring checks into a shared team checklist. When several people contribute, assign clear ownership for the final review so everyone knows who verifies consistency and completeness before delivery. Templates help establish a predictable structure, but they shouldn’t dictate the outcome. Keep standard sections ready, then tailor findings, evidence, and recommendations to the project.
This balance makes the process repeatable without making reports feel generic. PHOTO iD custom inspection templates support consistent documentation, while organized, labeled photos help reviewers connect evidence to report content. The platform assists with report preparation; your professional judgment determines what the findings mean.
To streamline your reporting workflow, see how PHOTO iD supports inspection reporting. A simple review routine, clear ownership, and flexible templates can make impressing clients with professional reports a more dependable part of every project.
Create client-ready reports faster with PHOTO iD
Clear reporting starts in the field. PHOTO iD brings photo organization, labeling, templates, and report generation into a workflow for field professionals. It helps keep observations and supporting images organized as you document, making report preparation more structured. Your expertise guides the findings; the app supports the documentation process.
Turn field documentation into an organized report
Automated photo labeling and organization make project images easier to navigate and connect to relevant findings. Add voice-to-text labels while documenting to capture descriptions in the moment, rather than relying only on memory when preparing the report later.
Custom inspection templates give reports a repeatable structure, with sections suited to the documentation process. They help maintain consistency without making every project identical: the framework stays familiar while findings and evidence reflect the work at hand. Once documentation is organized, instant photo report generation brings those materials into a report format for review and completion.
Keep each step connected: capture the observation, label the supporting photo, and place the information in the appropriate report section. Then review the result for accuracy, context, and clear recommendations. PHOTO iD can support impressing clients with professional reports without replacing professional judgment.
Support a consistent experience across the team
Shared templates and labeling practices help team members document projects consistently. This makes reports easier to review across contributors while leaving room for project-specific details. A team management dashboard provides a central view for project oversight and team activity, supporting coordination around documentation.
Choose a process your team can repeat: capture, label, organize, review, and report. PHOTO iD brings practical tools together to support that flow, from field notes to client-facing documentation. Explore PHOTO iD as a next step for inspection reporting.
Make Every Report Easier to Trust
Strong reports do more than record field observations. They help clients understand what matters, see the evidence behind each finding, and know what steps to consider next. Keep the structure easy to scan, use precise language, and connect important conclusions to relevant documentation.
Consistency matters, too. A repeatable review process can catch missing details before delivery, while flexible templates help maintain a professional standard without making every report feel identical. That’s the practical foundation of impressing clients with professional reports: clear findings, useful context, and evidence clients can follow.
PHOTO iD supports this workflow with automated photo labeling and organization, custom inspection templates, and instant photo report generation. Voice-to-text labeling can help capture descriptions during field documentation, while the team management dashboard supports project oversight and coordination. These tools assist your reporting process while your professional judgment guides the findings.
Explore PHOTO iD for clearer inspection reports and build a workflow that brings documentation together with less friction. Keep the evidence clear and the next steps useful. Explore PHOTO iD to support your inspection reporting workflow.
Frequently Asked Questions
What makes a professional report impressive to clients?
A professional report is clear, accurate, and easy to navigate. State its purpose and scope, organize findings logically, and connect important observations to relevant evidence. Consistent headings and concise captions help clients understand what they’re seeing without making the document feel cluttered. The aim isn’t decoration or maximum length. It’s a useful report that answers the client’s questions, explains what matters, and makes the next step easier to understand.
How do you make an inspection report easier for clients to understand?
Use plain language, descriptive headings, and a consistent order. Explain technical terms when needed, and keep observations separate from recommendations so clients can tell what was documented and what action is suggested. Pair important findings with relevant, labeled photos and concise captions. Before sending, review the report from the client’s perspective: can someone unfamiliar with the inspection locate the finding, understand its context, and identify the recommended next step?
Should every finding in a professional report include a photo?
No. Include a photo when it helps clarify or support a finding, and label it so the client can see why it’s relevant. An image without context may raise questions instead of answering them. Avoid repetitive photos, and explain findings clearly even when a useful image isn’t available. Follow the documentation requirements and professional standards that apply to your work, and make sure any included evidence supports what the report says.
How many photos should a client report include?
There’s no universal photo count that fits every project. Include enough relevant images to document important observations and give clients useful context, but leave out duplicates and unrelated shots. Organize photos by location or finding, then use descriptive labels or captions to show how they relate to the report. The goal is a clear evidence trail, not an unfiltered camera roll that makes key details harder to find.
Can templates help create more professional reports?
Yes. A well-designed template provides consistent sections, headings, and prompts, helping teams follow a familiar structure and avoid overlooking information. It should still leave room for project-specific findings and context, rather than making every report identical. Review each completed report for accuracy and relevance; a template supports consistency but doesn’t guarantee quality. PHOTO iD offers custom inspection templates as part of its reporting platform.
How can field professionals create reports faster without sacrificing quality?
Capture and organize information during field documentation instead of reconstructing it later. Use consistent labels, concise notes, and a repeatable review checklist. PHOTO iD supports automated photo labeling, voice-to-text labeling, custom templates, and instant photo report generation to help organize report preparation. Before delivery, verify that findings are accurate, supporting evidence is relevant, and explanations are clear. Efficient tools can support the workflow, while your judgment guides the report.