

What happens to your project evidence if your phone fails before the photos are sorted, shared, or backed up? The fear of losing important project photos is real: a damaged device or accidental deletion can leave you scrambling. Even when images still exist, unclear labels and handoffs can make the right photo hard to find. Treat project photos as records worth protecting, not files to leave on one device.
Build a repeatable workflow from capture through backup. This guide shows you how to label photos consistently, organize them by project, and keep separate copies so one device failure doesn’t take everything with it. You’ll also learn what to check before relying on a storage or documentation tool.
Practical protection combines good capture and sorting habits with local and off-site backups and clear handoffs. Tools such as PHOTO iD can support photo organization with automated and voice-to-text labeling, custom inspection templates, and instant photo reports. Those features can make documentation easier to use, but they shouldn’t be mistaken for an independent backup. Capture clearly, label consistently, and back up separately.
Key Takeaways
- The fear of losing important project photos can come from missing files or images that exist but are impossible to identify. Address both risks.
- Use a layered process to capture, label, transfer, verify, and retain project images. The 3-2-1 rule offers a useful framework for backup redundancy.
- Compare storage, sync, backup, and documentation tools by practical needs such as offline access, recovery options, search, permissions, and retention controls.
- Give crews a simple daily routine and a consistent naming format that makes project images easier to locate without putting sensitive details in filenames.
- PHOTO iD’s labeling, templates, and reports can support inspection documentation, while independent backups remain separate.
Fear of Losing Important Project Photos: Identify the Real Risks
Project photos help teams make decisions, support reports, and revisit site conditions later. The fear of losing important project photos is understandable, but the risk isn’t limited to a file disappearing. An image may still exist but be mislabeled, buried among unrelated files, or disconnected from the project and area it documents.
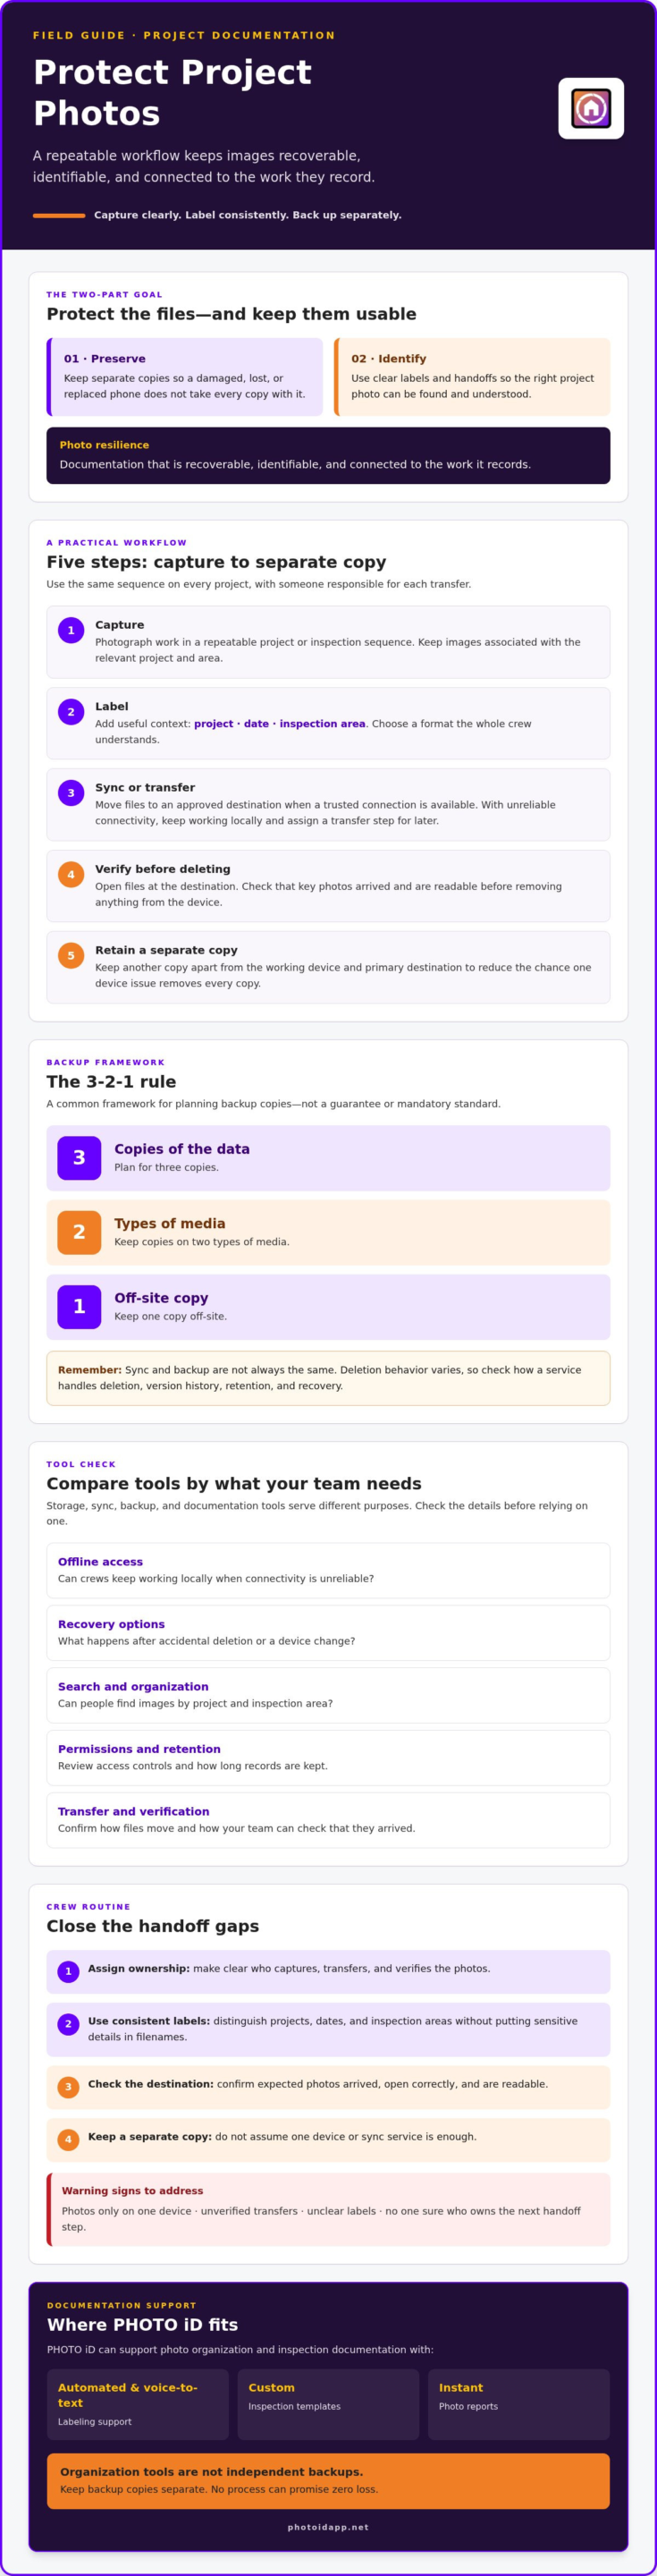
Photo protection has two connected parts: preserve the files and keep them usable. A backup can help with recovery; consistent labels and clear handoffs help people find the right image. The 3-2-1 backup rule is one familiar framework for planning backup copies. The next section explains how to use it within a broader workflow.
Which project-photo failures should field teams plan for?
A lost, damaged, or replaced phone can interrupt access to images stored locally. Accidental deletion and incomplete transfers can also leave gaps, particularly when nobody checks that files arrived at the destination. Handoffs create another risk: if no one owns capture, transfer, or verification, a step can be missed. Assign responsibility and build checks into the routine instead of relying on memory.
App and device behavior varies. Don’t assume photos sync automatically, remain available after a device change, or can be recovered after deletion. Before choosing a workflow, check the relevant platform’s storage, transfer, retention, and recovery details. A dependable routine reduces exposure, but no process can promise zero loss.
Why a folder full of photos is not enough
Keeping images is only the starting point. A useful project record needs enough context to identify the project, date, and area shown. Otherwise, a reviewer may have to open files one by one or ask a teammate what an image depicts. That slows reporting and weakens handoffs, even when every photo is technically still there.
Photo resilience means keeping project documentation recoverable, identifiable, and connected to the work it records. Look for these everyday warning signs:
- Images are stored on one device with no confirmed separate copy.
- Transfers finish without anyone checking that the expected photos arrived.
- Filenames or labels don’t distinguish projects, dates, or inspection areas.
- Team members aren’t sure who owns the next step in the photo handoff.
Use those gaps to set priorities: make each image easier to preserve, identify, and pass along.
How to Protect Project Photos with Layers of Backup
A reliable photo workflow has clear steps and a fallback for weak connections, busy crews, and missed handoffs. Rather than relying on one app or device, make sure images are captured, identified, transferred, checked, and kept in more than one place. This layered approach can ease the fear of losing important project photos without suggesting any process can eliminate risk.
Create a dependable capture-to-backup routine
Use the same sequence on every project. Keep the naming pattern consistent, and assign someone to own each transfer.
- Capture: Photograph work in a repeatable project or inspection sequence. Keep images associated with the relevant project and area.
- Label: Add identifying context, such as project, date, and inspection area. Choose a format the whole crew understands.
- Sync or transfer: Move files to an approved destination when a trusted connection is available. If connectivity is unreliable, keep working locally and assign a clear transfer step for later.
- Verify: Open files at the destination. Check that key images are present and readable before deleting anything from the device.
- Retain a separate copy: Keep another copy apart from the working device and primary destination, so one device issue is less likely to remove every copy.
Sync and backup aren’t always the same. Sync services help keep files aligned across locations or users, but deletion behavior varies. Depending on the service and its settings, deleting an image may remove it from synced locations too. Before trusting a system with project records, check how it handles deletion, version history, retention, and recovery.
Keep a separate copy and test recovery
The 3-2-1 backup rule is a common framework, not a guarantee or mandatory standard: keep three copies of data, on two types of media, with one copy off-site. Choose an approach that fits your team. Approved cloud storage, managed team storage, and encrypted external drives can each play a role, but confirm access, retention, and recovery details before adopting an option. Keep copies sufficiently separate so a single device problem or mistake is less likely to affect them all.
Test the process by restoring sample files to a separate location and confirming they open. A backup you can’t retrieve when needed isn’t a dependable recovery plan. Assign an owner and a regular schedule to check that copies are current, access still works, and restoration steps are clear. For teams handling growing libraries of project media, IBM’s overview of Digital Asset Management (DAM) explains how structured asset management can support finding and using files. For inspection photo organization, PHOTO iD photo documentation tools can support labeling and reporting workflows alongside separate backup arrangements.
Compare Project Photo Storage, Sync, Backup, and Documentation Tools
These tools solve related but different problems. Device storage keeps files close at hand. Sync can make them available across devices. Backup aims to provide another copy for recovery. Inspection documentation software helps organize images and connect them to reports or inspection workflows. Don’t assume one category covers all four jobs. Providers also vary in recovery, access, and retention controls.
| Tool type | Recovery and offline use | Team access and search | Exports and retention |
|---|---|---|---|
| Device storage | Available offline on that device; recovery may be limited if it’s lost or damaged. | Usually tied to the device user; findability depends on folders, filenames, and device search. | Files may be transferable, but retention depends on how the team manages the device. |
| Sync service | May support access across devices, depending on settings; offline access and recovery vary. | Sharing permissions and search tools vary by provider and plan. | Check supported exports, deletion behavior, version history, and retention settings. |
| Independent backup | Designed to provide another copy; recovery steps and offline access depend on the method. | Often less suited to day-to-day collaboration; confirm who can restore files. | Check restore options, backup coverage, and how long copies are retained. |
| Inspection documentation software | Offline use and recovery depend on the specific platform and should be verified. | May support structured labeling, project organization, and team workflows; confirm permissions and search features. | Check available export formats and retention controls before relying on it as a record repository. |
When does cloud sync help, and when is another copy needed?
Cloud sync can make project files easier to access from multiple devices, depending on the provider’s features and your settings. But sync isn’t automatically an independent backup. Deletion may carry across synchronized locations, and account-access problems can interrupt access. Review the service’s recovery and deletion policies, then consider a separate copy if project requirements and company policies allow it.
What should a field team check before choosing a tool?
Ask practical questions before committing: Can the crew capture or view files offline? Which formats can be exported? Who controls user permissions? Can administrators set retention? What recovery options are documented? Clarify who owns the images and how access changes when staff or contractors leave. These checks address the fear of losing important project photos without confusing organized documentation with protected files.
Storage keeps files, backup supports recovery, and documentation makes images useful. For teams comparing inspection workflows, explore this home inspection app guide. Check the platform’s current storage, export, retention, and recovery details separately before treating it as part of a backup plan.
Build a Project Photo Protection Checklist Your Crew Can Follow
A checklist turns good intentions into repeatable field habits. Use the same steps at setup, during capture, and before the crew closes out for the day. Keep the routine practical for busy sites and weak connections, and make one person responsible for confirming each handoff.
Set up consistent capture and labeling habits
Before the first site visit, create the project folder and agree on a naming format. For example, use ProjectCode_YYYY-MM-DD_Area_Sequence, such as PRJ42_2026-09-28_RoofNorth_001. Use an approved project code rather than a client name, address, or other sensitive detail if company policy calls for it. Keep originals according to your retention rules, even if you remove unnecessary duplicates from working folders.
- At job setup: Create the project location, confirm the naming convention, and check who is authorized to access the images.
- During capture: Photograph areas in a consistent sequence. Add labels or notes while the context is clear. Use voice notes or structured templates only if your chosen tool and workflow support them.
- Before leaving the site: Note any images still on a device because connectivity is limited. Assign who will complete the transfer and when.
- At handoff: Tell the recipient where the files are. Ask them to confirm they can access, identify, and open the relevant images, rather than relying on a sent message or transfer notification alone.
Verify the backup before the next job
Before the next job begins, check that the expected files reached the intended backup location and open a sample there. Confirm key images are present, readable, and labeled well enough to match them to the project. Record who performed the check and where authorized teammates can retrieve the files. Don’t clear device storage until the team has completed its verification steps and confirmed the applicable retention policy.
Keep account permissions, retention settings, and practices for sensitive property images aligned with company policy. Review the checklist after a device change, app update, or team-process change. These are useful points to confirm that capture, transfer, access, and recovery steps still work as intended. A routine won’t remove every risk, but it can make missing files and unclear ownership easier to catch.
For a more consistent inspection documentation workflow, explore PHOTO iD photo labeling and reporting tools. Its automated and voice-to-text labeling, custom inspection templates, and instant photo reports can support organized documentation. Keep separate backup and recovery procedures in place, and verify the platform’s current storage and export capabilities before relying on them.
Make Project Photos Easier to Find, Document, and Share
A protected image still needs to be useful. Clear labels and a consistent documentation process help teams connect photos to the right project, inspection area, and report. Photo organization software can make images easier to identify and retrieve, but organization is not a backup. Keep a separate-copy routine in place.
Where inspection documentation software fits in the workflow
Inspection documentation tools can support the steps between capture and review. PHOTO iD offers automated photo labeling and voice-to-text labeling to help add context to images. Custom inspection templates give teams a structured way to document inspections, while instant photo reports bring relevant documentation together for review and sharing.
Clear labels and consistent reports can make handoffs easier by giving the next person more context than an unlabeled camera roll. A team management dashboard also supports project oversight. Organized reporting can help teammates review and share documentation, but it doesn’t prove that the original files are independently backed up.
Choose a tool that supports your documentation process
Match the tool to the work your team does. Check whether its labeling approach fits your inspection process, whether the templates reflect the details you need to record, and whether the reports suit your review and handoff needs. Consider team oversight and field usability too. Confirm available export formats and test how your crew would retrieve or share files.
Before treating an app as part of a backup plan, verify its current storage, synchronization, retention, and recovery capabilities. Don’t infer those protections from photo organization or report-generation features. Keep backup responsibilities and destinations clear, even when documentation software streamlines the work.
If you’re looking to improve inspection photo organization, explore PHOTO iD and consider how its labeling, templates, reports, and team oversight tools fit your process. Pair documentation that’s easy to follow with an independent backup routine. That way, images are easier to find, explain, and pass along when the project needs them.
Make Every Project Photo Easier to Trust and Find
The fear of losing important project photos doesn’t have to dictate your workflow. Build protection into the routine: capture and label images consistently, transfer them to approved destinations, verify they open, and keep a separate copy. Treat syncing, backup, and documentation as different functions, and check recovery and retention details rather than assuming one tool covers them all.
Make every handoff count. Use clear project labels, confirm teammates can access the right files, and assign responsibility for checking transfers. These steps help protect images and make them easier to retrieve when decisions, reports, or later reviews depend on them.
PHOTO iD supports inspection documentation with automated photo labeling and voice-to-text labeling, custom inspection templates, instant photo report generation, and a team management dashboard for project oversight. These tools can help organize and communicate inspection photos, but they don’t replace an independent backup plan.
Explore PHOTO iD for organized inspection photo documentation and consider how its tools fit your process. Pair clear documentation with a repeatable, independent backup routine so project records are ready for the next person who needs them.
Frequently Asked Questions
What is the safest way to back up project photos?
Keep multiple copies, including at least one separate from the device used to capture the images. The 3-2-1 rule is a common planning framework, not a guarantee: it recommends three copies on two types of media, with one copy off-site. Confirm transfers complete, open files at the destination, and test restoring sample images. Check your company’s retention, access, and security policies before choosing storage.
Does cloud syncing count as backing up project photos?
Not necessarily. A synced library can make images available across devices, but protection depends on how the service handles deletion, version history, and account access. If a change or deletion propagates, synchronized copies may not provide independent recovery. Review the provider’s settings and documentation, then keep a separate, company-approved copy of important project records. Test recovery instead of assuming sync alone will restore files.
Can I recover project photos after deleting them from my phone?
Possibly, but recovery depends on the phone, app, cloud service, deletion timing, and whether a backup or recently deleted folder is available. Don’t assume recovery is guaranteed. Avoid saving new files or making unnecessary changes that could overwrite local data, then check the relevant device or service recovery options. If the images are work records, contact your organization’s IT support promptly and follow its procedures.
How often should project photos be backed up?
Choose a schedule based on the project’s importance, how many images crews capture, site connectivity, and company policy. For active field work, build transfer verification into the end-of-day routine, and confirm files are accessible before removing originals from a device. Projects with higher documentation requirements may call for more frequent checks. There’s no single cadence for every team, so assign an owner and make the schedule explicit.
How can a team keep project photos organized and easy to find?
Use a consistent folder structure and labels that identify the project, date, area, and image sequence without exposing sensitive details. Assign clear ownership for organizing and transferring files, and tell teammates where authorized images are stored. At handoff, ask the recipient to open the relevant files and confirm they can identify them. Inspection templates and automated labeling can support organization, but check backup and retention separately.
Can inspection photo software replace a separate backup system?
Don’t assume it can. Inspection documentation software may help capture, label, organize, and report images, while backup and recovery depend on the tool’s confirmed features and settings. Ask the provider about storage, exports, retention, deletion behavior, and restoration options. Keep an approved independent backup process unless the software’s documented capabilities meet your organization’s requirements. Confirm the details directly instead of treating organized reports as proof of recoverable copies.