
Great estimates aren’t built at a desk; they’re won in the field through structured, automated photo documentation. You know the drill. You spend all day climbing roofs and inspecting damage, only to face a second shift of “photo hell” once you get home. Manually adding photos to a claim report, matching messy field notes to unlabeled images, and dragging files into folders can easily eat up three hours per claim. It’s a frustrating bottleneck that delays your approvals, complicates your workflow, and kills your hourly profit.
It’s time to stop the manual grind and start working smarter. This 2026 efficiency guide shows you how to streamline your documentation, automate your labeling, and slash your estimating time in half. We’ll dive into the latest mobile workflows and intelligent automation features that turn onsite chaos into professional, carrier-ready evidence. We’ll show you how to capture, label, and sync your data with total precision. Get ready to master instant photo reports, eliminate rejections, and reclaim your evenings with a faster, cleaner, and more professional documentation process.
Key Takeaways
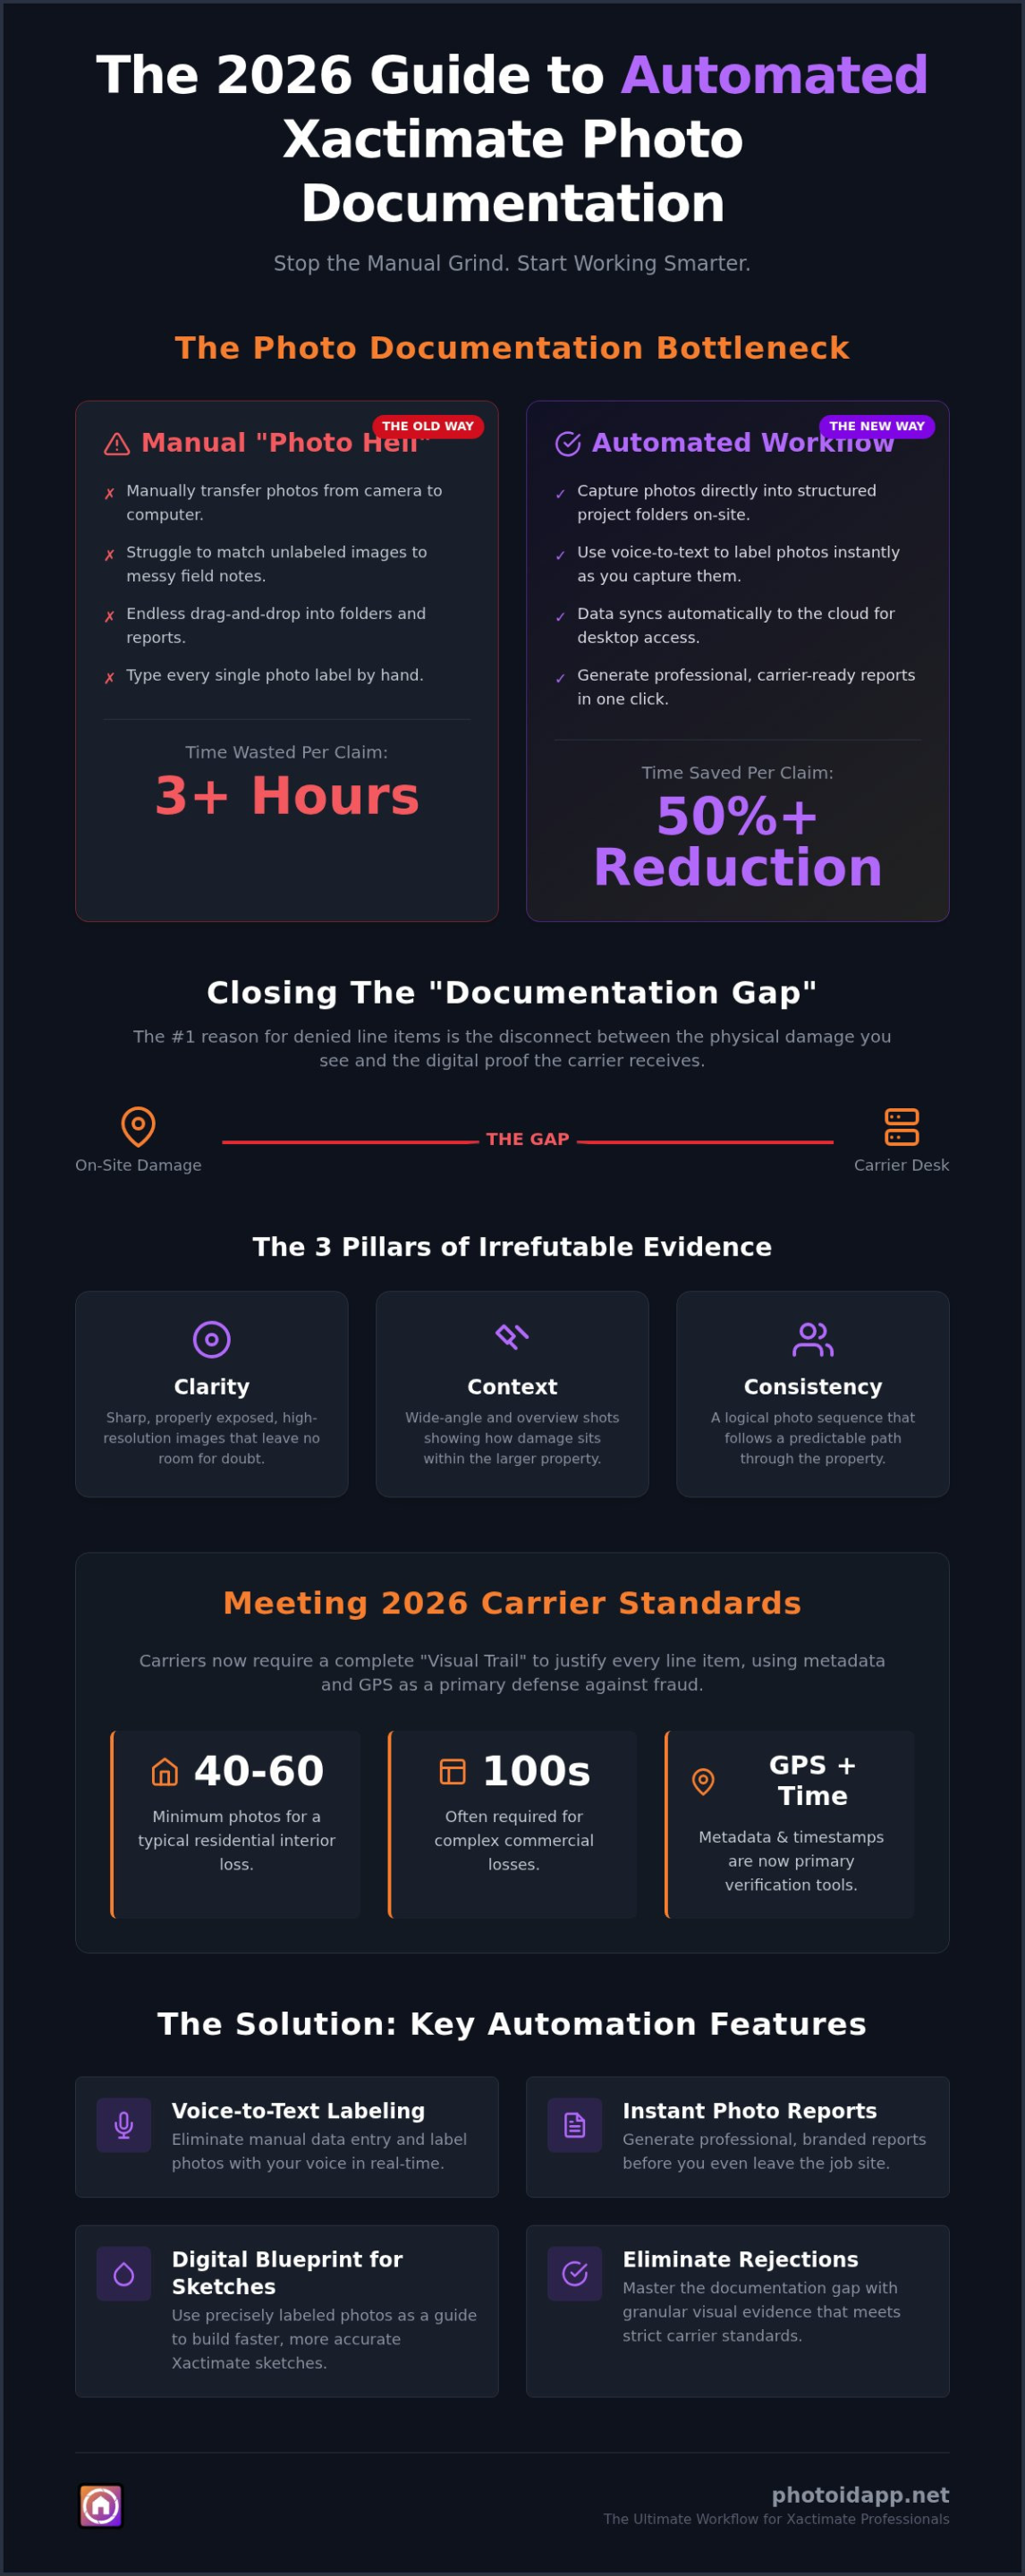
- Master the documentation gap by capturing granular visual evidence that meets strict 2026 carrier standards.
- Discover the fastest methods for seamlessly adding photos to your Xactimate reports using both mobile and desktop interfaces for maximum flexibility.
- Eliminate manual data entry with voice-to-text labeling that slashes your documentation time in half!
- Use your labeled photos as a digital blueprint to build faster, more accurate Xactimate sketches.
- Transform your field workflow with automated tools that generate instant, professional photo reports before you even leave the jobsite.
Why Photo Documentation is the Backbone of Xactimate Estimates
Your estimate is only as good as your evidence. In 2026, the “Documentation Gap” is the primary reason for denied line items and slashed totals. This gap represents the disconnect between the physical damage you saw on-site and the digital proof the carrier receives. If an examiner can’t verify the loss from their desk, the line item gets cut. High-volume adjusters don’t just take pictures; they build a visual narrative based on sound digital imaging principles to ensure every pixel justifies a dollar amount. Simply “taking photos” is no longer enough to survive a rigorous audit.
Professional reports rely on three non-negotiable pillars. First is Clarity; every image must be sharp, properly exposed, and high-resolution. Second is Context; you must provide wide-angle shots that show how the damage sits within the room. Third is Consistency; your photo sequence must follow a logical, predictable path through the property. When you master these three pillars, adding photos to xactimate report becomes a powerful tool for instant approval rather than a tedious administrative chore. Capture the truth. Close the file. Get paid.
The Financial Cost of Messy Photos
Messy documentation is a silent profit killer. Every unlabeled photo acts as a speed bump for the claims process. When an examiner sees a pile of random, disorganized images, they immediately start questioning your judgment. These questions lead to supplements, back-and-forth emails, and weeks of payment delays. We define Estimate Integrity as the seamless alignment of visual evidence and line items. When your photos tell exactly the same story as your estimate, approvals happen in hours instead of weeks. Stop guessing and start documenting with precision.
Xactimate Photo Requirements in 2026
Carrier standards have tightened significantly. For a typical residential interior loss, you are now looking at a minimum of 40 to 60 photos to cover all angles and pre-existing conditions. Commercial losses often require hundreds of images to document complex structural systems and specialized equipment. Carriers now use metadata and GPS timestamps as a primary defense against fraud, verifying exactly when and where each shot was taken. You are essentially building a “Visual Trail” for structural repairs. This trail must document the necessity behind every demolition and reconstruction task when you are adding photos to xactimate report. If the trail is broken, the payment stops.
Step-by-Step: Adding Photos to Xactimate (Mobile and Desktop)
Efficiency in the field depends on your ability to navigate the software without thinking. When you are adding photos to xactimate report, you are building the foundation of your claim. You need speed. You need structure. You need a system that doesn’t crash when you upload fifty high-res images at once. Mastering both mobile and desktop workflows ensures you stay flexible regardless of site conditions. Capture the truth, label the damage, and move to the next room.
Using Xactimate Mobile for Real-Time Capture
Open your project on your tablet or phone. Tap the hamburger menu in the top left corner. Navigate directly to the Photos tab. This is where the heavy lifting happens. You have two choices: use the live ‘Camera’ or pull from your ‘Photo Library.’ For most inspections, the live camera is your best friend. It saves images directly into the project, reducing the risk of lost files or messy camera rolls.
Structure your report before you snap the first shutter. Create folders for every room. Label them clearly: Kitchen, Master Bath, Roof, and Elevations. This organization mirrors the physical property layout and makes the estimating process seamless. If you encounter sync issues, check your cloud status immediately. Always ensure your mobile device has finished uploading before you open the project on your desktop. Following forensic best practices for digital evidence ensures your mobile captures remain untampered, credible, and ready for carrier review.
Desktop Uploads: Organizing the ESX File
Managing large sets of images can be a nightmare. You have to click, type, and click again for every single label. It’s a slow, manual process that eats your profit margins. If you want to bypass the manual rename-and-drag struggle, consider using a specialized photo organization app that automates the heavy lifting before you even open your laptop. This pre-work approach ensures that when you are adding photos to xactimate report, they are already labeled, categorized, and ready for approval. Capture. Sync. Succeed. This workflow ensures that your documentation is bulletproof, your labels are precise, and your time is spent on the estimate, not the admin work.
The Labeling Crisis: Why Manual Entry Kills Your Productivity
Typing labels on a cracked phone screen in the middle of a rainstorm isn’t just annoying. It’s a massive financial drain. Many adjusters argue that labeling in the field takes too long, so they dump hundreds of unlabeled images into a folder and head home. This decision creates the dreaded “Office Headache.” Two days later, you’re staring at twenty identical photos of wet drywall, trying to remember which one belonged to the pantry and which was in the hall closet. This confusion leads to “Photo Hunting,” a time-wasting cycle that happens when you’re trying to build your sketch and can’t find the evidence you need.
Professionalism requires a systematic approach to evidence. Following a formal SOP for Photographic Documentation ensures that your files are audit-ready and easy to navigate. When you’re adding photos to xactimate report, your labels must be instant and accurate. If you wait until you’re back at the office, the details are already fading. Structured labeling isn’t a luxury; it’s the only way to maintain a high-volume workflow without losing your mind or your profit margins.
Voice-to-Text: The Game Changer for Field Adjusters
Stop fighting with your mobile keyboard. PHOTO iD’s voice-to-text feature allows you to dictate descriptions as you walk through the property. Speak the label, and the app writes it instantly. This technology eliminates the need for manual typing and allows you to maintain focus on the damage. Automated labeling acts as a digital assistant for the estimator, providing immediate context for every line item in the file. It standardizes labels across your entire team, ensuring that every report looks professional, consistent, and ready for carrier review. Speak it. Save it. Done.
Custom Templates for Every Loss Type
Memory is a poor substitute for a checklist. Whether you’re inspecting a complex HVAC system, a steep roof, or a flooded basement, custom templates ensure you never miss a critical shot. These templates guide you through a logical walk-through, prompting you for specific angles that carriers demand in 2026. This systematic approach is vital when adding photos to xactimate report because it guarantees the “Visual Trail” is complete. By using mandatory photo checklists, you can reduce the risk of frustrating site re-visits by 90%. You get the right photos the first time, every time. Capture with confidence and close your files faster.
Advanced Workflow: Integrating Photos with Xactimate Sketch
A sketch is the skeleton of your estimate. But a skeleton without muscle is useless. Use your labeled photos as a high-speed cheat sheet for building an accurate sketch. When you start adding photos to xactimate report, you aren’t just checking a box for the carrier. You are building a reference library that defines your sketch’s accuracy. Match your photo annotations to Xactimate variables like ceiling height and wall length to eliminate guesswork. This integration ensures your line items are backed by visual proof that matches your digital geometry. Build it right. Build it once.
Validating Measurements with Visual Evidence
Prove your dimensions. Carriers in 2026 demand more than just a number on a screen. Take photos of your tape measure in place. Use these images to justify non-standard room shapes and avoid the “Missing Wall” trap. If a room has a unique offset or a complex structural detail, a labeled photo is your best defense. It validates your sketch and secures your line items. Stop fighting over supplements and start providing the proof up front.
Exterior work requires even more precision. Use aerial measurements to validate your on-site photo documentation. This dual-layered approach ensures your roof and wall sketches are bulletproof. By integrating these visual data points, you create a report that is impossible to deny. You aren’t just estimating; you’re providing a forensic level of detail that commands respect and ensures faster approvals. Capture. Validate. Win.
Mastering Photo Annotations and Arrows
Use the tools at your disposal. The ‘Annotate’ tool in Xactimate Mobile allows you to circle specific damage points instantly. Add text overlays to emphasize moisture meter readings or specific material types. This visual emphasis guides the examiner’s eye exactly where you want it. It removes ambiguity. It clarifies the scope. It speeds up the entire review process by highlighting exactly what needs repair.
Speed up your sketching by using the ‘Spacebar’ and ‘Vertex’ tools alongside your visual references. When your photos are pre-labeled and organized, your sketch time drops. You aren’t hunting for a specific wall length; you’re looking at a photo that tells you the answer. This synergy between the physical site and the digital sketch is what separates high-volume professionals from the rest of the pack.
Stop wasting time on manual organization and messy field notes. If you want to transform your photos into a high-velocity blueprint for your estimate, start your PHOTO iD subscription today and automate your entire field workflow. Capture the damage, label the details, and sync your data with total precision!
The Ultimate Workflow: From PHOTO iD to a Final Xactimate Report
Efficiency isn’t just about working harder; it’s about eliminating redundant steps. The transition from the field to the office is where most adjusters lose their momentum. By implementing a unified “Field-to-Desktop” workflow, you can turn a three-hour struggle into a thirty-minute victory. This process starts on the jobsite and ends with a finalized ESX file that carriers can’t wait to approve. Follow these steps to master the workflow. Capture. Sync. Succeed!
- Step 1: Conduct the walk-through. Use the PHOTO iD app to capture every angle of the loss. Utilize voice-to-text labeling to describe damage as you see it. No typing. No delays. No mistakes.
- Step 2: Generate the report. Create an instant photo report before you even leave the driveway. This document serves as your estimate’s blueprint, keeping your facts straight and your measurements organized.
- Step 3: Sync and Upload. Move your organized, labeled images directly into your project. When you are adding photos to xactimate report, they are already categorized, descriptive, and audit-ready.
- Step 4: Build the Sketch. Use your labeled photo trail to validate every wall length and ceiling height. The photos guide your line item selection, ensuring you never miss a supplement-worthy detail.
- Step 5: Export and Submit. Finalize your ESX file and send it off. Your documentation is bulletproof. Your estimate is accurate. Your job is done.
Standardizing the Process for Teams
Managing a team of adjusters requires total visibility and zero guesswork. With the PHOTO iD dashboard, managers can provide real-time project oversight from the home office. You can review field documentation the moment it’s captured, spotting missing measurements before the adjuster even leaves the site. This structured approach reduces training time for new hires and ensures every report meets your firm’s professional standards. Consistency builds trust. Trust builds profit.
The Future of AI-Driven Documentation
The industry is changing fast. AI is now beginning to recognize damage patterns in photos, suggesting line items based on visual evidence. The most successful firms are already moving away from manual photo entry to stay ahead of the curve. Don’t get left behind in the “photo hell” of previous years. Embrace the speed of automation. It’s time to restore order to the chaos of onsite documentation. Start your free trial of PHOTO iD and automate your Xactimate workflow today!
Master Your Workflow and Reclaim Your Time
Stop letting manual documentation drain your daily profits. You now have the roadmap to transform your field inspections from a chaotic struggle into a high-velocity victory. By mastering the art of adding photos to xactimate report with speed and precision, you ensure faster carrier approvals and eliminate the nightmare of endless supplements. The old way of typing labels on a jobsite is officially dead. It’s time to embrace a system that works as hard as you do.
Founded by “The Claims Coach” Ken Perry, PHOTO iD was built by adjusters for adjusters. Thousands of professional field experts already trust this platform to handle their most complex documentation needs. Our voice-to-text labeling is a true game-changer, saving you 50% on field time and letting you focus on the damage instead of a keyboard. Don’t settle for “photo hell” when you can have a digital assistant in your pocket.
Streamline your Xactimate workflow with PHOTO iD-Get Started for Free!
Take control of your documentation today. Restore order to the chaos. Scale your business with total confidence!
Frequently Asked Questions
What is the fastest way to add photos to an Xactimate report?
The fastest way to add photos to an Xactimate report is to use an automated pre-work tool that handles labeling and organization in the field. Tools like PHOTO iD allow you to capture and categorize images instantly. This eliminates the need for manual dragging and dropping later. You simply sync your organized files and move straight into the estimating phase. Speed is profit. Capture. Sync. Succeed.
How do I label photos in Xactimate Mobile?
Open your project in the mobile app and navigate to the Photos tab. Tap any image to open the detail view and select the ‘Description’ or ‘Label’ field. You can then type your label or use your phone’s native dictation. For a truly professional result, ensure your labels are consistent across every room in the property. Consistency builds trust with carriers.
Can I import a photo report into Xactimate?
Yes, you can import labeled images from a third-party photo report into your Xactimate project. This is a common workflow for high-volume adjusters who want to bypass the software’s native upload limitations. Using an external report as a blueprint helps you maintain accuracy when you’re adding photos to xactimate report. It keeps your evidence structured and easy to review. Clean data leads to fast approvals.
Does Xactimate support voice-to-text labeling?
Xactimate has introduced AI-assisted descriptions, but dedicated voice-to-text labeling is best handled by specialized field apps. These tools allow you to dictate complex descriptions while you walk the loss. This technology saves you hours of office work. It ensures that every photo has a clear, professional description the moment it’s taken. Stop typing and start speaking!
How many photos should I include in a standard Xactimate report?
Aim for a minimum of 40 to 60 photos for a standard residential claim. Commercial losses often require hundreds of images to document complex structural damage. Every line item in your estimate should have a corresponding photo to justify the cost. Follow the “Visual Trail” to ensure your report is audit-ready and easy for carriers to approve. More proof means fewer supplements.
What is the best app for automated photo labeling for adjusters?
PHOTO iD is the premier choice for adjusters who need automated photo labeling. It integrates voice-to-text technology and custom templates to slash your documentation time in half. It’s built by industry experts who understand the daily grind of field inspections. Stop fighting with your keyboard. Start using a tech-savvy ally that restores order to the chaos of onsite documentation!
How do I organize photos by room in Xactimate?
Navigate to the Photos tab in your project and create individual folders for each room. Name them clearly, such as “Kitchen” or “Master Bedroom,” to mirror the property’s physical layout. This structure makes adding photos to xactimate report much simpler. It also provides a logical sequence for anyone reviewing the file later. Organized files get paid faster.
Can I add annotations to my Xactimate photos on a mobile device?
You can add annotations directly within Xactimate Mobile by using the built-in ‘Annotate’ tool. This feature allows you to draw circles around damage or place arrows to highlight specific points of interest. You can also add text overlays to clarify moisture readings or material types. Clear annotations remove ambiguity and lead to faster claim settlements. Point out the facts!