
With over $5.6 billion paid out in hail-related claims by State Farm alone last year, insurance carriers are tightening their grip on 2026 approvals like never before. You’ve felt the pressure. You spend hours on a hot roof, circle every hit, and capture hundreds of photos, yet you still struggle with how to document hail damage on a roof so the claim actually sticks. One missed label or a “wear and tear” excuse from an adjuster can stall your project for weeks.
We understand the grind. You want to focus on the inspection, not the paperwork. This guide provides the master workflow to establish an undeniable link between the storm and the damage. Stop wasting your evenings on manual data entry. Start producing professional, labeled reports before you even climb down the ladder. It’s time to restore order to the chaos of onsite documentation and regain your competitive edge.
Expect a deep dive into the 2026 documentation standards, the essential test-square methodology, and the automated tools that slash your reporting cycle times by 40%. Capture the data. Label the damage. Win the claim!
Key Takeaways
- Identify functional damage by detecting shingle bruising and compromised water-shedding capabilities to satisfy 2026 insurance standards.
- Follow the professional 4-point inspection workflow to learn exactly how to document hail damage on a roof while establishing clear storm directionality.
- Deploy the chalk test and scale markers to capture high-impact evidence that eliminates adjuster excuses and “wear and tear” denials.
- Eliminate the manual labeling headache by using PHOTO iD to generate instant, professional reports directly from the field.
- Secure faster approvals by avoiding common pitfalls like poor lighting and missing context shots that stall the claim cycle.
The Anatomy of Hail Damage: What Adjusters Look For
Functional damage isn’t just a dent. It’s a failure. Adjusters define it as a reduction in the roof’s ability to shed water or a direct decrease in its expected service life. When you’re learning how to document hail damage on a roof, you must focus on shingle “bruising.” These circular fractures in the asphalt mat are often invisible to the naked eye. You’ll feel them as soft spots, similar to a bruised apple. Don’t confuse these with manufacturing defects or heat blisters. Blisters usually pop upward from trapped gases. Hail impacts drive granules downward into the mat. It’s a physical crush, not a chemical release.
Carriers rely on the “hit” criteria. Most insurance standards require 8 to 10 verifiable hits within a 10×10 foot test square on each slope to justify a full replacement. If you can’t find those numbers, your claim is dead on arrival. You need to be precise. You need to be fast. You need to be undeniable. Standardizing your inspection squares ensures your data matches the adjuster’s expectations perfectly.
Direct vs. Collateral Damage
Direct damage includes fractured fiberglass mats and displaced granules on the shingle surface. While essential, these aren’t always enough to win. Collateral damage is your “smoking gun.” Look for dents in soft metals like ridge vents, box vents, and flashing. Understanding All About Hail formation helps you realize that if a storm is strong enough to dent a galvanized vent, it’s strong enough to ruin a shingle. Documenting these dents establishes a clear storm date. It proves the intensity of the event. Capture the downspouts. Check the siding. Photograph the window wraps. These secondary hits confirm the storm’s directionality and intensity, leaving no room for “wear and tear” excuses.
The Role of Granule Loss
Hail impacts accelerate the loss of the protective mineral layer. This leaves the asphalt mat exposed to UV rays, leading to rapid deterioration. Look for “granule dams” in the gutters. These piles of minerals are physical proof of a recent high-impact event. When photographing this, avoid angles that look like standard foot traffic wear. Focus on the impact crater itself. Show the granules embedded in the mat, not just scattered on the surface. This distinction separates a professional inspection from an amateur guess. High-resolution shots of gutter debris provide the context adjusters need to approve the claim. Use these visuals to tell a story of total roof compromise.
The Professional 4-Point Inspection Workflow
Speed is everything on a jobsite. You need a repeatable system that leaves no room for doubt. This 4-point workflow ensures you capture every detail while maintaining a safe, logical progression. It’s the gold standard for how to document hail damage on a roof in 2026. Mastering how to document hail damage on a roof requires more than just a camera; it requires a strategy that links every dent to the storm event. Move with purpose, follow the sequence, and build an undeniable case.
Step 1: Ground-Level and Elevation Overviews
Start at the curb. Capture wide-angle directional photos for all four elevations: North, South, East, and West. This property orientation is vital for matching weather data to the structure. Document the “line of sight” from the ground up to highlight missing shingles or displaced components. These wide-angle shots are your best defense against fraud accusations because they show the entire context of the property before you zoom in on specific hits. Establish the baseline before you ever set foot on a ladder.
Step 2: The Soft Metal and Collateral Sweep
Don’t climb the ladder yet. Scour the perimeter for collateral damage. Check window screens, downspouts, and garage doors for high-velocity impact marks. Pay special attention to the AC condenser fins. Hail hits here are nearly impossible for adjusters to dispute. If the dents are shallow, use a side-lighting technique. Hold your light or position your camera at an angle to create shadows that make the damage pop. This cumulative evidence builds a rock-solid case. For even faster results, you can use an inspection camera app to organize these collateral shots instantly.
Step 3: The Roof Surface and Test Squares
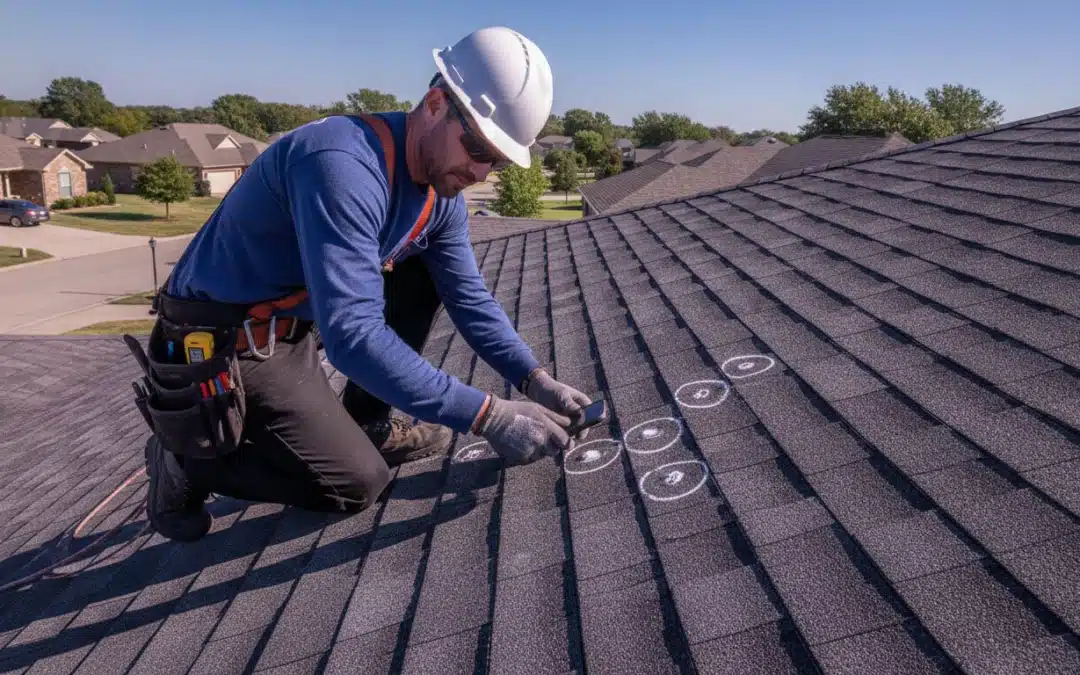
Now, get on the roof. Your primary goal is to find the most damaged slope and mark a 10×10 foot test square with chalk. This is the industry standard for justifying a full replacement. Photograph every single impact within that square to meet the carrier’s threshold requirements. Be meticulous. If you find 12 hits, document 12 hits. Don’t forget to capture the ridge. Showing the storm’s path across the peak of the house provides a clear narrative of the weather event. It proves the hail didn’t just hit one spot but swept across the entire structure.
Step 4: Ancillary Structures and Final Proof
Conclude your inspection by walking the rest of the property to find ancillary damage. Document the fence, the garden shed, and any outdoor furniture or play sets. Each dented surface adds a layer of proof to your file. By the time you’re done, you’ll have a comprehensive record that establishes the storm’s intensity and directionality with absolute certainty. This cumulative evidence file makes it nearly impossible for an adjuster to claim the damage is pre-existing or unrelated to the recent storm event. Finish strong and leave the site with a complete data set.
Capturing Evidence That Adjusters Can’t Deny
Scale is the difference between a guess and a claim approval. When you’re identifying impact diameters, never photograph a hit without a reference point. Use a professional hail gauge or a simple coin to provide immediate context for the adjuster. Mastering how to document hail damage on a roof requires more than just a clear lens; it requires undeniable proof of size and severity. Execute the “Chalk Test” with precision. Rub your chalk lightly over a suspected hit. This reveals the circular fracture in the mat that the eye might miss. It turns a debatable smudge into a documented impact.
Expect adjusters to claim “old wear” or “manufacturing defects.” Counter this objection with physical proof. Fresh hail hits expose the underlying asphalt mat, which appears dark, oily, and un-weathered. Older damage looks gray, oxidized, and filled with dirt. If the bruise shows fresh asphalt, it happened recently. Pair this visual evidence with mandatory 2026 technical standards. Every photo must contain EXIF data, including GPS coordinates and time-stamps. This digital signature proves you were at the right property at the right time. It eliminates any question of authenticity.
Label Every Shot with Precision
A folder full of 200 unlabeled photos is a liability, not an asset. A single photo of a dent is useless without a specific label like “North Slope, Test Square 1, 1.5-inch impact.” Manual labeling is the fastest way to hit a wall of “photo fatigue” and introduce errors into your report. You need a system that works as fast as you do. Voice-to-text labeling allows you to dictate descriptions while your hands are still on the ladder or holding the gauge. This ensures every image is categorized correctly the moment it’s captured. Organized data wins claims. Random photos cause denials.
Verify the Date of Loss
Establish a rock-solid Date of Loss (DOL) by cross-referencing your site evidence with National Weather Service or NOAA hail reports. Don’t just document one house. Document the storm’s footprint across the entire neighborhood. Photograph dented mailboxes, shredded window screens, and bruised trees on adjacent properties. This neighborhood-wide context proves the storm event was widespread and intense. Create a clear damage timeline that links the specific weather data to the physical evidence on your client’s roof. When the weather report matches your GPS-tagged photos, the carrier has no choice but to acknowledge the loss.

Avoiding Common Documentation Mistakes That Kill Claims
Even the most damaged roof can result in a denied claim if your presentation is flawed. Adjusters look for any reason to flag a file as “insufficient,” and your documentation habits are often the first place they find it. Knowing how to document hail damage on a roof means knowing what to avoid. Lighting is the most frequent offender. Stop shooting at high noon. The mid-day sun creates harsh vertical shadows that wash out the texture of the shingle and hide subtle bruising. If you can’t see the impact crater in the photo, the adjuster won’t see it in the report. Schedule your inspections for early morning or late afternoon to let natural side-lighting reveal the true extent of the mat fractures.
Organization is your next hurdle. Sending a zip folder of 200 unnamed photos like “IMG_0432.jpg” is an invitation for a denial. It forces the adjuster to guess the location and significance of every shot. They won’t do your work for you; they will simply move to the next file. Don’t forget the ridge and valleys. Hail often concentrates in these areas due to the angle of the slopes, yet many inspectors skip them entirely. Capture these high-impact zones to provide a complete picture of the storm’s path across the structure. Stop fighting with disorganized folders and generate professional, branded PDF reports instantly while you’re still on the jobsite.
The ‘Insufficient Evidence’ Trap
Adjusters deny claims when they can’t verify exactly where a photo was taken. Close-ups of a bruise are meaningless without context. Use “transition shots” to bridge the gap. Start with a wide view of the slope, move to a medium shot of the test square, and then go tight on the specific impact. This logical sequence creates a digital map that adjusters can follow without confusion. Always document un-damaged slopes as well. Showing a fair and balanced inspection builds professional credibility and proves you aren’t just “cherry-picking” hits to force an approval.
Over-Documentation vs. Quality Documentation
More photos don’t equal a better claim. 500 blurry or redundant shots cause “photo fatigue” and slow down the review process. Follow the “Rule of Three” for every significant piece of damage: Wide, Medium, and Tight. This tells a complete story in just three frames. Combine these high-quality visuals with aerial measurements to establish an accurate scope of loss from the start. Mastering how to document hail damage on a roof requires a shift from quantity to quality. Focus on capturing the data points that matter, such as impact diameters and directional evidence, to ensure your cumulative evidence file is undeniable.
Streamline Your Claims with PHOTO iD Automation
Stop bringing the job home with you. Manual labeling is a relic of the past that drains your productivity and delays your payments. When you master how to document hail damage on a roof with PHOTO iD, you replace hours of tedious data entry with seconds of automated efficiency. Our app organizes your photos as you take them. No more scrolling through a cluttered gallery at 9:00 PM trying to remember which slope had the three-inch hit. Capture the image. Tag the location. Move to the next slope. It’s that simple.
Safety and speed go hand-in-hand with our voice-to-text labeling feature. Keep your hands on the ladder and your eyes on the shingles. Dictate your findings directly into the app to create instant, accurate descriptions. Once the inspection is complete, sync your field data to the team management dashboard. This provides the home office with real-time oversight and ensures every team member follows the same high standard. You aren’t just taking pictures; you’re building a professional evidence file that is ready for review before you even start your truck.
Accelerate Approvals with Professional Reports
Carriers respect organized data. When you provide a standardized, easy-to-read report, you eliminate the friction that causes claim delays. Our instant photo report generation creates professional, branded PDFs that are optimized for major estimating platforms and claims management systems. These reports make it effortless for adjusters to import critical data without the usual confusion. You reduce the back-and-forth by answering every question before they ask it. Building this level of trust through software-driven documentation positions you as a top-tier professional who values the carrier’s time as much as your own.
The ROI of Automated Inspection Software
Time is your most valuable asset. Professionals who automate their reporting see a dramatic decrease in claim cycle times and administrative overhead. Calculate the hours you currently spend every week on “office nights” just labeling and organizing photos. By eliminating that manual headache, you free up your schedule for more inspections and more revenue. Faster reporting leads to faster claim resolutions and consistently happier clients. Don’t let paperwork be the bottleneck in your business growth. Stop wasting time on manual labels, get PHOTO iD today! Take control of your workflow and turn your documentation into a competitive advantage.
Win More Claims with Superior Evidence
You’ve seen the 2026 standards. You know the master workflow. Mastering how to document hail damage on a roof is no longer a guessing game; it’s a science of speed and precision. By following a structured 4-point inspection and focusing on high-impact collateral evidence, you eliminate the “insufficient data” excuses that stall your revenue. Organized data doesn’t just win claims; it builds your reputation as an undeniable expert in the field.
Don’t let the office night drain your energy. Transition from manual chaos to digital order. Thousands of field professionals nationwide already trust PHOTO iD to handle the heavy lifting. Founded by “The Claims Coach” Ken Perry, our platform is built by industry veterans who intimately understand your daily grind. It’s time to reduce your claim cycle times by up to 40% and restore the value of your saved hours.
Start Your Free Trial of PHOTO iD and Automate Your Inspections! Take the headache out of reporting. Capture the damage. Close the claim. Scale your business!
Frequently Asked Questions
How many photos are needed for a roof hail damage claim?
Most professional inspections require 100 to 200 photos to be comprehensive. You need wide-angle shots of all four elevations, medium shots of every test square, and tight macros of individual shingle bruises. Don’t forget collateral damage on vents, gutters, and siding. While volume is important, the logical organization of these images is what actually prevents claim denials.
What is the best time of day to photograph roof damage?
Early morning or late afternoon is the gold standard for roof photography. High-noon sun creates harsh vertical shadows that wash out mat fractures and hide subtle bruising. Lower sun angles provide natural side-lighting that highlights the depth and texture of impact craters. If you must inspect at mid-day, use a high-powered inspection light to reveal hidden shingle damage.
Can I use my phone camera for professional hail documentation?
Modern smartphone cameras are perfectly capable of capturing high-resolution evidence. However, your standard photo gallery is not enough. You need a dedicated inspection app to manage how to document hail damage on a roof correctly. Professional software embeds the mandatory GPS coordinates and EXIF time-stamps required for 2026 insurance standards, ensuring your evidence is authenticated and undeniable.
What is a ‘test square’ in a roof inspection?
A test square is a 10×10 foot area marked on a roof slope to measure damage density. This is the industry standard for determining if a roof qualifies for a total replacement. Most insurance carriers require a threshold of 8 to 10 verifiable hits within this square. Documenting these hits with scale and clarity is the most critical step in the approval process.
How do I prove hail damage is new and not old wear and tear?
Fresh hail hits expose the dark, oily asphalt mat that hasn’t been weathered by UV rays. Old damage looks gray, oxidized, and often contains dirt or biological growth. You can also prove a recent storm by documenting “collateral damage” on soft metals. Fresh, shiny dents in aluminum ridge vents or downspouts provide clear evidence of a recent high-velocity weather event.
What happens if the adjuster misses the damage I documented?
Request a re-inspection and present your organized photo report as the primary evidence. Adjusters are human and can miss subtle bruising during a quick walk-through. When you provide a professional, labeled report with GPS-tagged photos, you shift the conversation from subjective opinion to objective fact. Clear documentation is your strongest leverage to overturn an initial denial or “partial” approval.
Do I need to label every photo in my inspection report?
Every photo must be labeled to ensure the adjuster understands the location and significance of the evidence. Unlabeled photos lead to “insufficient data” flags and stall the claim cycle. Use specific labels like “North Slope, Test Square 2, 1.5-inch impact” to provide instant context. This level of detail proves your expertise and makes it easier for carriers to approve the scope of loss.
How does voice-to-text labeling work in the field?
Voice-to-text allows you to dictate photo descriptions while your hands are still on the ladder. You simply speak the label as you capture the image, and the app converts your words into a permanent caption. This feature is a game-changer for how to document hail damage on a roof safely and efficiently. It eliminates the need for manual typing, allowing you to finish your report on-site.